ReactJS - 无状态组件
具有内部状态的 React 组件称为有状态组件,没有任何内部状态管理的 React 组件称为无状态组件。React 建议尽可能多地创建和使用无状态组件,仅在绝对必要时才创建有状态组件。此外,React 不与子组件共享状态。数据需要通过子组件的属性传递给子组件。
将日期传递给 FormattedDate 组件的示例如下 −
<FormattedDate value={this.state.item.spend_date} />
总体思路是不要让应用程序逻辑过于复杂,只在必要时使用高级功能。
创建有状态组件
让我们创建一个 React 应用程序来显示当前日期和时间。
步骤 1 − 首先,按照创建 React 应用程序一章中的说明,使用 Create React App 或 Rollup 捆绑器创建一个新的 React 应用程序 react-clock-app。
在您最喜欢的编辑器中打开该应用程序。
步骤 2 −在应用程序的根目录下创建 src 文件夹。
在 src 文件夹下创建 components 文件夹。
在 src/components 文件夹下创建文件 Clock.js 并开始编辑。
导入 React 库。
import React from 'react';
接下来,创建 Clock 组件。
class Clock extends React.Component {
   constructor(props) {
      super(props);
   }
}
步骤 3 − 使用当前日期和时间初始化状态。
constructor(props) {
   super(props);
   this.state = {
      date: new Date()
   }
}
步骤 4 − 添加方法 setTime() 来更新当前时间 −
setTime() {
   console.log(this.state.date);
   this.setState((state, props) => (
      {
         date: new Date()
      }
   ))
}
步骤 5 − 使用 JavaScript 方法 setInterval 并每秒调用 setTime() 方法,以确保组件的状态每秒更新一次。
constructor(props) {
   super(props);
   this.state = {
      date: new Date()
   }
   setInterval( () => this.setTime(), 1000);
}
步骤 6 − 创建一个 render 函数。
render() {
}
Next, update the render() method to show the current time.
render() {
   return (
      <div><p>The current time is {this.state.date.toString()}</p></div>
   );
}
最后,导出组件。
export default Clock;
Clock组件的完整源代码如下 −
import React from 'react';

class Clock extends React.Component {
   constructor(props) {
      super(props);
      this.state = {
         date: new Date()
      }
      setInterval( () => this.setTime(), 1000);
   }
   setTime() {
      console.log(this.state.date);
      this.setState((state, props) => (
         {
            date: new Date()
         }
      ))
   }
   render() {
      return (
         <div>
            <p>The current time is {this.state.date.toString()}</p>
         </div>
      );
   }
}
export default Clock;
index.js
接下来,在 src 文件夹下创建一个文件 index.js 并使用 Clock 组件。
import React from 'react';
import ReactDOM from 'react-dom';
import Clock from './components/Clock';

ReactDOM.render(
   <React.StrictMode>
      <Clock />
   </React.StrictMode>,
   document.getElementById('root')
);
index.html
最后,在根文件夹下创建public文件夹,并创建index.html文件。
<!DOCTYPE html>
<html lang="en">
   <head>
      <meta charset="utf-8">
      <title>Clock</title>
   </head>
   <body>
      <div id="root"></div>
      <script type="text/JavaScript" src="./index.js"></script>
   </body>
</html>
使用 npm 命令为应用程序提供服务。
npm start
打开浏览器,在地址栏中输入 http://localhost:3000,然后按回车键。应用程序将显示时间并每秒更新一次。
The current time is Wed Nov 11 2020 10:10:18 GMT+0530(Indian Standard Time)
上述应用程序运行正常但在控制台中抛出错误。
Can't call setState on a component that is not yet mounted.
错误消息表明只有在安装组件后才需要调用 setState。
什么是安装?
React 组件具有生命周期,安装是生命周期中的一个阶段。让我们在接下来的章节中了解有关生命周期的更多信息。
在Expense Manager(费用管理器)应用中引入状态
让我们通过添加一个简单的功能来删除费用项目,在Expense Manager(费用管理器)应用中引入状态管理。
步骤 1 − 在您最喜欢的编辑器中打开 expense-manager 应用程序。
打开 ExpenseEntryItemList.js 文件。
使用通过属性传递到组件中的费用项目初始化组件的状态。
this.state = {
   items: this.props.items
}
步骤 2 − 在 render() 方法中添加 Remove 标签。
<thead>
   <tr>
      <th>Item</th>
      <th>Amount</th>
      <th>Date</th>
      <th>Category</th>
      <th>Remove</th>
   </tr>
</thead>
步骤 3 − 更新 render() 方法中的列表以包含删除链接。此外,使用状态 (this.state.items) 中的项目,而不是属性 (this.props.items) 中的项目。
const lists = this.state.items.map((item) =>
   <tr key={item.id} onMouseEnter={this.handleMouseEnter} onMouseLeave={this.handleMouseLeave}>
      <td>{item.name}</td>
      <td>{item.amount}</td>
      <td>{new Date(item.spendDate).toDateString()}</td>
      <td>{item.category}</td>
      <td><a href="#" onClick={(e) =>  this.handleDelete(item.id, e)}>Remove</a></td>
   </tr>
);
步骤 4 − 实现 handleDelete 方法,该方法将从状态中删除相关费用项目。
handleDelete = (id, e) => {
   e.preventDefault();
   console.log(id);

   this.setState((state, props) => {
      let items = [];

      state.items.forEach((item, idx) => {
         if(item.id != id)
            items.push(item)
      })
      let newState = {
         items: items
      }
      return newState;
   })
}
此处,
从组件的当前状态获取费用项目。
循环遍历当前费用项目,使用项目的 ID 查找用户引用的项目。
创建一个新的项目列表,其中包含除用户引用的费用项目之外的所有费用项目
步骤 5 − 添加新行以显示总费用金额。
<tr>
   <td colSpan="1" style={{ textAlign: "right" }}>Total Amount</td>
   <td colSpan="4" style={{ textAlign: "left" }}>
      {this.getTotal()}
   </td>
</tr>
步骤 6 − 实现 getTotal() 方法计算总支出金额。
getTotal() {
   let total = 0;
   for(var i = 0; i < this.state.items.length; i++) {
      total += this.state.items[i].amount
   }
   return total;
}
render()方法完整代码如下 −
render() {
   const lists = this.state.items.map((item) =>
      <tr key={item.id} onMouseEnter={this.handleMouseEnter} onMouseLeave={this.handleMouseLeave}>
         <td>{item.name}</td>
         <td>{item.amount}</td>
         <td>{new Date(item.spendDate).toDateString()}</td>
         <td>{item.category}</td>
         <td><a href="#"
            onClick={(e) =>  this.handleDelete(item.id, e)}>Remove</a></td>
      </tr>
   );
   return (
      <table onMouseOver={this.handleMouseOver}>
         <thead>
            <tr>
               <th>Item</th>
               <th>Amount</th>
               <th>Date</th>
               <th>Category</th>
               <th>Remove</th>
            </tr>
         </thead>
         <tbody>
            {lists}
            <tr>
               <td colSpan="1" style={{ textAlign: "right" }}>Total Amount</td>
               <td colSpan="4" style={{ textAlign: "left" }}>
                  {this.getTotal()}
               </td>
            </tr>
         </tbody>
      </table>
   );
}
最后,ExpenseEntryItemList更新后的代码如下 −
import React from 'react';
import './ExpenseEntryItemList.css';

class ExpenseEntryItemList extends React.Component {
   constructor(props) {
      super(props);
      this.state = {
         items: this.props.items
      }
      this.handleMouseEnter = this.handleMouseEnter.bind();
      this.handleMouseLeave = this.handleMouseLeave.bind();
      this.handleMouseOver = this.handleMouseOver.bind();
   }
   handleMouseEnter(e) {
      e.target.parentNode.classList.add("highlight");
   }
   handleMouseLeave(e) {
      e.target.parentNode.classList.remove("highlight");
   }
   handleMouseOver(e) {
      console.log("The mouse is at (" + e.clientX + ", " + e.clientY + ")");
   }
   handleDelete = (id, e) => {
      e.preventDefault();
      console.log(id);
      this.setState((state, props) => {
         let items = [];
         state.items.forEach((item, idx) => {
            if(item.id != id)
               items.push(item)
         })
         let newState = {
            items: items
         }
         return newState;
      })
   }
   getTotal() {
      let total = 0;
      for(var i = 0; i < this.state.items.length; i++) {
         total += this.state.items[i].amount
      }
      return total;
   }
   render() {
      const lists = this.state.items.map((item) =>
         <tr key={item.id} onMouseEnter={this.handleMouseEnter} onMouseLeave={this.handleMouseLeave}>
            <td>{item.name}</td>
            <td>{item.amount}</td>
            <td>{new Date(item.spendDate).toDateString()}</td>
            <td>{item.category}</td>
            <td><a href="#"
               onClick={(e) =>  this.handleDelete(item.id, e)}>Remove</a></td>
         </tr>
      );
      return (
         <table onMouseOver={this.handleMouseOver}>
            <thead>
               <tr>
                  <th>Item</th>
                  <th>Amount</th>
                  <th>Date</th>
                  <th>Category</th>
                  <th>Remove</th>
               </tr>
            </thead>
            <tbody>
               {lists}
               <tr>
                  <td colSpan="1" style={{ textAlign: "right" }}>Total Amount</td>
                  <td colSpan="4" style={{ textAlign: "left" }}>
                     {this.getTotal()}
                  </td>
               </tr>
            </tbody>
         </table>
      );
   }
}
export default ExpenseEntryItemList;
index.js
更新 index.js 并包含 ExpenseEntyItemList 组件。
import React from 'react';
import ReactDOM from 'react-dom';
import ExpenseEntryItemList from './components/ExpenseEntryItemList'

const items = [
   { id: 1, name: "Pizza", amount: 80, spendDate: "2020-10-10", category: "Food" },
   { id: 2, name: "Grape Juice", amount: 30, spendDate: "2020-10-12", category: "Food" },
   { id: 3, name: "Cinema", amount: 210, spendDate: "2020-10-16", category: "Entertainment" },
   { id: 4, name: "Java Programming book", amount: 242, spendDate: "2020-10-15", category: "Academic" },
   { id: 5, name: "Mango Juice", amount: 35, spendDate: "2020-10-16", category: "Food" },
   { id: 6, name: "Dress", amount: 2000, spendDate: "2020-10-25", category: "Cloth" },
   { id: 7, name: "Tour", amount: 2555, spendDate: "2020-10-29", category: "Entertainment" },
   { id: 8, name: "Meals", amount: 300, spendDate: "2020-10-30", category: "Food" },
   { id: 9, name: "Mobile", amount: 3500, spendDate: "2020-11-02", category: "Gadgets" },
   { id: 10, name: "Exam Fees", amount: 1245, spendDate: "2020-11-04", category: "Academic" }
]
ReactDOM.render(
   <React.StrictMode>
      <ExpenseEntryItemList items={items} />
   </React.StrictMode>,
   document.getElementById('root')
);
使用 npm 命令为应用程序提供服务。
npm start
接下来,打开浏览器并在地址栏中输入 http://localhost:3000 并按 Enter。
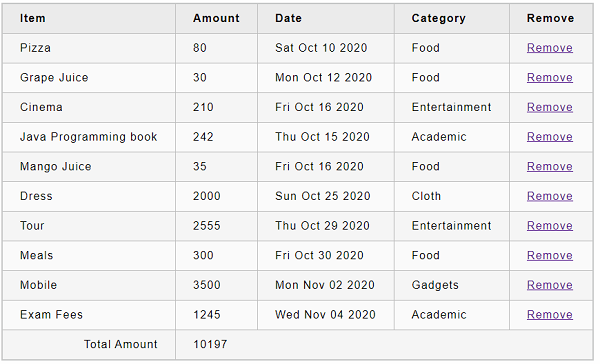
最后,要删除费用项目,请单击相应的删除链接。它将删除相应的项目并刷新用户界面,如动画 gif 所示。