
ReactJS - getChildContext() 方法
getChildContext() 函数是 React 中的组件生命周期函数。React 中的此函数允许父组件与其子组件交换指定的信息。它类似于制作一个特定的框(上下文),父组件可以在其中存储重要数据。父组件确定要将什么放入框中,并允许子组件通过使用 getChildContext() 访问它,而无需直接传递。这种通信方法使事情井然有序,并简化了应用程序不同部分之间的通信方式,类似于一个家庭有特定的方式来讨论关键信息,而无需分别与每个成员沟通。
语法
getChildContext()
为了使用 getChildContext(),组件必须定义一个名为 childContextTypes 的静态属性,该属性指定上下文数据的预期类型。
示例
示例 1
让我们使用 getChildContext() 函数创建一个示例。在此示例中,我们将创建一个简单的应用程序,通过上下文传递用户数据来显示用户信息。
import PropTypes from 'prop-types';
import React, { Component } from 'react';

// 创建上下文
const UserContext = React.createContext({
    username: 'Guest',
    age: 0,
});

// 创建组件
class UserProvider extends Component {
   // 定义子上下文类型
   static childContextTypes = {
      user: PropTypes.shape({
      username: PropTypes.string,
      age: PropTypes.number,
   }),
   };
   getChildContext() {
      return {
         user: {
            username: this.props.username,
            age: this.props.age,
         },
      };
   }

   render() {
      // 渲染子组件
      return this.props.children;
   }
}

// 创建一个从上下文中使用用户数据的组件
class UserInfo extends Component {
   static contextTypes = {
      user: PropTypes.shape({
         username: PropTypes.string,
         age: PropTypes.number,
      }),
   };
   render() {
      return (
         <div>
            <p>Welcome, {this.context.user.username}!</p>
            <p>Your age: {this.context.user.age}</p>
         </div>
      );
   }
}

// 创建主 App 组件
class App extends Component {
   render() {
      return (
         // 使用 UserProvider 包装 UserInfo 组件
         <UserProvider username="Amit" age={25}>
            <UserInfo />
         </UserProvider>
      );
   }
}

export default App;
输出
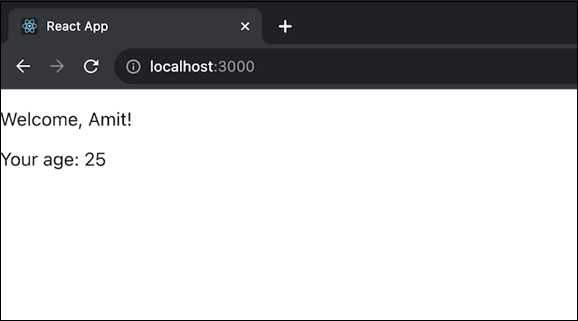
在上面的代码中,App 组件使用 UserProvider 包装 UserInfo 组件,以通过上下文传递用户数据。
示例 2
这是另一个使用 getChildContext() 在 React 应用中创建简单主题上下文的示例 −
import React, { Component } from 'react';
import PropTypes from 'prop-types';

// 为主题创建上下文
const ThemeContext = React.createContext({
    theme: 'light',
    toggleTheme: () => {},
});

// 创建一个用于提供主题的组件
class ThemeProvider extends Component {

   // 定义子上下文类型
   static childContextTypes = {
      themeContext: PropTypes.shape({
         theme: PropTypes.string,
         toggleTheme: PropTypes.func,
      }),
   };

   // 设置初始状态
   state = {
      theme: 'light',
   };

   // 定义一个函数来切换主题
   toggleTheme = () => {
      this.setState((prevState) => ({
         theme: prevState.theme === 'light' ? 'dark' : 'light',
      }));
   };

   // 通过 getChildContext() 提供主题上下文
   getChildContext() {
      return {
         themeContext: {
            theme: this.state.theme,
            toggleTheme: this.toggleTheme,
         },
      };
   }

   render() {
      // 渲染子组件
      return this.props.children;
   }
}

// 创建一个组件
class ThemedComponent extends Component {
   // 定义上下文类型
   static contextTypes = {
      themeContext: PropTypes.shape({
         theme: PropTypes.string,
         toggleTheme: PropTypes.func,
      }),
   };

   render() {
      return (
         <div style={{ background: this.context.themeContext.theme === 'light' ? '#fff' : '#333', color: this.context.themeContext.theme === 'light' ? '#333' : '#fff' }}>
            <p>Current Theme: {this.context.themeContext.theme}</p>
            <button onClick={this.context.themeContext.toggleTheme}>Toggle Theme</button>
         </div>
      );
   }
}

// 创建主 App 组件
class ThemeApp extends Component {
   render() {
      return (
         <ThemeProvider>
            <ThemedComponent />
         </ThemeProvider>
      );
   }
}

export default ThemeApp;
输出
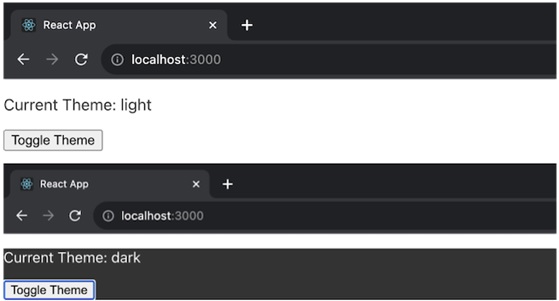
在上面的示例中,ThemeProvider 组件使用 getChildContext() 提供主题上下文,其默认主题为"light",并提供切换主题的功能。ThemedComponent 随后使用此上下文显示有关当前主题的信息和切换按钮。ThemeApp 组件在 ThemeProvider 的上下文中呈现 ThemedComponent。
示例 3
让我们再创建一个使用 getChildContext() 来管理 React 应用中的用户身份验证的示例 −
import React, { Component } from 'react';
import PropTypes from 'prop-types';

// 创建用户身份验证的上下文
const AuthContext = React.createContext({
   isAuthenticated: false,
   login: () => {},
   logout: () => {},
});

// 创建一个用于提供身份验证上下文的组件
class AuthProvider extends Component {
   static childContextTypes = {
      authContext: PropTypes.shape({
         isAuthenticated: PropTypes.bool,
         login: PropTypes.func,
         logout: PropTypes.func,
      }),
   };

   // 设置初始状态
   state = {
      isAuthenticated: false,
   };

   // 定义一个函数来处理用户登录
   login = () => {
      this.setState({
         isAuthenticated: true,
      });
   };

   // 定义一个函数来处理用户注销
   logout = () => {
      this.setState({
         isAuthenticated: false,
      });
   };

   // 通过 getChildContext() 提供身份验证上下文
   getChildContext() {
      return {
         authContext: {
            isAuthenticated: this.state.isAuthenticated,
            login: this.login,
            logout: this.logout,
         },
      };
   }

   render() {
      // 渲染子组件
      return this.props.children;
   }
}

// 创建一个使用身份验证上下文的组件
class AuthComponent extends Component {
   // 定义上下文类型
   static contextTypes = {
      authContext: PropTypes.shape({
         isAuthenticated: PropTypes.bool,
         login: PropTypes.func,
         logout: PropTypes.func,
      }),
   };

   render() {
      return (
         <div>
            <p>User is {this.context.authContext.isAuthenticated ? 'authenticated' : 'not authenticated'}</p>
            {this.context.authContext.isAuthenticated ? (
               <button onClick={this.context.authContext.logout}>Logout</button>
            ) : (
               <button onClick={this.context.authContext.login}>Login</button>
            )}
         </div>
      );
   }
}

// 创建主 App 组件
class App extends Component {
   render() {
      return (
         <AuthProvider>
            <AuthComponent />
         </AuthProvider>
      );
   }
}

export default App;
输出
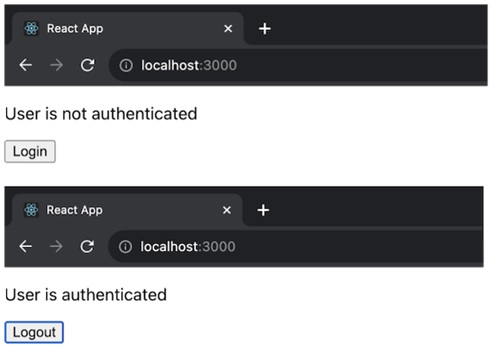
在上述应用中,AuthProvider 组件使用 getChildContext() 提供身份验证上下文,并将 isAuthenticated 的默认值设置为 false。它还具有管理登录和注销操作的功能。AuthComponent 使用此上下文来查明用户是否已通过身份验证并提供登录和注销按钮。
限制
从 React 16.3 开始,getChildContext() 函数已弃用,不鼓励使用该函数,而应使用新的 Context API。
摘要
getChildContext() 函数可用于在 React 组件中提供上下文,建议开发人员采用新的 Context API 以提高可读性和未来的兼容性。
 reactjs_reference_api.html
