SwiftUI - 绘制星形
星星是一种类似于宇宙中星星的形状。它是通过连接正多边形的非相邻顶点创建的封闭形状。在 SwiftUI 中,星形用于评级系统中表示评级,在书签系统中标记喜欢的项目,也可用于指示各种状态或成就。
它也用于导航等。它还有助于为 Apple 的应用程序创建引人入胜且有吸引力的用户界面。
在 SwiftUI 中绘制星形
Swift 不提供任何内置方法来直接创建星形,因此在这里我们将讨论如何借助 path(in:) 和 addLine(to:) 方法创建自定义星形。这里使用 path(in:) 方法计算星形的点,使用 addLine(to:) 方法通过画线将它们连接起来。
语法
以下是语法 −
addLine(to end: CGPoint)
参数
end:此参数表示线段终点在用户空间坐标中的位置。
按照步骤在 SwiftUI 中绘制星形 −
在 SwiftUI 中绘制星形的步骤
步骤 1:定义星形的形状
创建一个符合 Shape 协议的星形结构体。在这个结构中,我们实现 path(in:) 和 addLine(to:) 方法来查找点并连接它们。
struct MyStar: Shape {
   func path(in rect: CGRect) -> Path {
      let Scenter = CGPoint(x: rect.width / 2, y: rect.height / 2)
      let StarVertices = 5
      let SinnerRadius = rect.width / 5
      let SouterRadius = rect.width / 2

      var path = Path()

      let AIncrement = .pi * 2 / CGFloat(StarVertices)
      let halfAngleIncrement = AIncrement / 2

      for p in 0..<StarVertices {
         let angle = CGFloat(p) * AIncrement
         let outerPoint = CGPoint(
            x: Scenter.x + cos(angle) * SouterRadius, y: Scenter.y + sin(angle) * SouterRadius)
         let innerPoint = CGPoint(
            x: Scenter.x + cos(angle + halfAngleIncrement) * SinnerRadius,
            y: Scenter.y + sin(angle + halfAngleIncrement) * SinnerRadius)

         if p == 0 {
            path.move(to: outerPoint)
         } else {
            path.addLine(to: outerPoint)
         }

         path.addLine(to: innerPoint)
      }

      path.closeSubpath()

      return path
   }
}
步骤 2:在视图中指定星形
现在在 ContentView 中插入星形结构以在屏幕上显示该形状
struct ContentView: View {
   var body: some View {
      VStack {
         MyStar()
      }
   }
}
步骤 3:自定义星形
我们可以借助 SwiftUI 提供的各种修饰符(例如 fill()、frame()、background() 等)自定义星形。
struct ContentView: View {
   var body: some View {
      VStack {
         MyStar()
           .fill(Color.pink)
           .frame(width: 150, height: 150)
           .background(Color.yellow)
           .clipShape(Circle())
      }
   }
}
示例 1
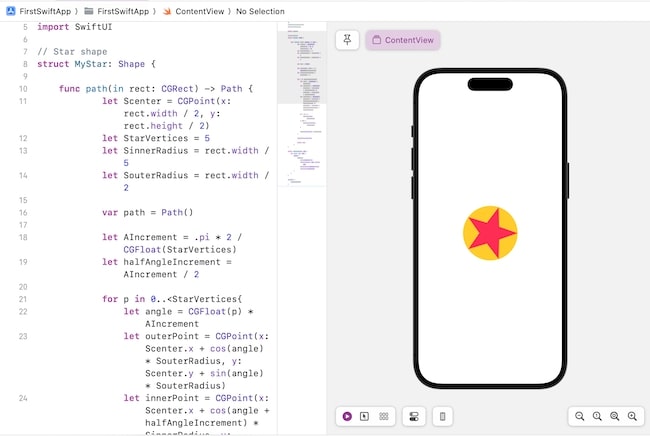
以下 SwiftUI 程序用于绘制具有圆形背景的星形。
import SwiftUI

// Star shape
struct MyStar: Shape {

  func path(in rect: CGRect) -> Path {
    let Scenter = CGPoint(x: rect.width / 2, y: rect.height / 2)
    let StarVertices = 5
    let SinnerRadius = rect.width / 5
    let SouterRadius = rect.width / 2

    var path = Path()

    let AIncrement = .pi * 2 / CGFloat(StarVertices)
    let halfAngleIncrement = AIncrement / 2

    for p in 0..<StarVertices {
      let angle = CGFloat(p) * AIncrement
      let outerPoint = CGPoint(
        x: Scenter.x + cos(angle) * SouterRadius, y: Scenter.y + sin(angle) * SouterRadius)
      let innerPoint = CGPoint(
        x: Scenter.x + cos(angle + halfAngleIncrement) * SinnerRadius,
        y: Scenter.y + sin(angle + halfAngleIncrement) * SinnerRadius)

      if p == 0 {
         path.move(to: outerPoint)
      } else {
         path.addLine(to: outerPoint)
      }
       path.addLine(to: innerPoint)
    }
    path.closeSubpath()
    return path
  }
}
struct ContentView: View {
   var body: some View {
      VStack {
         MyStar()
            .fill(Color.pink)
            .frame(width: 150, height: 150)
            .background(Color.yellow)
            .clipShape(Circle())
      }
   }
}

#Preview {
   ContentView()
}
输出
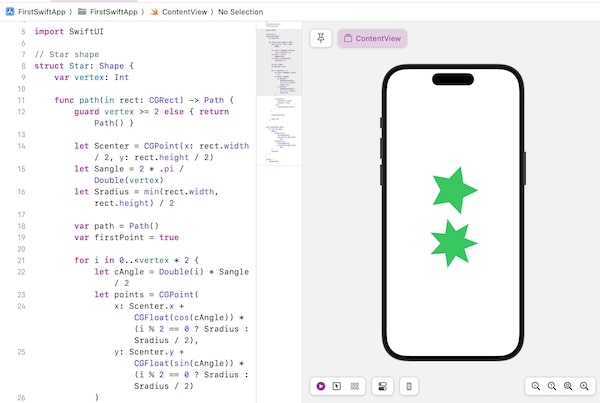
示例 2
以下 SwiftUI 程序用于绘制具有不同顶点数的多个星形。
import SwiftUI

// Star shape
struct Star: Shape {
   var vertex: Int

   func path(in rect: CGRect) -> Path {
      guard vertex >= 2 else { return Path() }

      let Scenter = CGPoint(x: rect.width / 2, y: rect.height / 2)
      let Sangle = 2 * .pi / Double(vertex)
      let Sradius = min(rect.width, rect.height) / 2

      var path = Path()
      var firstPoint = true

      for i in 0..<vertex * 2 {
         let cAngle = Double(i) * Sangle / 2
         let points = CGPoint(
            x: Scenter.x + CGFloat(cos(cAngle)) * (i % 2 == 0 ? Sradius : Sradius / 2),
            y: Scenter.y + CGFloat(sin(cAngle)) * (i % 2 == 0 ? Sradius : Sradius / 2)
         )

         if firstPoint {
            path.move(to: points)
            firstPoint = false
         } else {
            path.addLine(to: points)
         }
      }

      path.closeSubpath()

      return path
   }
}

struct ContentView: View {
   var body: some View {
      VStack {
         Star(vertex: 5)
            .fill(Color.green)
            .frame(width: 150, height: 150)
         Star(vertex: 7)
            .fill(Color.green)
            .frame(width: 150, height: 150)
      }.padding()
   }
}
#Preview {
   ContentView()
}
输出