SwiftUI - 表格
SwiftUI 对表格提供了良好的支持。表格视图用于以表格形式显示数据。它可以创建简单和复杂的表格布局。它允许我们以结构化和多列布局显示。
我们还可以自定义表格及其数据,例如标题、表格内容样式、字体、背景颜色、每列的格式等。日历、产品比较等是 UI 中表格的一些实际示例。因此,在本章中,我们将介绍如何创建表格、如何设置样式、如何对表格数据进行排序等等。
在 SwiftUI 中创建表格
在 SwiftUI 中,我们可以借助表格视图创建表格。表格视图以行和列格式显示数据。它根据可识别的数据集合计算其行。Identifiable 是一个类,其实例保存具有有效身份的实体的值。如果行数和列数超出视图的宽度,表格支持水平和垂直滚动来调整表格的视图。
语法
以下是语法 −
Table(IdentifiableData){
   TableColumn(Text, value: \.IdentifiableProperty1)
   TableColumn(Text, value: \.IdentifiableProperty1
}
示例
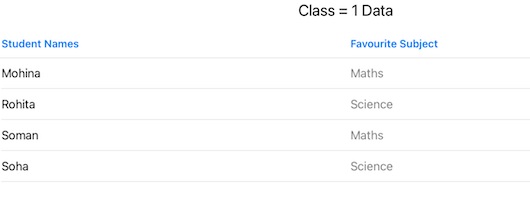
以下 SwiftUI 程序用于创建一个简单的表,其中存储学生姓名及其最喜欢的科目。
import SwiftUI

struct Student: Identifiable{
   let name: String
   let id = UUID()
   let subject: String
}

struct ContentView: View {
   @State private var stud = [
   Student(name: "Mohina", subject: "Maths"),
   Student(name: "Rohita", subject: "Science"),
   Student(name: "Soman", subject: "Maths"),
   Student(name: "Soha", subject: "Science"),
   ]

   var body: some View {
     VStack{
       Text("Class = 1 Data ").font(.title2)

       // Creating table
       Table(stud){
         TableColumn("Student Names", value: \.name)
         TableColumn("Favourite Subject", value: \.subject)
       }
     }

   }
}
#Preview {
   ContentView()
}
输出
在 SwiftUI 中向表格添加选择
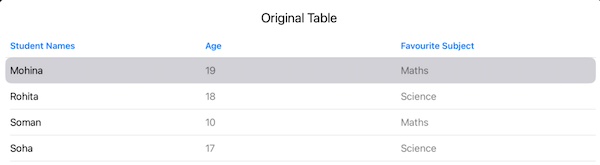
我们还可以通过创建 Set 类型的绑定选择变量来使表格的一行或多行可选。要创建可选的表格数据单个实例,我们必须为该表格创建一个 id 类型,然后在表格视图中传递该变量。
示例
以下 SwiftUI 程序用于创建可选表格。
import SwiftUI

struct Student: Identifiable{
   let name: String
   let id = UUID()
   let age: Int
   let subject: String
}
struct ContentView: View {
   @State private var stud = [
     Student(name: "Mohina", age: 19, subject: "Maths"),
     Student(name: "Rohita", age: 18, subject: "Science"),
     Student(name: "Soman", age: 10, subject: "Maths"),
     Student(name: "Soha", age: 17, subject: "Science"),
   ]
   @State private var select = Set<Student.ID>()

   var body: some View {
     VStack{
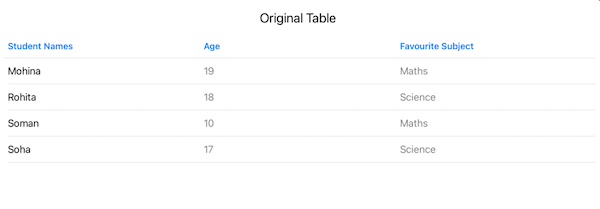
       Text("Original Table ").font(.title2)

       // Creating table
       Table(stud, selection: $select){
         TableColumn("Student Names", value: \.name)
         TableColumn("Age"){
            stud in Text(String(stud.age))
         }
         TableColumn("Favourite Subject", value: \.subject)
       }
     }

   }
}
#Preview {
   ContentView()
}
输出
在 SwiftUI 中设置表格样式
在 SwiftUI 中,我们可以使用 tableStyle() 修饰符根据设计需要设置表格样式。.tableStyle() 修饰符为我们提供了一些预定义的表格样式,使用它们我们可以增强简单表格的外观。
语法
以下是语法 −
func tableStyle(_ style: S) -> some View where S : TableStyle
它只接受一个参数,即样式。此参数的值可以是以下任意一个 −
.automatic:用于将默认系统样式应用于表格。
inset:用于将插入样式应用于表格,使其内容从边缘缩进。
示例
以下 SwiftUI 程序用于以插入格式设置表格样式。
import SwiftUI
struct Student: Identifiable{
   let name: String
   let id = UUID()
   let age: Int
   let subject: String
}
struct ContentView: View {
   @State private var stud = [
     Student(name: "Mohina", age: 19, subject: "Maths"),
     Student(name: "Rohita", age: 18, subject: "Science"),
     Student(name: "Soman", age: 10, subject: "Maths"),
     Student(name: "Soha", age: 17, subject: "Science"),
   ]
   var body: some View {
     VStack{
       Text("Original Table ").font(.title2)

       // Creating table
       Table(stud){
         TableColumn("Student Names", value: \.name)
         TableColumn("Age"){
            stud in Text(String(stud.age))
         }
         TableColumn("Favorite Subject", value: \.subject)
       }.tableStyle(.inset)
     }
   }
}

#Preview {
   ContentView()
}
输出