Android 绝对布局
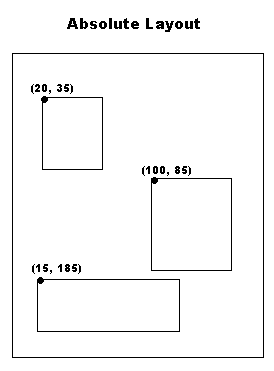
绝对布局允许您指定其子项的确切位置(x/y 坐标)。 与没有绝对定位的其他类型的布局相比,绝对布局更不灵活且更难维护。
绝对布局
AbsoluteLayout 属性
以下是 AbsoluteLayout 特有的重要属性 −
| 序号 | 属性 & 描述 |
|---|---|
| 1 | android:id 这是唯一标识布局的 ID。 |
| 2 | android:layout_x 这指定了视图的 x 坐标。 |
| 3 | android:layout_y 这指定了视图的 y 坐标。 |
公共构造函数
| AbsoluteLayout(Context context) |
| AbsoluteLayout(Context context, AttributeSet attrs) |
| AbsoluteLayout(Context context, AttributeSet attrs, int defStyleAttr) |
| AbsoluteLayout(Context context, AttributeSet attrs, int defStyleAttr, int defStyleRes) |
示例
本示例将通过简单的步骤向您展示如何使用绝对布局创建您自己的 Android 应用程序。 按照以下步骤修改我们在 Hello World 示例章节中创建的 Android 应用程序 −
| 步骤 | 描述 |
|---|---|
| 1 | 您将使用 Android Studio IDE 创建一个 Android 应用程序,并将其命名为 demo,位于包 com.example.demo 下,如 Hello World 示例 一章中所述。 |
| 2 | 修改 res/layout/activity_main.xml 文件的默认内容以在绝对布局中包含一些小部件。 |
| 3 | 无需修改 string.xml,Android Studio 负责默认常量 |
| 4 | 运行应用程序以启动 Android 模拟器并验证应用程序中所做更改的结果。 |
以下是修改后的主活动文件 src/com.example.demo/MainActivity.java 的内容。 该文件可以包含每个基本生命周期方法。
package com.example.demo;

import android.os.Bundle;
import android.app.Activity;

public class MainActivity extends Activity {
   @Override
   protected void onCreate(Bundle savedInstanceState) {
      super.onCreate(savedInstanceState);
      setContentView(R.layout.activity_main);
   }

}
以下是 res/layout/activity_main.xml 文件的内容 −
<AbsoluteLayout xmlns:android="http://schemas.android.com/apk/res/android"
   android:layout_width="fill_parent"
   android:layout_height="fill_parent">

   <Button
      android:layout_width="100dp"
      android:layout_height="wrap_content"
      android:text="OK"
      android:layout_x="50px"
      android:layout_y="361px" />
   <Button
      android:layout_width="100dp"
      android:layout_height="wrap_content"
      android:text="Cancel"
      android:layout_x="225px"
      android:layout_y="361px" />

</AbsoluteLayout>
以下将是 res/values/strings.xml 的内容来定义两个新常量 −
<?xml version="1.0" encoding="utf-8"?>
<resources>
   <string name="app_name">demo</string>
   <string name="action_settings">Settings</string>
</resources>
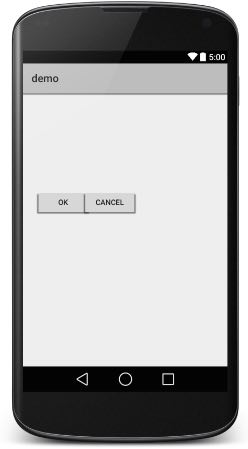
让我们尝试运行我们刚刚修改的 Hello World! 应用程序。假设您在进行环境设置时已经创建了 AVD。 要从 Android Studio 运行应用程序,请打开项目的活动文件之一,然后单击工具栏中的 Run  图标。Android Studio 在您的 AVD 上安装应用程序并启动它,如果您的设置和应用程序一切正常,它将显示以下 Emulator 窗口 −