Android - 进度圈/h1>
制作进度圈的最简单方法是使用名为 ProgressDialog 的类。 加载栏也可以通过该类制作。 bar 和 circle 之间唯一的逻辑区别是,前者在您知道等待特定任务的总时间时使用,而后者在您不知道等待时间时使用。
为此,您需要实例化此类的一个对象。 它的语法是。
ProgressDialog progress = new ProgressDialog(this);
现在您可以设置此对话框的一些属性。 比如,它的风格,它的文字等等
progress.setMessage("Downloading Music :) ");
progress.setProgressStyle(ProgressDialog.STYLE_SPINNER);
progress.setIndeterminate(true);
除了这些方法之外,ProgressDialog 类还提供了其他方法。
| 序号 | Classes & 描述 |
|---|---|
| 1 |
getMax() 此方法返回进度的最大值 |
| 2 |
incrementProgressBy(int diff) 此方法通过作为参数传递的值的差异来增加进度条 |
| 3 |
setIndeterminate(boolean indeterminate) 此方法将进度指示器设置为确定或不确定 |
| 4 |
setMax(int max) 此方法设置进度对话框的最大值 |
| 5 |
setProgress(int value) 此方法用于使用某些特定值更新进度对话框 |
| 6 |
show(Context context, CharSequence title, CharSequence message) 这是一个静态方法,用于显示进度对话框 |
示例
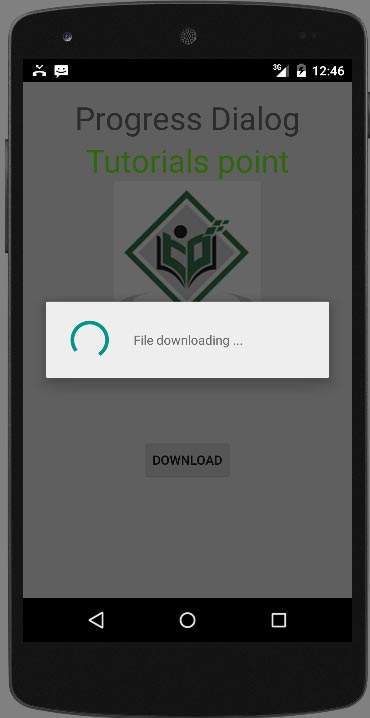
此示例演示了进度对话框的旋转使用。 它在按下按钮时显示一个旋转的进度对话框。
要试验这个例子,您需要在按照以下步骤开发应用程序后在实际设备上运行它。
| 步骤 | 描述 |
|---|---|
| 1 | 您将使用 Android Studio 在 com.example.sairamkrishna.myapplication 包下创建一个 Android 应用程序。 |
| 2 | 修改 src/MainActivity.java 文件以添加进度代码以显示旋转进度对话框。 |
| 3 | 修改 res/layout/activity_main.xml 文件以添加相应的 XML 代码。 |
| 4 | 运行应用程序并选择一个正在运行的 android 设备并在其上安装应用程序并验证结果。 |
以下是修改后的主活动文件src/MainActivity.java.的内容
package com.example.sairamkrishna.myapplication;

import android.app.ProgressDialog;
import android.app.Activity;
import android.os.Bundle;
import android.os.Handler;
import android.view.View;
import android.widget.Button;

public class MainActivity extends Activity {
   Button b1;
   private  ProgressDialog progressBar;
   private int progressBarStatus = 0;
   private Handler progressBarbHandler = new Handler();
   private long fileSize = 0;

   @Override
   protected void onCreate(Bundle savedInstanceState) {
      super.onCreate(savedInstanceState);
      setContentView(R.layout.activity_main);
      b1=(Button)findViewById(R.id.button);

      b1.setOnClickListener(new View.OnClickListener() {
         @Override
         public void onClick(View v) {
            progressBar = new ProgressDialog(v.getContext());
            progressBar.setCancelable(true);
            progressBar.setMessage("File downloading ...");
            progressBar.setProgressStyle(ProgressDialog.STYLE_SPINNER);
            progressBar.setProgress(0);
            progressBar.setMax(100);
            progressBar.show();
            progressBarStatus = 0;

            fileSize = 0;
            new Thread(new Runnable() {
               public void run() {
                  while (progressBarStatus < 100) {
                     progressBarStatus = downloadFile();

                     try {
                        Thread.sleep(1000);
                     } catch (InterruptedException e) {
                        e.printStackTrace();
                     }

                     progressBarbHandler.post(new Runnable() {
                        public void run() {
                           progressBar.setProgress(progressBarStatus);
                        }
                     });
                  }

                  if (progressBarStatus >= 100) {
                     try {
                        Thread.sleep(2000);
                     } catch (InterruptedException e) {
                        e.printStackTrace();
                     }
                     progressBar.dismiss();
                  }
               }
            }).start();
         }
      });
   }

   public int downloadFile() {
      while (fileSize <= 1000000) {
         fileSize++;

         if (fileSize == 100000) {
            return 10;
         }else if (fileSize == 200000) {
            return 20;
         }else if (fileSize == 300000) {
            return 30;
         }else if (fileSize == 400000) {
            return 40;
         }else if (fileSize == 500000) {
            return 50;
         }else if (fileSize == 700000) {
            return 70;
         }else if (fileSize == 800000) {
            return 80;
         }
      }
      return 100;
   }
}
修改res/layout/activity_main.xml的内容如下
以下代码中的abc表示tutorialspoint.com的标志
<?xml version="1.0" encoding="utf-8"?>
<RelativeLayout xmlns:android="http://schemas.android.com/apk/res/android"
   xmlns:tools="http://schemas.android.com/tools" android:layout_width="match_parent"
   android:layout_height="match_parent" android:paddingLeft="@dimen/activity_horizontal_margin"
   android:paddingRight="@dimen/activity_horizontal_margin"
   android:paddingTop="@dimen/activity_vertical_margin"
   android:paddingBottom="@dimen/activity_vertical_margin" tools:context=".MainActivity">

   <TextView android:text="Music Palyer" android:layout_width="wrap_content"
      android:layout_height="wrap_content"
      android:id="@+id/textview"
      android:textSize="35dp"
      android:layout_alignParentTop="true"
      android:layout_centerHorizontal="true" />

   <TextView
      android:layout_width="wrap_content"
      android:layout_height="wrap_content"
      android:text="Tutorials point"
      android:id="@+id/textView"
      android:layout_below="@+id/textview"
      android:layout_centerHorizontal="true"
      android:textColor="#ff7aff24"
      android:textSize="35dp" />

   <Button
      android:layout_width="wrap_content"
      android:layout_height="wrap_content"
      android:text="download"
      android:id="@+id/button"
      android:layout_alignParentBottom="true"
      android:layout_centerHorizontal="true"
      android:layout_marginBottom="112dp" />

   <ImageView
      android:layout_width="wrap_content"
      android:layout_height="wrap_content"
      android:id="@+id/imageView"
      android:src="@drawable/abc"
      android:layout_below="@+id/textView"
      android:layout_centerHorizontal="true" />

</RelativeLayout>
将res/values/string.xml修改为如下
<resources>
   <string name="app_name">My Application</string>
</resources>
这是默认的 AndroidManifest.xml
<?xml version="1.0" encoding="utf-8"?>
<manifest xmlns:android="http://schemas.android.com/apk/res/android"
   package="com.example.sairamkrishna.myapplication" >

   <application
      android:allowBackup="true"
      android:icon="@drawable/ic_launcher"
      android:label="@string/app_name"
      android:theme="@style/AppTheme" >

      <activity
         android:name="com.example.sairamkrishna.myapplication.MainActivity"
         android:label="@string/app_name" >

         <intent-filter>
            <action android:name="android.intent.action.MAIN" />
            <category android:name="android.intent.category.LAUNCHER" />
         </intent-filter>
      </activity>

   </application>
</manifest>
让我们尝试运行您的应用程序。要从 Android Studio 运行应用程序,请打开项目的活动文件之一,然后单击工具栏中的 Run  图标。在启动您的应用程序之前,Android Studio 将显示以下窗口以选择您要运行 Android 应用程序的选项。
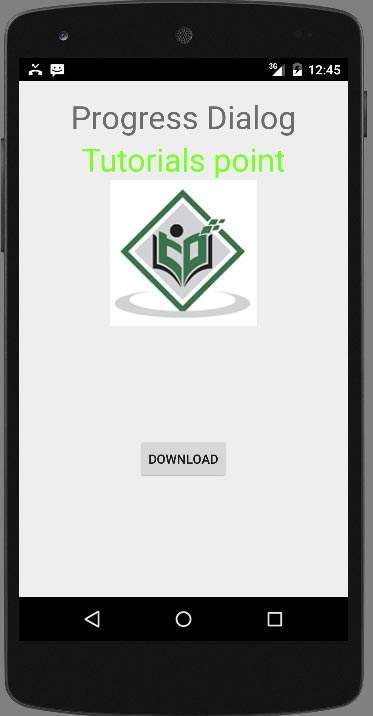
只需按下按钮即可启动进度对话框。 按下后,会出现以下画面。