Android - Facebook 集成
Android 允许您的应用程序连接到 facebook 并在 facebook 上共享数据或任何类型的更新。 本章是关于将 facebook 集成到您的应用程序中。
您可以通过两种方式集成 facebook 并从您的应用程序中共享某些内容。 下面列出了这些方法 −
- Facebook SDK
- 意图共享
集成 Facebook SDK
这是与 facebook 连接的第一种方式。 您必须注册您的应用程序,然后接收一些 Application Id ,然后您必须下载 facebook SDK 并将其添加到您的项目中。 具体步骤如下:
生成应用签名
您必须生成密钥签名,但在生成之前,请确保您已安装 SSL,否则您必须下载 SSl。 可以在这里下载 https://code.google.com/p/openssl-for-windows/downloads/detail?name=openssl-0.9.8k_WIN32.zip。
现在打开命令提示符并重定向到您的 java jre 文件夹。 到达那里后,请准确输入此命令。您必须将引号中的路径替换为您可以在 Eclipse 中找到的密钥库路径,方法是选择窗口选项卡并选择首选项选项卡,然后从左侧选择 android 下的构建选项。
keytool -exportcert -alias androiddebugkey -keystore "your path"
   | openssl sha1 -binary | openssl base64
输入后,系统会提示您输入密码。 给 android 作为密码,然后复制给你的密钥。 如下图所示 −

注册您的应用程序
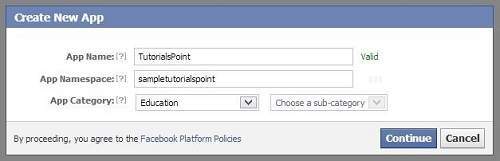
现在在 developers.facebook.com/apps 创建一个新的 facebook 应用程序并填写所有信息。 如下图所示 −
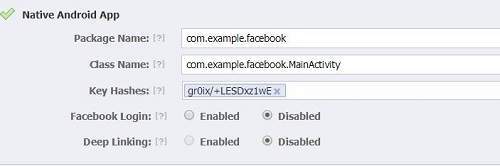
现在移动到本机 android 应用程序部分并填写您的项目和类名称并粘贴您在步骤 1 中复制的哈希值。如下所示 −
如果一切正常,您将收到一个带有密钥的应用程序 ID。 只需复制应用程序 ID 并将其保存在某处。 如下图所示−

下载 SDK 并集成
在此处下载 facebook sdk https://github.com/facebook/facebook-android-sdk。 将此导入eclipse。 导入后,右键单击您的 facebook 项目并单击属性。单击 android,单击添加按钮并选择 facebook sdk 作为项目。单击确定。
创建 facebook 登录应用程序
一切都完成后,您可以运行 SDK 附带的示例或创建您自己的应用程序。 为了登录,您需要调用 openActiveSession 方法并实现其回调。 它的语法如下 −
// start Facebook Login
Session.openActiveSession(this, true, new Session.StatusCallback() {

   // callback when session changes state
   public void call(Session session, SessionState state, Exception exception) {
      if (session.isOpened()) {
         // make request to;2 the /me API
         Request.executeMeRequestAsync(session, new Request.GraphUserCallback() {

            // callback after Graph API response with user object
            @Override
            public void onCompleted(GraphUser user, Response response) {
               if (user != null) {
                  TextView welcome = (TextView) findViewById(R.id.welcome);
                  welcome.setText("Hello " + user.getName() + "!");
               }
            }
         });
      }
   }
}
意图共享
意图共享用于在应用程序之间共享数据。 在这个策略中,我们不会处理 SDK 的东西,而是让 facebook 应用程序处理它。 我们将简单地调用 facebook 应用程序并将数据传递给共享。 这样,我们就可以在 facebook 上分享一些东西。
Android 提供了意图库来在活动和应用程序之间共享数据。 为了将其用作分享意图,我们必须将分享意图的类型指定为 ACTION_SEND。 它的语法如下 −
Intent shareIntent = new Intent();
shareIntent.setAction(Intent.ACTION_SEND);
接下来您需要定义要传递的数据类型,然后传递数据。 它的语法如下 −
shareIntent.setType("text/plain");
shareIntent.putExtra(Intent.EXTRA_TEXT, "Hello, from tutorialspoint");
startActivity(Intent.createChooser(shareIntent, "Share your thoughts"));
除了这些方法之外,还有其他可用的方法可以进行意图处理。 它们在下面列出 −
| 序号 | 方法 & 描述 |
|---|---|
| 1 |
addCategory(String category) 此方法向意图添加一个新类别。 |
| 2 |
createChooser(Intent target, CharSequence title) 用于创建 ACTION_CHOOSER Intent 的便捷函数 |
| 3 |
getAction() 此方法检索要执行的一般操作,例如 ACTION_VIEW |
| 4 |
getCategories() 该方法返回意图中所有类别的集合和当前的缩放事件 |
| 5 |
putExtra(String name, int value) 此方法将扩展数据添加到意图。 |
| 6 |
toString() 此方法返回一个字符串,其中包含此对象的简明、人类可读的描述 |
示例
这是一个示例,展示了如何使用 IntentShare 在 facebook 上共享数据。 它创建了一个基本应用程序,允许您在 facebook 上分享一些文本。
要试验这个示例,您可以在实际设备或模拟器中运行它。
| 步骤 | 描述 |
|---|---|
| 1 | 您将使用 Android Studio 在 com.example.sairamkrishna.myapplication 包下创建一个 Android 应用程序。 |
| 2 | 修改 src/MainActivity.java 文件添加必要的代码。 |
| 3 | 修改 res/layout/activity_main 以添加相应的 XML 组件。 |
| 4 | 运行应用程序并选择一个正在运行的 android 设备并在其上安装应用程序并验证结果。 |
以下是修改后的主活动文件MainActivity.java的内容。
package com.example.sairamkrishna.myapplication;

import android.content.Intent;
import android.net.Uri;
import android.os.Bundle;
import android.support.v7.app.AppCompatActivity;
import android.view.View;

import android.widget.Button;
import android.widget.ImageView;

import java.io.FileNotFoundException;
import java.io.InputStream;

public class MainActivity extends AppCompatActivity {
   private ImageView img;

   protected void onCreate(Bundle savedInstanceState) {
      super.onCreate(savedInstanceState);
      setContentView(R.layout.activity_main);

      img=(ImageView)findViewById(R.id.imageView);
      Button b1=(Button)findViewById(R.id.button);

      b1.setOnClickListener(new View.OnClickListener() {
         @Override
         public void onClick(View v) {
            Intent sharingIntent = new Intent(Intent.ACTION_SEND);
            Uri screenshotUri = Uri.parse("android.
            resource://comexample.sairamkrishna.myapplication/*");

            try {
               InputStream stream = getContentResolver().openInputStream(screenshotUri);
            } catch (FileNotFoundException e) {
               // TODO Auto-generated catch block
               e.printStackTrace();
            }

            sharingIntent.setType("image/jpeg");
            sharingIntent.putExtra(Intent.EXTRA_STREAM, screenshotUri);
            startActivity(Intent.createChooser(sharingIntent, "Share image using"));
         }
      });
   }
}
以下是 res/layout/activity_main.xml 的修改内容。
In the below code abc indicates the logo of tutorialspoint.com
<?xml version="1.0" encoding="utf-8"?>
<RelativeLayout
   xmlns:android="http://schemas.android.com/apk/res/android"
   xmlns:tools="http://schemas.android.com/tools"
   android:layout_width="match_parent"
   android:layout_height="match_parent"
   android:paddingLeft="@dimen/activity_horizontal_margin"
   android:paddingRight="@dimen/activity_horizontal_margin"
   android:paddingTop="@dimen/activity_vertical_margin"
   android:paddingBottom="@dimen/activity_vertical_margin"
   tools:context=".MainActivity">

   <TextView
      android:layout_width="wrap_content"
      android:layout_height="wrap_content"
      android:id="@+id/textView"
      android:layout_alignParentTop="true"
      android:layout_centerHorizontal="true"
      android:textSize="30dp"
      android:text="Facebook share " />

   <TextView
      android:layout_width="wrap_content"
      android:layout_height="wrap_content"
      android:text="Tutorials Point"
      android:id="@+id/textView2"
      android:layout_below="@+id/textView"
      android:layout_centerHorizontal="true"
      android:textSize="35dp"
      android:textColor="#ff16ff01" />

   <ImageView
      android:layout_width="wrap_content"
      android:layout_height="wrap_content"
      android:id="@+id/imageView"
      android:layout_below="@+id/textView2"
      android:layout_centerHorizontal="true"
      android:src="@drawable/abc"/>

   <Button
      android:layout_width="wrap_content"
      android:layout_height="wrap_content"
      android:text="Share"
      android:id="@+id/button"
      android:layout_marginTop="61dp"
      android:layout_below="@+id/imageView"
      android:layout_centerHorizontal="true" />

</RelativeLayout>
以下是 AndroidManifest.xml 文件的内容。
<?xml version="1.0" encoding="utf-8"?>
<manifest xmlns:android="http://schemas.android.com/apk/res/android"
   package="com.example.sairamkrishna.myapplication" >
   <application
      android:allowBackup="true"
      android:icon="@mipmap/ic_launcher"
      android:label="@string/app_name"
      android:theme="@style/AppTheme" >

      <activity
         android:name=".MainActivity"
         android:label="@string/app_name" >

         <intent-filter>
            <action android:name="android.intent.action.MAIN" />
            <category android:name="android.intent.category.LAUNCHER" />
         </intent-filter>

      </activity>
   </application>
</manifest>
让我们尝试运行您的应用程序。 我假设您已将实际的 Android 移动设备与您的计算机连接起来。要从 Android Studio 运行应用程序,请打开项目的活动文件之一,然后单击工具栏中的 Run  图标。在启动您的应用程序之前,Android Studio 将显示以下窗口以选择您要运行 Android 应用程序的选项。
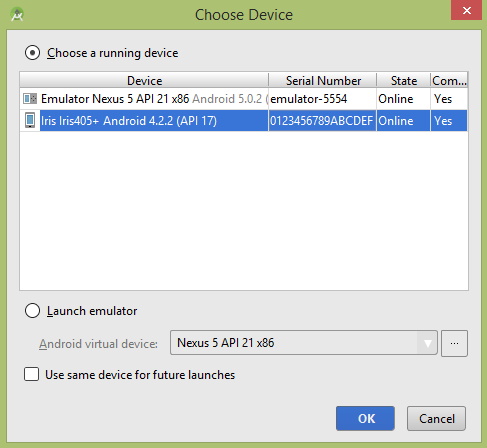
选择您的移动设备作为选项,然后检查您的移动设备,它将显示您的默认屏幕 −
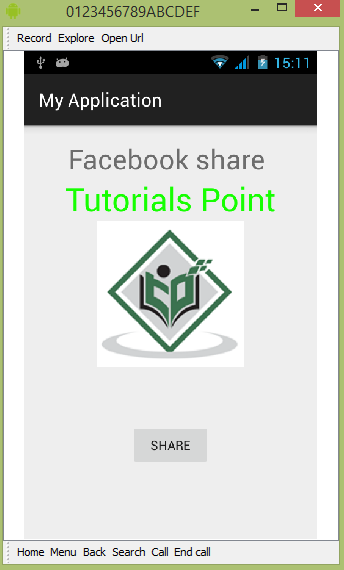
现在只需点击按钮,您就会看到共享提供商列表。
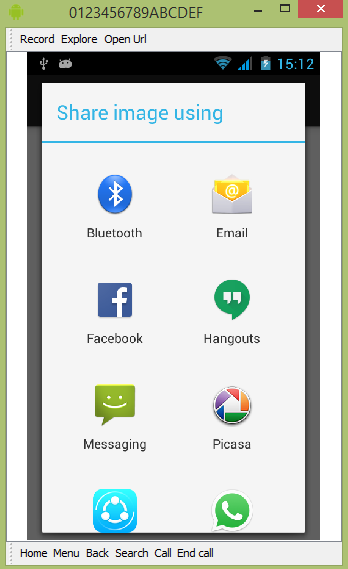
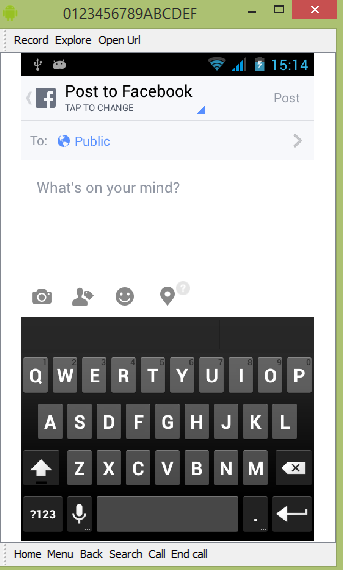
现在只需从该列表中选择 facebook,然后写任何消息。 如下图所示 −