
Android - 会话管理
当你想将用户数据存储在你的应用程序之外时,Session 会帮助你,这样当用户下次使用你的应用程序时,你可以很容易地取回他的详细信息并执行相应的操作。
这可以通过多种方式完成。 但最简单和最好的方法是通过 Shared Preferences。
共享首选项
Shared Preferences 共享首选项允许您以键值对的形式保存和检索数据。 为了使用共享首选项,您必须调用 getSharedPreferences() 方法,该方法返回一个 SharedPreference 实例,该实例指向包含首选项值的文件。
SharedPreferences sharedpreferences = getSharedPreferences(MyPREFERENCES, Context.MODE_PRIVATE);
您可以使用 SharedPreferences.Editor 类将某些内容保存在 sharedpreferences 中。 您将调用 SharedPreference 实例的编辑方法,并将在编辑器对象中接收它。 它的语法是 −
Editor editor = sharedpreferences.edit();
editor.putString("key", "value");
editor.commit();
除了 putString 方法之外,编辑器类中还有一些方法允许在共享首选项中操作数据。 它们列出如下 −
| 序号 | 模式 & 描述 |
|---|---|
| 1 |
apply() 它是一种抽象方法。 它会将您的更改从编辑器提交回您正在调用的 sharedPreference 对象 |
| 2 |
clear() 它将从编辑器中删除所有值 |
| 3 |
remove(String key) 它将删除其键已作为参数传递的值 |
| 4 |
putLong(String key, long value) 它将在首选项编辑器中保存一个长值 |
| 5 |
putInt(String key, int value) 它将在首选项编辑器中保存一个整数值 |
| 6 |
putFloat(String key, float value) 它将在首选项编辑器中保存一个浮点值 |
通过共享首选项进行会话管理
为了从共享首选项执行会话管理,我们需要在 onResume 方法中检查存储在共享首选项中的值或数据。 如果我们没有数据,我们将从头开始启动应用程序,因为它是新安装的。 但是如果我们得到数据,我们将从用户离开的地方开始。 在下面的示例中演示 −
示例
下面的示例演示了会话管理的使用。 它创建了一个基本应用程序,允许您首次登录。 然后当您退出应用程序而不注销时,如果您再次启动应用程序,您将被带回同一位置。 但是,如果您从应用程序中注销,您将被带回主登录屏幕。
要试验此示例,您需要在实际设备或模拟器中运行它。
| 步骤 | 描述 |
|---|---|
| 1 | 您将使用 android studio IDE 在 com.example.sairamkrishna.myapplication 包下创建一个 Android 应用程序。 |
| 2 | 修改 src/MainActivity.java 文件添加进度代码添加会话代码。 |
| 3 | 创建新活动并将其命名为 second.java。编辑此文件以添加进度代码以添加会话代码。 |
| 4 | 修改 res/layout/activity_main.xml 文件以添加相应的 XML 代码。 |
| 5 | 修改 res/layout/second_main.xml 文件以添加相应的 XML 代码。 |
| 7 | 运行应用程序并选择一个正在运行的 android 设备并在其上安装应用程序并验证结果。 |
这是MainActivity.java的内容。
package com.example.sairamkrishna.myapplication;

import android.content.Context;
import android.content.Intent;
import android.content.SharedPreferences;
import android.os.Bundle;
import android.support.v7.app.AppCompatActivity;
import android.view.View;
import android.widget.Button;
import android.widget.EditText;

public class MainActivity extends AppCompatActivity {
   EditText ed1,ed2,ed3;
   Button b1;
   Intent in;

   public static final String MyPREFERENCES = "MyPrefs" ;
   public static final String Name = "nameKey";
   public static final String Phone = "phoneKey";
   public static final String Email = "emailKey";
   SharedPreferences sharedpreferences;

   @Override
   protected void onCreate(Bundle savedInstanceState) {
      super.onCreate(savedInstanceState);
      setContentView(R.layout.activity_main);

      ed1=(EditText)findViewById(R.id.editText);
      ed2=(EditText)findViewById(R.id.editText2);
      ed3=(EditText)findViewById(R.id.editText3);

      b1=(Button)findViewById(R.id.button);
      sharedpreferences = getSharedPreferences(MyPREFERENCES, Context.MODE_PRIVATE);

      b1.setOnClickListener(new View.OnClickListener() {
         @Override
         public void onClick(View v) {
            String n  = ed1.getText().toString();
            String ph  = ed2.getText().toString();
            String e  = ed3.getText().toString();

            SharedPreferences.Editor editor = sharedpreferences.edit();

            editor.putString(Name, n);
            editor.putString(Phone, ph);
            editor.putString(Email, e);
            editor.commit();

            in = new Intent(MainActivity.this,second_main.class);
            startActivity(in);
         }
      });
   }
}
这是 second_main.java 的内容。
package com.example.sairamkrishna.myapplication;

import android.app.Activity;
import android.content.Context;
import android.content.SharedPreferences;
import android.os.Bundle;
import android.view.View;
import android.widget.Button;

public class second_main extends Activity {
   Button bu=null;
   Button bu2=null;

   @Override
   protected void onCreate(Bundle savedInstanceState) {
      super.onCreate(savedInstanceState);
      setContentView(R.layout.second_main);

      bu=(Button)findViewById(R.id.button2);
      bu2=(Button)findViewById(R.id.button3);
   }

   public  void logout(View view){
      SharedPreferences sharedpreferences = getSharedPreferences(MainActivity.MyPREFERENCES, Context.MODE_PRIVATE);
      SharedPreferences.Editor editor = sharedpreferences.edit();
      editor.clear();
      editor.commit();
   }

   public void close(View view){
      finish();
   }
}
这是activity_main.xml 的内容。
<?xml version="1.0" encoding="utf-8"?>
<RelativeLayout xmlns:android="http://schemas.android.com/apk/res/android"
   xmlns:tools="http://schemas.android.com/tools" android:layout_width="match_parent"
   android:layout_height="match_parent" android:paddingLeft="@dimen/activity_horizontal_margin"
   android:paddingRight="@dimen/activity_horizontal_margin"
   android:paddingTop="@dimen/activity_vertical_margin"
   android:paddingBottom="@dimen/activity_vertical_margin" tools:context=".MainActivity">

   <TextView
      android:layout_width="wrap_content"
      android:layout_height="wrap_content"
      android:text="Shared Preference"
      android:id="@+id/textView"
      android:layout_alignParentTop="true"
      android:layout_centerHorizontal="true"
      android:textSize="35dp" />

   <TextView
      android:layout_width="wrap_content"
      android:layout_height="wrap_content"
      android:text="Tutorials Point"
      android:id="@+id/textView2"
      android:layout_below="@+id/textView"
      android:layout_centerHorizontal="true"
      android:textSize="35dp"
      android:textColor="#ff16ff01" />

   <EditText
      android:layout_width="wrap_content"
      android:layout_height="wrap_content"
      android:id="@+id/editText"
      android:layout_below="@+id/textView2"
      android:layout_marginTop="67dp"
      android:hint="Name"
      android:layout_alignParentRight="true"
      android:layout_alignParentEnd="true"
      android:layout_alignParentLeft="true"
      android:layout_alignParentStart="true" />

   <EditText
      android:layout_width="wrap_content"
      android:layout_height="wrap_content"
      android:id="@+id/editText2"
      android:layout_below="@+id/editText"
      android:layout_alignParentLeft="true"
      android:layout_alignParentStart="true"
      android:layout_alignParentRight="true"
      android:layout_alignParentEnd="true"
      android:hint="Pass" />

   <EditText
      android:layout_width="wrap_content"
      android:layout_height="wrap_content"
      android:id="@+id/editText3"
      android:layout_below="@+id/editText2"
      android:layout_alignParentLeft="true"
      android:layout_alignParentStart="true"
      android:layout_alignParentRight="true"
      android:layout_alignParentEnd="true"
      android:hint="Email" />

   <Button
      android:layout_width="wrap_content"
      android:layout_height="wrap_content"
      android:text="login"
      android:id="@+id/button"
      android:layout_below="@+id/editText3"
      android:layout_centerHorizontal="true"
      android:layout_marginTop="50dp" />

</RelativeLayout>
这是 second_main.xml 的内容。
<?xml version="1.0" encoding="utf-8"?>
<RelativeLayout xmlns:android="http://schemas.android.com/apk/res/android"
   android:orientation="vertical" android:layout_width="match_parent"
   android:layout_height="match_parent">

   <Button
      android:layout_width="wrap_content"
      android:layout_height="wrap_content"
      android:text="Logout"
      android:onClick="logout"
      android:id="@+id/button2"
      android:layout_gravity="center_horizontal"
      android:layout_alignParentTop="true"
      android:layout_centerHorizontal="true"
      android:layout_marginTop="191dp" />

   <Button
      android:layout_width="wrap_content"
      android:layout_height="wrap_content"
      android:text="Close"
      android:onClick="close"
      android:id="@+id/button3"
      android:layout_below="@+id/button2"
      android:layout_centerHorizontal="true"
      android:layout_marginTop="69dp" />

</RelativeLayout>
这是Strings.xml的内容。
<resources>
   <string name="app_name">My Application</string>
</resources>
这是AndroidManifest.xml的内容。
<?xml version="1.0" encoding="utf-8"?>
<manifest xmlns:android="http://schemas.android.com/apk/res/android"
   package="com.example.sairamkrishna.myapplication" >

   <application
      android:allowBackup="true"
      android:icon="@mipmap/ic_launcher"
      android:label="@string/app_name"
      android:theme="@style/AppTheme" >

      <activity
         android:name=".MainActivity"
         android:label="@string/app_name" >

         <intent-filter>
            <action android:name="android.intent.action.MAIN" />
            <category android:name="android.intent.category.LAUNCHER" />
         </intent-filter>

      </activity>

      <activity android:name=".second"></activity>

   </application>
</manifest>
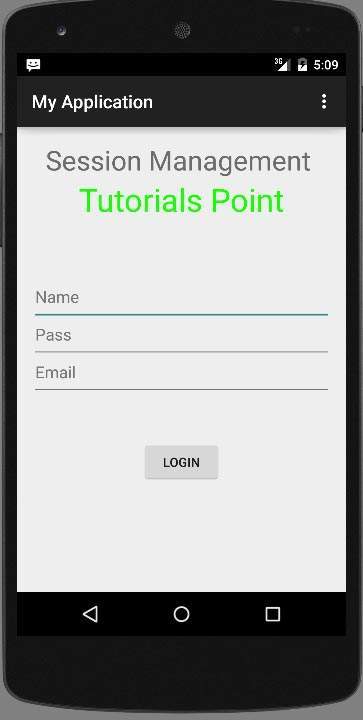
让我们尝试运行您的应用程序。 我假设您在进行环境设置时已经创建了 AVD。要从 Android Studio 运行应用程序,请打开项目的一个活动文件,然后单击工具栏中的运行  图标。Android Studio 在您的 AVD 上安装应用程序并启动它,如果您的设置和应用程序一切正常,它将显示以下 Emulator 窗口 −
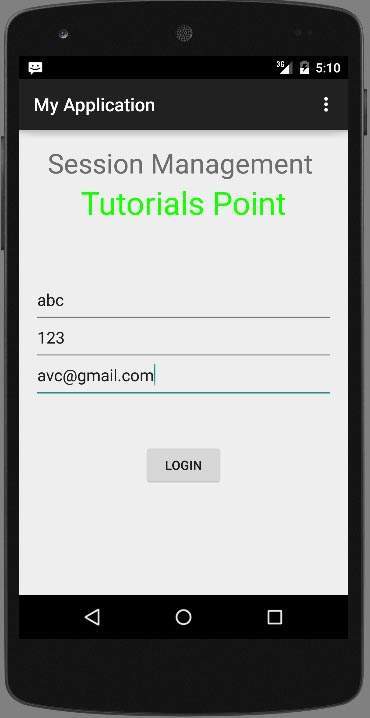
输入您的用户名和密码(输入您喜欢的任何内容,但记住您输入的内容),然后单击登录按钮。 如下图所示 −
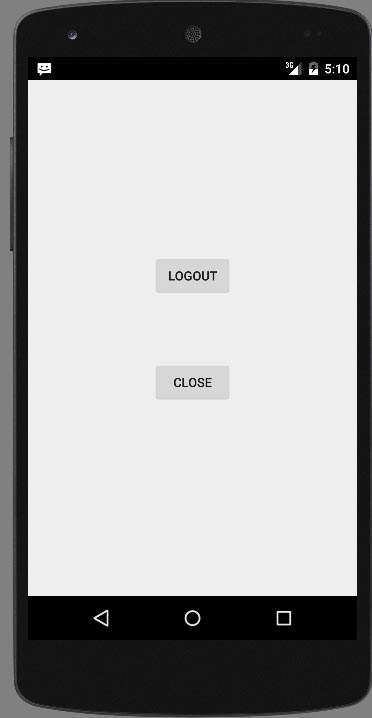
一旦您点击登录按钮,您将被带到这个欢迎屏幕。 现在您的登录信息存储在共享首选项中。
现在点击 Exit without logout 按钮,您将返回主屏幕,在首选文件中输出如下图所示
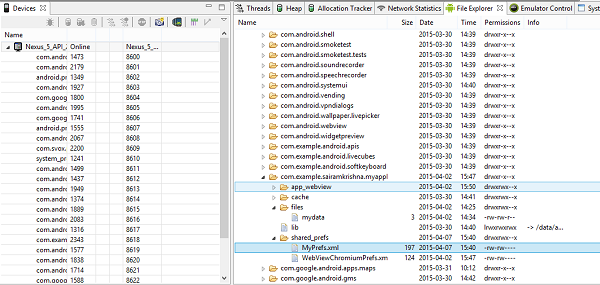
如果您将 myPref.xml 文件作为注释文件打开,它将如下所示
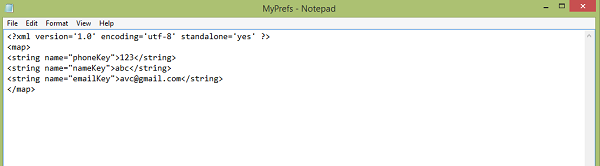
如果您单击注销按钮,它将删除首选项值。 如果您输入了不同的值作为输入,它将在 XML 中输入这些值作为首选项。

