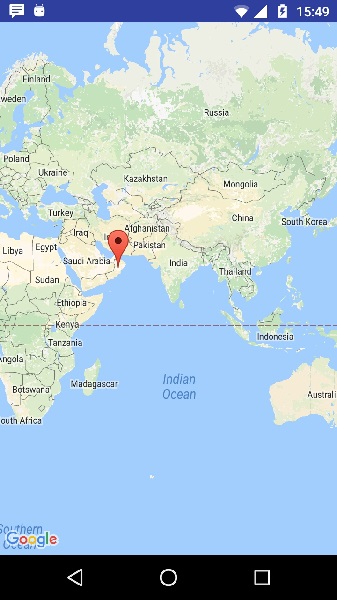
Android - 谷歌地图
Android 允许我们将谷歌地图集成到我们的应用程序中。 您可以在地图上显示任何位置,也可以在地图上显示不同的路线等。 您还可以根据自己的选择自定义地图。
谷歌地图 - 布局文件
现在您必须将地图片段添加到 xml 布局文件中。 它的语法如下 −
<fragment
   android:id="@+id/map"
   android:name="com.google.android.gms.maps.MapFragment"
   android:layout_width="match_parent"
   android:layout_height="match_parent"/>
谷歌地图 - AndroidManifest 文件
接下来您需要在 AndroidManifest.XML 文件中添加一些权限以及 Google Map API 密钥。 它的语法如下 −
<!--Permissions-->

<uses-permission android:name="android.permission.ACCESS_NETWORK_STATE" />
<uses-permission android:name="android.permission.INTERNET" />
<uses-permission android:name="com.google.android.providers.gsf.permission.
   READ_GSERVICES" />
<uses-permission android:name="android.permission.WRITE_EXTERNAL_STORAGE" />

<!--Google MAP API key-->

<meta-data
   android:name="com.google.android.maps.v2.API_KEY"
   android:value="AIzaSyDKymeBXNeiFWY5jRUejv6zItpmr2MVyQ0" />
自定义谷歌地图
您可以轻松地从默认视图自定义谷歌地图,并根据您的需求进行更改。
添加标记
您可以放置一个带有一些文字的标记,在地图上显示您的位置。 它可以通过 addMarker() 方法来完成。 它的语法如下 −
final LatLng TutorialsPoint = new LatLng(21 , 57);
Marker TP = googleMap.addMarker(new MarkerOptions()
   .position(TutorialsPoint).title("TutorialsPoint"));
更改地图类型
您还可以更改 MAP 的类型。 有四种不同类型的地图,每一种都提供不同的地图视图。 这些类型是正常、混合、卫星和地形。 您可以按如下方式使用它们
googleMap.setMapType(GoogleMap.MAP_TYPE_NORMAL);
googleMap.setMapType(GoogleMap.MAP_TYPE_HYBRID);
googleMap.setMapType(GoogleMap.MAP_TYPE_SATELLITE);
googleMap.setMapType(GoogleMap.MAP_TYPE_TERRAIN);
启用/禁用缩放
您还可以通过调用 setZoomControlsEnabled(boolean) 方法来启用或禁用地图中的缩放手势。 它的语法如下 −
googleMap.getUiSettings().setZoomGesturesEnabled(true);
除了这些自定义之外,GoogleMap 类中还有其他可用的方法,可以帮助您更多地自定义地图。 它们在下面列出 −
| 序号 | 方法 & 描述 |
|---|---|
| 1 |
addCircle(CircleOptions options) 此方法在地图上添加一个圆圈 |
| 2 |
addPolygon(PolygonOptions options) 此方法将多边形添加到地图中 |
| 3 |
addTileOverlay(TileOverlayOptions options) 此方法在地图上添加叠加 |
| 4 |
animateCamera(CameraUpdate update) 此方法根据更新用动画移动地图 |
| 5 |
clear() 此方法从地图中删除所有内容。 |
| 6 |
getMyLocation() 此方法返回当前显示的用户位置。 |
| 7 |
moveCamera(CameraUpdate update) 此方法根据更新中定义的指令重新定位相机 |
| 8 |
setTrafficEnabled(boolean enabled) 此方法打开或关闭流量层。 |
| 9 |
snapshot(GoogleMap.SnapshotReadyCallback callback) 此方法拍摄地图的快照 |
| 10 | stopAnimation() 如果有一个正在进行中,此方法会停止相机动画 |
示例
这是一个演示 GoogleMap 类使用的示例。 它创建了一个基本的 M 应用程序,允许您在地图中导航。
要试验此示例,您可以在实际设备或模拟器中运行此示例。
使用谷歌地图活动创建一个项目,如下所示 −
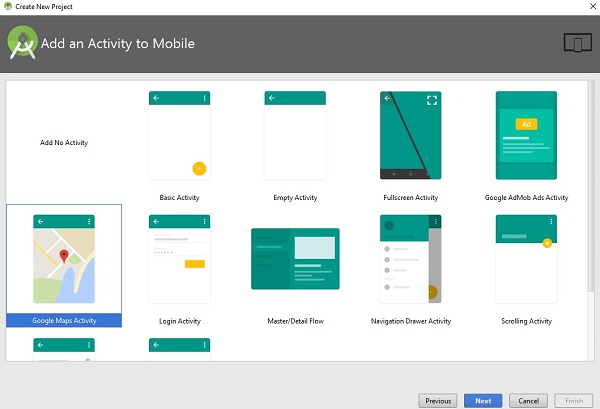
它将打开以下屏幕并复制 API Key 的控制台 URL,如下所示 −
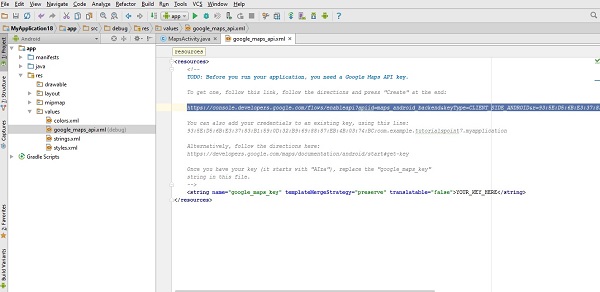
将其复制并粘贴到您的浏览器。 它将给出以下屏幕 −
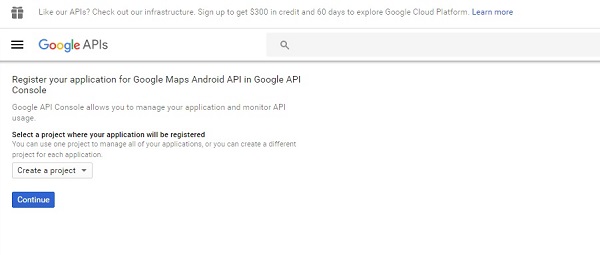
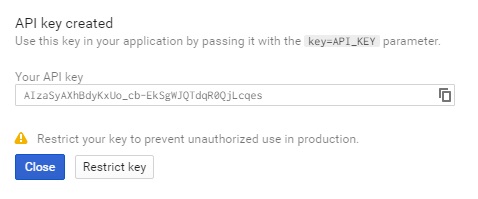
点击继续,点击创建API密钥,然后会显示如下画面
这是activity_main.xml 的内容。
<fragment xmlns:android="http://schemas.android.com/apk/res/android"
   xmlns:map="http://schemas.android.com/apk/res-auto"
   xmlns:tools="http://schemas.android.com/tools"
   android:id="@+id/map"
   android:name="com.google.android.gms.maps.SupportMapFragment"
   android:layout_width="match_parent"
   android:layout_height="match_parent"
   tools:context="com.example.tutorialspoint7.myapplication.MapsActivity" />
这是MapActivity.java 的内容。
在下面的代码中,我们给出了示例纬度和经度详细信息
package com.example.tutorialspoint7.myapplication;

import android.support.v4.app.FragmentActivity;
import android.os.Bundle;

import com.google.android.gms.maps.CameraUpdateFactory;
import com.google.android.gms.maps.GoogleMap;
import com.google.android.gms.maps.OnMapReadyCallback;
import com.google.android.gms.maps.SupportMapFragment;
import com.google.android.gms.maps.model.LatLng;
import com.google.android.gms.maps.model.MarkerOptions;

public class MapsActivity extends FragmentActivity implements OnMapReadyCallback {

   private GoogleMap mMap;

   @Override
   protected void onCreate(Bundle savedInstanceState) {
      super.onCreate(savedInstanceState);
      setContentView(R.layout.activity_maps);
      // Obtain the SupportMapFragment and get notified when the map is ready to be used.
      SupportMapFragment mapFragment = (SupportMapFragment) getSupportFragmentManager()
         .findFragmentById(R.id.map);
      mapFragment.getMapAsync(this);
   }

   /**
      * Manipulates the map once available.
      * This callback is triggered when the map is ready to be used.
      * This is where we can add markers or lines, add listeners or move the camera.
      * In this case, we just add a marker near Sydney, Australia.
      * If Google Play services is not installed on the device.
      * This method will only be triggered once the user has installed
         Google Play services and returned to the app.
   */

   @Override
   public void onMapReady(GoogleMap googleMap) {
      mMap = googleMap;
      // Add a marker in Sydney and move the camera
      LatLng TutorialsPoint = new LatLng(21, 57);
      mMap.addMarker(new
         MarkerOptions().position(TutorialsPoint).title("Tutorialspoint.com"));
      mMap.moveCamera(CameraUpdateFactory.newLatLng(TutorialsPoint));
   }
}
以下是 AndroidManifest.xml 文件的内容。
<?xml version="1.0" encoding="utf-8"?>
<manifest xmlns:android="http://schemas.android.com/apk/res/android"
    package="com.example.tutorialspoint7.myapplication">

   <!--
      The ACCESS_COARSE/FINE_LOCATION permissions are not required to use
      Google Maps Android API v2, but you must specify either coarse or fine
      location permissions for the 'MyLocation' functionality.
   -->

   <uses-permission android:name="android.permission.ACCESS_FINE_LOCATION" />
   <uses-permission android:name="android.permission.ACCESS_COARSE_LOCATION" />
   <uses-permission android:name="android.permission.INTERNET" />
   <application
      android:allowBackup="true"
      android:icon="@mipmap/ic_launcher"
      android:label="@string/app_name"
      android:supportsRtl="true"
      android:theme="@style/AppTheme">

      <!--
         The API key for Google Maps-based APIs is defined as a string resource.
         (See the file "res/values/google_maps_api.xml").
         Note that the API key is linked to the encryption key used to sign the APK.
         You need a different API key for each encryption key, including the release key
         that is used to sign the APK for publishing.
         You can define the keys for the debug and
            release targets in src/debug/ and src/release/.
      -->

      <meta-data
         android:name="com.google.android.geo.API_KEY"
         android:value="AIzaSyAXhBdyKxUo_cb-EkSgWJQTdqR0QjLcqes" />

      <activity
         android:name=".MapsActivity"
         android:label="@string/title_activity_maps">
         <intent-filter>
            <action android:name="android.intent.action.MAIN" />
            <category android:name="android.intent.category.LAUNCHER" />
         </intent-filter>
      </activity>
   </application>

</manifest>
Output should be like this −