Android - 推送通知
通知是您可以在应用程序的正常 UI 之外向用户显示的消息。 您可以非常轻松地在 android 中创建自己的通知。
为此,Android 提供了 NotificationManager 类。 为了使用这个类,你需要通过 getSystemService() 方法向 android 系统请求实例化这个类的一个对象。 它的语法如下 −
NotificationManager NM;
NM=(NotificationManager)getSystemService(Context.NOTIFICATION_SERVICE);
之后,您将通过 Notification 类创建通知并指定其属性,例如图标、标题和时间等。 它的语法如下 −
Notification notify = new Notification(android.R.drawable.stat_notify_more,title,System.currentTimeMillis());
您需要做的下一件事是通过将上下文和意图作为参数传递来创建 PendingIntent。 通过将 PendingIntent 提供给另一个应用程序,您授予它执行您指定的操作的权利,就好像另一个应用程序是您自己一样。
PendingIntent pending = PendingIntent.getActivity(getApplicationContext(), 0, new Intent(),0);
您需要做的最后一件事是调用 Notification 类的 setLatestEventInfo 方法并传递待处理的意图以及通知主题和正文详细信息。 它的语法如下。 然后最后调用 NotificationManager 类的 notify 方法。
notify.setLatestEventInfo(getApplicationContext(), subject, body,pending);
NM.notify(0, notify);
除了 notify 方法,NotificationManager 类中还有其他可用的方法。 它们在下面列出 −
| 序号 | 方法 & 描述 |
|---|---|
| 1 |
cancel(int id) 此方法取消之前显示的通知。 |
| 2 |
cancel(String tag, int id) 此方法还会取消之前显示的通知。 |
| 3 |
cancelAll() 此方法取消所有先前显示的通知。 |
| 4 |
notify(int id, Notification notification) 此方法发布要在状态栏中显示的通知。 |
| 5 |
notify(String tag, int id, Notification notification) 此方法还发布要在状态栏中显示的通知。 |
示例
下面的示例演示了 NotificationManager 类的使用。 它创建了一个允许您创建通知的基本应用程序。
要试验此示例,您需要在实际设备或模拟器中运行它。
| 步骤 | 描述 |
|---|---|
| 1 | 您将使用 Android Studio 在 packagecom.example.sairamkrishna.myapplication 下创建一个 Android 应用程序。 |
| 2 | 修改 src/MainActivity.java 文件添加通知代码。 |
| 3 | 修改布局 XML 文件 res/layout/activity_main.xml 如果需要,添加任何 GUI 组件。 |
| 4 | 运行应用程序并选择一个正在运行的 android 设备并在其上安装应用程序并验证结果。 |
这是MainActivity.java的内容。
以下代码中的abc表示tutorialspoint.com的标志
package com.example.sairamkrishna.myapplication;

import android.app.Notification;
import android.app.NotificationManager;

import android.content.Context;
import android.support.v7.app.ActionBarActivity;
import android.os.Bundle;
import android.view.View;

import android.widget.Button;
import android.widget.EditText;

public class MainActivity extends ActionBarActivity {
   EditText ed1,ed2,ed3;
   protected void onCreate(Bundle savedInstanceState) {
      super.onCreate(savedInstanceState);
      setContentView(R.layout.activity_main);

      ed1=(EditText)findViewById(R.id.editText);
      ed2=(EditText)findViewById(R.id.editText2);
      ed3=(EditText)findViewById(R.id.editText3);
      Button b1=(Button)findViewById(R.id.button);

      b1.setOnClickListener(new View.OnClickListener() {
         @Override
         public void onClick(View v) {
            String tittle=ed1.getText().toString().trim();
            String subject=ed2.getText().toString().trim();
            String body=ed3.getText().toString().trim();

            NotificationManager notif=(NotificationManager)getSystemService(Context.NOTIFICATION_SERVICE);
            Notification notify=new Notification.Builder
               (getApplicationContext()).setContentTitle(tittle).setContentText(body).
               setContentTitle(subject).setSmallIcon(R.drawable.abc).build();

               notify.flags |= Notification.FLAG_AUTO_CANCEL;
               notif.notify(0, notify);
         }
      });
   }
}
这是 activity_main.xml 的内容
<?xml version="1.0" encoding="utf-8"?>
<RelativeLayout xmlns:android="http://schemas.android.com/apk/res/android"
   xmlns:tools="http://schemas.android.com/tools" android:layout_width="match_parent"
   android:layout_height="match_parent" android:paddingLeft="@dimen/activity_horizontal_margin"
   android:paddingRight="@dimen/activity_horizontal_margin"
   android:paddingTop="@dimen/activity_vertical_margin"
   android:paddingBottom="@dimen/activity_vertical_margin" tools:context=".MainActivity">

   <TextView
      android:layout_width="wrap_content"
      android:layout_height="wrap_content"
      android:text="Notification"
      android:id="@+id/textView"
      android:layout_alignParentTop="true"
      android:layout_centerHorizontal="true"
      android:textSize="30dp" />
      .
   <TextView
      android:layout_width="wrap_content"
      android:layout_height="wrap_content"
      android:text="Tutorials Point"
      android:id="@+id/textView2"
      android:layout_below="@+id/textView"
      android:layout_centerHorizontal="true"
      android:textSize="35dp"
      android:textColor="#ff16ff01" />

   <EditText
      android:layout_width="wrap_content"
      android:layout_height="wrap_content"
      android:id="@+id/editText"
      android:layout_below="@+id/textView2"
      android:layout_alignLeft="@+id/textView2"
      android:layout_alignStart="@+id/textView2"
      android:layout_marginTop="52dp"
      android:layout_alignRight="@+id/textView2"
      android:layout_alignEnd="@+id/textView2"
      android:hint="Name" />

   <EditText
      android:layout_width="wrap_content"
      android:layout_height="wrap_content"
      android:id="@+id/editText2"
      android:hint="Subject"
      android:layout_below="@+id/editText"
      android:layout_alignLeft="@+id/editText"
      android:layout_alignStart="@+id/editText"
      android:layout_alignRight="@+id/editText"
      android:layout_alignEnd="@+id/editText" />

   <EditText
      android:layout_width="wrap_content"
      android:layout_height="wrap_content"
      android:inputType="textPersonName"
      android:ems="10"
      android:id="@+id/editText3"
      android:hint="Body"
      android:layout_below="@+id/editText2"
      android:layout_alignLeft="@+id/editText2"
      android:layout_alignStart="@+id/editText2"
      android:layout_alignRight="@+id/editText2"
      android:layout_alignEnd="@+id/editText2" />

   <Button
      android:layout_width="wrap_content"
      android:layout_height="wrap_content"
      android:text="Notification"
      android:id="@+id/button"
      android:layout_marginTop="77dp"
      android:layout_below="@+id/editText3"
      android:layout_alignRight="@+id/textView"
      android:layout_alignEnd="@+id/textView" />

</RelativeLayout>
这是AndroidManifest.xml的内容。
<?xml version="1.0" encoding="utf-8"?>
<manifest xmlns:android="http://schemas.android.com/apk/res/android"
   package="com.example.sairamkrishna.myapplication" >

   <application
      android:allowBackup="true"
      android:icon="@mipmap/ic_launcher"
      android:label="@string/app_name"
      android:theme="@style/AppTheme" >

      <activity
         android:name=".MainActivity"
         android:label="@string/app_name" >

         <intent-filter>
            <action android:name="android.intent.action.MAIN" />
            <category android:name="android.intent.category.LAUNCHER" />
         </intent-filter>

      </activity>

   </application>
</manifest>
让我们尝试运行应用程序。要从 Android Studio 运行应用程序,请打开项目的一个活动文件,然后单击工具栏中的运行  图标。在启动您的应用程序之前,Android Studio 将显示以下窗口以选择您要运行 Android 应用程序的选项。
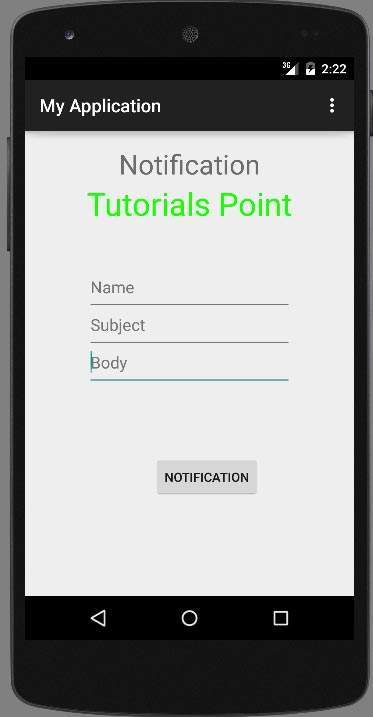
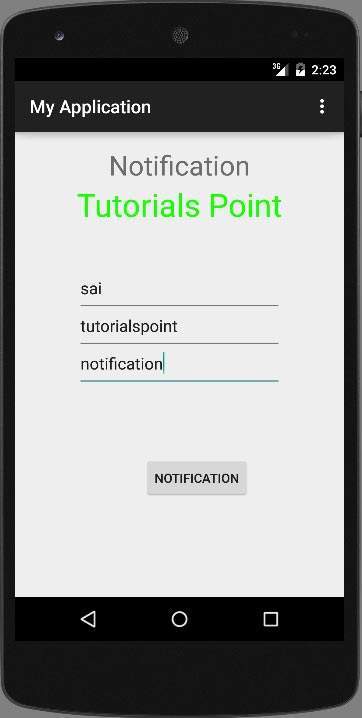
现在用标题、主题和正文填写该字段。 如下图所示 −
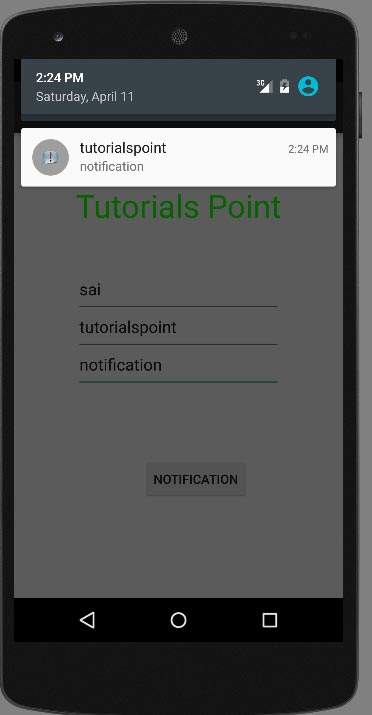
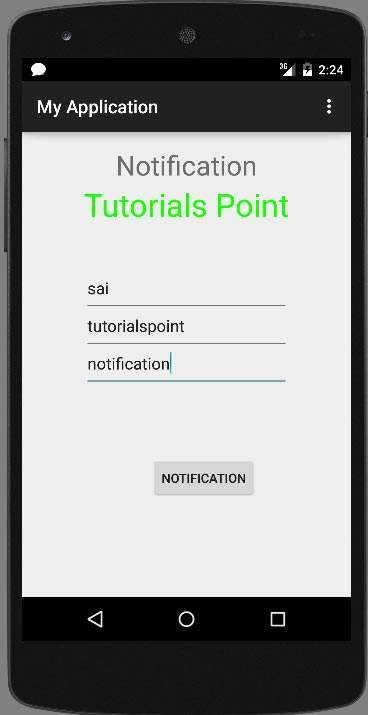
现在单击通知按钮,您将在顶部通知栏中看到一个通知。 如下图所示 −
现在向下滚动通知栏并查看通知。 如下图所示 −