Android - 本地化
一个 android 应用程序可以在许多不同地区的许多设备上运行。 为了使您的应用程序更具交互性,您的应用程序应该以适合您的应用程序将使用的语言环境的方式处理文本、数字、文件等。
将字符串转换为不同语言的方式称为本地化
在本章中,我们将解释如何根据不同的地区等本地化您的应用程序。 我们将对应用程序中使用的字符串进行本地化,并以同样的方式对其他内容进行本地化。
本地化字符串
为了本地化应用程序中使用的字符串,请在 res 下创建一个名为 values-local 的新文件夹,其中 local 将替换为区域。
例如,在意大利的情况下,values-it 文件夹将在 res 下创建。 如下图所示 −
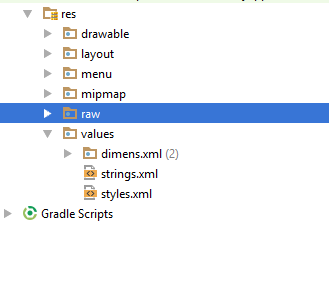
创建该文件夹后,将 strings.xml 从默认文件夹复制到您创建的文件夹。 并更改其内容。 例如,我更改了 hello_world 字符串的值。
意大利语, res/values-it/strings.xml
<;?xml version="1.0" encoding="utf-8"?>
<resources>
   <string name="hello_world">Ciao mondo!</string>
</resources>
西班牙语,res/values-it/strings.xml
<;?xml version="1.0" encoding="utf-8"?>
<resources>
   <string name="hello_world">Hola Mundo!</string>
</resources>
法语, res/values-it/strings.xml
<;?xml version="1.0" encoding="utf-8"?>
<resources>
   <string name="hello_world">Bonjour le monde !</string>
</resources>
除这些语言外,其他语言的地区代码已在下表中给出 −
| 序号 | 语言 & 代码 |
|---|---|
| 1 | Afrikanns 代码: af ,文件夹名称:values-af |
| 2 | Arabic 代码: ar ,文件夹名称:values-ar |
| 3 | Bengali 代码: bn ,文件夹名称:values-bn |
| 4 | Czech 代码: cs ,文件夹名称:values-cs |
| 5 | Chinese 代码: zh ,文件夹名称:values-zh |
| 6 | German 代码: de ,文件夹名称:values-de |
| 7 | French 代码: fr ,文件夹名称:values-fr |
| 8 | Japanese 代码: ja ,文件夹名称:values-ja |
示例
要试验此示例,您可以在实际设备或模拟器中运行此示例。
| 步骤 | 描述 |
|---|---|
| 1 | 您将使用 Android Studio 在 com.example.sairamkrishna.myapplication 包下创建一个 Android 应用程序。 |
| 2 | 修改 res/layout/activity_main 以添加相应的 XML 组件 |
| 3 | 修改 res/values/string.xml 以添加必要的字符串组件 |
| 4 | 运行应用程序并选择一个正在运行的 android 设备并在其上安装应用程序并验证结果 |
以下是 res/layout/activity_main.xml 的修改内容。
<?xml version="1.0" encoding="utf-8"?>
<RelativeLayout
   xmlns:android="http://schemas.android.com/apk/res/android"
   xmlns:tools="http://schemas.android.com/tools"
   android:layout_width="match_parent"
   android:layout_height="match_parent" android:paddingLeft="@dimen/activity_horizontal_margin"
   android:paddingRight="@dimen/activity_horizontal_margin"
   android:paddingTop="@dimen/activity_vertical_margin"
   android:paddingBottom="@dimen/activity_vertical_margin"
   tools:context=".MainActivity">

   <TextView android:text="Wifi"
      android:layout_width="wrap_content"
      android:layout_height="wrap_content"
      android:id="@+id/textview"
      android:textSize="35dp"
      android:layout_alignParentTop="true"
      android:layout_centerHorizontal="true" />

   <TextView
      android:layout_width="wrap_content"
      android:layout_height="wrap_content"
      android:text="Tutorials point"
      android:id="@+id/textView"
      android:layout_below="@+id/textview"
      android:layout_centerHorizontal="true"
      android:textColor="#ff7aff24"
      android:textSize="35dp" />

   <TextView
      android:layout_width="wrap_content"
      android:layout_height="wrap_content"
      android:text="@string/hindi"
      android:id="@+id/textView2"
      android:layout_below="@+id/textView"
      android:layout_centerHorizontal="true"
      android:layout_marginTop="50dp"
      android:textColor="#ff59ff1a"
      android:textSize="30dp" />

   <TextView
      android:layout_width="wrap_content"
      android:layout_height="wrap_content"
      android:text="@string/marathi"
      android:id="@+id/textView3"
      android:textSize="30dp"
      android:textColor="#ff67ff1e"
      android:layout_centerVertical="true"
      android:layout_centerHorizontal="true" />

   <TextView
      android:layout_width="wrap_content"
      android:layout_height="wrap_content"
      android:text="@string/arabic"
      android:id="@+id/textView4"
      android:layout_below="@+id/textView3"
      android:layout_centerHorizontal="true"
      android:layout_marginTop="42dp"
      android:textColor="#ff40ff08"
      android:textSize="30dp" />

   <TextView
      android:layout_width="wrap_content"
      android:layout_height="wrap_content"
      android:text="@string/chinese"
      android:id="@+id/textView5"
      android:layout_below="@+id/textView4"
      android:layout_alignLeft="@+id/textView3"
      android:layout_alignStart="@+id/textView3"
      android:layout_marginTop="42dp"
      android:textSize="30dp"
      android:textColor="#ff56ff12"
      android:layout_alignRight="@+id/textView3"
      android:layout_alignEnd="@+id/textView3" />

</RelativeLayout>
以下是 res/values/string.xml 的内容。
<resources>
   <string name="app_name">My Application</string>
   <string name="hello_world">Hello world!</string>
   <string name="action_settings">Settings</string>
   <string name="hindi">ట్యుటోరియల్స్ పాయింట్</string>
   <string name="marathi">शिकवण्या बिंदू</string>
   <string name="arabic">نقطة الدروس7</string>
   <string name="chinese">教程点</string>
</resources>
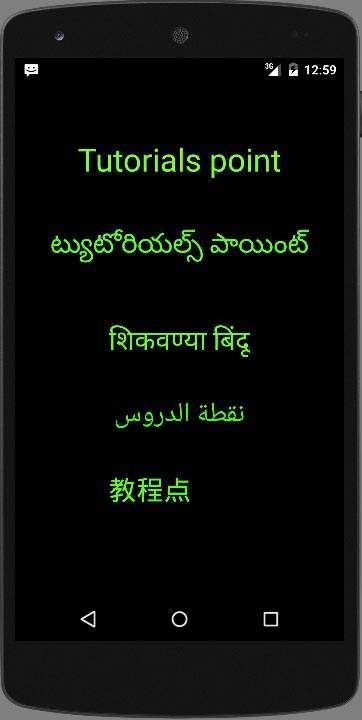
让我们尝试运行我们刚刚修改的应用程序。 我假设您在进行环境设置时已经创建了 AVD。要从 Android Studio 运行应用程序,请打开项目的一个活动文件,然后单击工具栏中的 Run  图标。 Android Studio 在您的 AVD 上安装应用程序并启动它,如果您的设置和应用程序一切正常,它将显示以下 Emulator 窗口 −