
Android - JSON 解析器
JSON代表 JavaScript Object Notation。它是一种独立的数据交换格式,是XML的最佳替代品。 本章说明如何解析 JSON 文件并从中提取必要的信息。
Android 提供了四种不同的类来操作 JSON 数据。 这些类是 JSONArray、JSONObject、JSONStringer 和 JSONTokenizer。
第一步是识别 JSON 数据中您感兴趣的字段。例如。 在下面给出的 JSON 中,我们只对获取温度感兴趣。
{
   "sys":
   {
      "country":"GB",
      "sunrise":1381107633,
      "sunset":1381149604
   },
   "weather":[
      {
         "id":711,
         "main":"Smoke",
         "description":"smoke",
         "icon":"50n"
      }
   ],

  "main":
   {
      "temp":304.15,
      "pressure":1009,
   }
}
JSON - 元素
一个 JSON 文件由许多组件组成。 这是定义 JSON 文件的组件及其描述的表格 −
| 序号 | Component & 描述 |
|---|---|
| 1 | Array([) 在 JSON 文件中,方括号 ([) 表示 JSON 数组 |
| 2 | Objects({) 在 JSON 文件中,大括号 ({) 表示 JSON 对象 |
| 3 | Key JSON 对象包含一个只是字符串的键。 键/值对组成一个 JSON 对象 |
| 4 | Value 每个键都有一个值,可以是字符串、整数或双精度等 |
JSON - 解析
为了解析 JSON 对象,我们将创建一个 JSONObject 类的对象,并为其指定一个包含 JSON 数据的字符串。 它的语法是 −
String in;
JSONObject reader = new JSONObject(in);
最后一步是解析 JSON。 JSON 文件由具有不同键/值对等的不同对象组成。 所以 JSONObject 有一个单独的函数来解析 JSON 文件的每个组件。 它的语法如下 −
JSONObject sys  = reader.getJSONObject("sys");
country = sys.getString("country");

JSONObject main  = reader.getJSONObject("main");
temperature = main.getString("temp");
getJSONObject 方法返回 JSON 对象。 getString 方法返回指定键的字符串值。
除了这些方法之外,该类还提供了其他方法来更好地解析 JSON 文件。 下面列出了这些方法 −
| 序号 | 方法 & 描述 |
|---|---|
| 1 | get(String name) 该方法只是返回值,但以 Object 类型的形式返回 |
| 2 | getBoolean(String name) 该方法返回键指定的布尔值 |
| 3 | getDouble(String name) 此方法返回键指定的双精度值 |
| 4 |
getInt(String name)
该方法返回键指定的整数值 |
| 5 | getLong(String name) 该方法返回键指定的长整数值 |
| 6 | length() 此方法返回此对象中名称/值映射的数量。 |
| 7 | names() 此方法返回一个包含此对象中的字符串名称的数组。 |
示例
要试验此示例,您可以在实际设备或模拟器中运行此示例。
| 步骤 | 描述 |
|---|---|
| 1 | 您将使用 Android Studio 创建一个 Android 应用程序。 |
| 2 | 修改 src/MainActivity.java 文件添加必要的代码。 |
| 3 | 修改 res/layout/activity_main 以添加相应的 XML 组件 |
| 4 | 修改 res/values/string.xml 以添加必要的字符串组件 |
| 5 | 运行应用程序并选择一个正在运行的 android 设备并在其上安装应用程序并验证结果 |
以下是修改后的主活动文件src/MainActivity.java的内容。
package com.example.tutorialspoint7.myapplication;

import android.os.AsyncTask;
import android.os.Bundle;
import android.support.v7.app.AppCompatActivity;
import android.util.Log;
import android.widget.ListAdapter;
import android.widget.ListView;
import android.widget.SimpleAdapter;
import android.widget.Toast;

import org.json.JSONArray;
import org.json.JSONException;
import org.json.JSONObject;

import java.util.ArrayList;
import java.util.HashMap;

public class MainActivity extends AppCompatActivity {

   private String TAG = MainActivity.class.getSimpleName();
   private ListView lv;

   ArrayList<HashMap<String, String>> contactList;

   @Override
   protected void onCreate(Bundle savedInstanceState) {
      super.onCreate(savedInstanceState);
      setContentView(R.layout.activity_main);

      contactList = new ArrayList<>();
      lv = (ListView) findViewById(R.id.list);

      new GetContacts().execute();
   }

   private class GetContacts extends AsyncTask<Void, Void, Void> {
      @Override
      protected void onPreExecute() {
         super.onPreExecute();
         Toast.makeText(MainActivity.this,"Json Data is
            downloading",Toast.LENGTH_LONG).show();

      }

      @Override
      protected Void doInBackground(Void... arg0) {
         HttpHandler sh = new HttpHandler();
         // Making a request to url and getting response
         String url = "http://api.androidhive.info/contacts/";
         String jsonStr = sh.makeServiceCall(url);

         Log.e(TAG, "Response from url: " + jsonStr);
         if (jsonStr != null) {
            try {
               JSONObject jsonObj = new JSONObject(jsonStr);

               // Getting JSON Array node
               JSONArray contacts = jsonObj.getJSONArray("contacts");

               // looping through All Contacts
               for (int i = 0; i < contacts.length(); i++) {
                  JSONObject c = contacts.getJSONObject(i);
                  String id = c.getString("id");
                  String name = c.getString("name");
                  String email = c.getString("email");
                  String address = c.getString("address");
                  String gender = c.getString("gender");

                  // Phone node is JSON Object
                  JSONObject phone = c.getJSONObject("phone");
                  String mobile = phone.getString("mobile");
                  String home = phone.getString("home");
                  String office = phone.getString("office");

                  // tmp hash map for single contact
                  HashMap<String, String> contact = new HashMap<>();

                  // adding each child node to HashMap key => value
                  contact.put("id", id);
                  contact.put("name", name);
                  contact.put("email", email);
                  contact.put("mobile", mobile);

                  // adding contact to contact list
                  contactList.add(contact);
               }
            } catch (final JSONException e) {
               Log.e(TAG, "Json parsing error: " + e.getMessage());
               runOnUiThread(new Runnable() {
                  @Override
                  public void run() {
                     Toast.makeText(getApplicationContext(),
                     "Json parsing error: " + e.getMessage(),
                        Toast.LENGTH_LONG).show();
                  }
               });

            }

         } else {
            Log.e(TAG, "Couldn't get json from server.");
            runOnUiThread(new Runnable() {
               @Override
               public void run() {
                  Toast.makeText(getApplicationContext(),
                     "Couldn't get json from server. Check LogCat for possible errors!",
                     Toast.LENGTH_LONG).show();
               }
            });
         }

         return null;
      }

      @Override
      protected void onPostExecute(Void result) {
         super.onPostExecute(result);
         ListAdapter adapter = new SimpleAdapter(MainActivity.this, contactList,
            R.layout.list_item, new String[]{ "email","mobile"},
               new int[]{R.id.email, R.id.mobile});
         lv.setAdapter(adapter);
      }
   }
}
以下是 HttpHandler.java 的修改内容。
package com.example.tutorialspoint7.myapplication;

import android.util.Log;

import java.io.BufferedInputStream;
import java.io.BufferedReader;
import java.io.IOException;
import java.io.InputStream;
import java.io.InputStreamReader;
import java.net.HttpURLConnection;
import java.net.MalformedURLException;
import java.net.ProtocolException;
import java.net.URL;

public class HttpHandler {

   private static final String TAG = HttpHandler.class.getSimpleName();

   public HttpHandler() {
   }

   public String makeServiceCall(String reqUrl) {
      String response = null;
      try {
         URL url = new URL(reqUrl);
         HttpURLConnection conn = (HttpURLConnection) url.openConnection();
         conn.setRequestMethod("GET");
         // read the response
         InputStream in = new BufferedInputStream(conn.getInputStream());
         response = convertStreamToString(in);
      } catch (MalformedURLException e) {
         Log.e(TAG, "MalformedURLException: " + e.getMessage());
      } catch (ProtocolException e) {
         Log.e(TAG, "ProtocolException: " + e.getMessage());
      } catch (IOException e) {
         Log.e(TAG, "IOException: " + e.getMessage());
      } catch (Exception e) {
         Log.e(TAG, "Exception: " + e.getMessage());
      }
      return response;
   }

   private String convertStreamToString(InputStream is) {
      BufferedReader reader = new BufferedReader(new InputStreamReader(is));
      StringBuilder sb = new StringBuilder();

      String line;
      try {
         while ((line = reader.readLine()) != null) {
            sb.append(line).append('\n');
         }
      } catch (IOException e) {
         e.printStackTrace();
      } finally {
         try {
            is.close();
         } catch (IOException e) {
            e.printStackTrace();
         }
      }

      return sb.toString();
   }
}
以下是 res/layout/activity_main.xml 的修改内容。
<?xml version="1.0" encoding="utf-8"?>
<RelativeLayout xmlns:android="http://schemas.android.com/apk/res/android"
    xmlns:tools="http://schemas.android.com/tools"
    android:layout_width="match_parent"
    android:layout_height="match_parent"
    tools:context="com.example.tutorialspoint7.myapplication.MainActivity">

   <ListView
      android:id="@+id/list"
      android:layout_width="fill_parent"
      android:layout_height="wrap_content" />
</RelativeLayout>
以下是 res/layout/list_item.xml的修改内容。
<?xml version="1.0" encoding="utf-8"?>
<LinearLayout xmlns:android="http://schemas.android.com/apk/res/android"
   android:layout_width="fill_parent"
   android:layout_height="wrap_content"
   android:orientation="vertical"
   android:padding="@dimen/activity_horizontal_margin">
   <TextView
      android:id="@+id/email"
      android:layout_width="fill_parent"
      android:layout_height="wrap_content"
      android:paddingBottom="2dip"
      android:textColor="@color/colorAccent" />

   <TextView
      android:id="@+id/mobile"
      android:layout_width="wrap_content"
      android:layout_height="wrap_content"
      android:textColor="#5d5d5d"
      android:textStyle="bold" />
</LinearLayout>
以下是 AndroidManifest.xml 文件的内容。
<?xml version="1.0" encoding="utf-8"?>
<manifest xmlns:android="http://schemas.android.com/apk/res/android"
    package="com.example.tutorialspoint7.myapplication">

   <uses-permission android:name="android.permission.INTERNET"/>
   <application
      android:allowBackup="true"
      android:icon="@mipmap/ic_launcher"
      android:label="@string/app_name"
      android:supportsRtl="true"
      android:theme="@style/AppTheme">
         <activity android:name=".MainActivity">
            <intent-filter>
               <action android:name="android.intent.action.MAIN" />
               <category android:name="android.intent.category.LAUNCHER" />
            </intent-filter>
        </activity>
    </application>
</manifest>
让我们尝试运行我们刚刚修改的应用程序。 我假设您在进行环境设置时已经创建了 AVD。要从 Android Studio 运行应用程序,请打开项目的一个活动文件,然后单击工具栏中的 Run  图标。 Android Studio 在您的 AVD 上安装应用程序并启动它,如果您的设置和应用程序一切正常,它将显示以下 Emulator 窗口 −
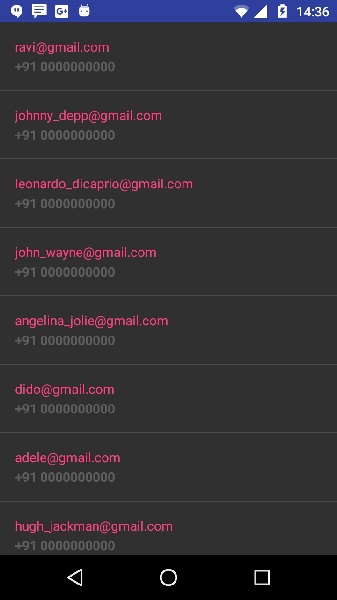
以上示例显示了来自字符串 json 的数据,该数据包含雇主详细信息以及工资信息。

