Android - 网络连接
Android 允许您的应用程序连接到互联网或任何其他本地网络,并允许您执行网络操作。
一个设备可以有各种类型的网络连接。 本章重点介绍使用 Wi-Fi 或移动网络连接。
检查网络连接
在您执行任何网络操作之前,您必须首先检查您是否连接到该网络或互联网等。 为此 android 提供了 ConnectivityManager 类。 您需要通过调用 getSystemService() 方法来实例化该类的一个对象。 它的语法如下 −
ConnectivityManager check = (ConnectivityManager)
this.context.getSystemService(Context.CONNECTIVITY_SERVICE);
实例化 ConnectivityManager 类的对象后,可以使用 getAllNetworkInfo 方法获取所有网络的信息。 此方法返回一个 NetworkInfo 数组。 所以你必须像这样接收它。
NetworkInfo[] info = check.getAllNetworkInfo();
您需要做的最后一件事是检查网络的已连接状态。 它的语法如下 −
for (int i = 0; i<info.length; i++){
   if (info[i].getState() == NetworkInfo.State.CONNECTED){
      Toast.makeText(context, "Internet is connected
      Toast.LENGTH_SHORT).show();
   }
}
除了这种连接状态之外,网络还可以实现其他状态。 它们在下面列出 −
| 序号 | 状态 |
|---|---|
| 1 | Connecting 连接 |
| 2 | Disconnected 断开连接 |
| 3 | Disconnecting 断开连接 |
| 4 | Suspended 暂停 |
| 5 | Unknown 未知 |
执行网络操作
检查您已连接到互联网后,您可以执行任何网络操作。 在这里,我们从 url 获取网站的 html。
Android 提供了 HttpURLConnection 和 URL 类来处理这些操作。 您需要通过提供网站链接来实例化 URL 类的对象。 它的语法如下 −
String link = "http://www.google.com";
URL url = new URL(link);
之后,您需要调用 url 类的 openConnection 方法并在 HttpURLConnection 对象中接收它。 之后,您需要调用 HttpURLConnection 类的 connect 方法。
HttpURLConnection conn = (HttpURLConnection) url.openConnection();
conn.connect();
您需要做的最后一件事是从网站获取 HTML。 为此,您将使用 InputStream 和 BufferedReader 类。 它的语法如下 −
InputStream is = conn.getInputStream();
BufferedReader reader = new BufferedReader(new InputStreamReader(is, "UTF-8"));
String webPage = "",data="";

while ((data = reader.readLine()) != null){
   webPage += data + "\n";
}
除了这个 connect 方法之外,HttpURLConnection 类中还有其他可用的方法。 它们在下面列出 −
| 序号 | 方法 & 描述 |
|---|---|
| 1 |
disconnect() 此方法释放此连接,以便其资源可以重用或关闭 |
| 2 |
getRequestMethod() 此方法返回将用于向远程 HTTP 服务器发出请求的请求方法 |
| 3 |
getResponseCode() 该方法返回远程 HTTP 服务器返回的响应码 |
| 4 |
setRequestMethod(String method) 此方法设置将发送到远程 HTTP 服务器的请求命令 |
| 5 |
usingProxy() 此方法返回此连接是否使用代理服务器 |
示例
下面的示例演示了 HttpURLConnection 类的使用。 它创建了一个基本应用程序,允许您从给定的网页下载 HTML。
要试验此示例,您需要在连接了 wifi 互联网的实际设备上运行它。
| 步骤 | 描述 |
|---|---|
| 1 | 您将使用 Android Studio IDE 在 com.tutorialspoint.myapplication 包下创建一个 Android 应用程序。 |
| 2 | 修改 src/MainActivity.java 文件添加活动代码。 |
| 4 | 修改布局 XML 文件 res/layout/activity_main.xml 如果需要,添加任何 GUI 组件。 |
| 6 | 修改 AndroidManifest.xml 以添加必要的权限。 |
| 7 | 运行应用程序并选择一个正在运行的 android 设备并在其上安装应用程序并验证结果。 |
Here is the content of src/MainActivity.java.
package com.tutorialspoint.myapplication;

import android.app.ProgressDialog;
import android.graphics.Bitmap;
import android.graphics.BitmapFactory;

import android.net.ConnectivityManager;
import android.os.Bundle;
import android.os.Handler;
import android.os.Message;
import android.support.v7.app.ActionBarActivity;
import android.view.View;

import android.widget.Button;
import android.widget.ImageView;
import android.widget.Toast;

import java.io.IOException;
import java.io.InputStream;

import java.net.HttpURLConnection;
import java.net.MalformedURLException;
import java.net.URL;
import java.net.URLConnection;

public class MainActivity extends ActionBarActivity {
   private ProgressDialog progressDialog;
   private Bitmap bitmap = null;
   Button b1;

   @Override
   protected void onCreate(Bundle savedInstanceState) {
      super.onCreate(savedInstanceState);
      setContentView(R.layout.activity_main);
      b1 = (Button) findViewById(R.id.button);

      b1.setOnClickListener(new View.OnClickListener() {
         @Override
         public void onClick(View v) {
            checkInternetConenction();
            downloadImage("http://www.tutorialspoint.com/green/images/logo.png");
         }
      });
   }

   private void downloadImage(String urlStr) {
      progressDialog = ProgressDialog.show(this, "", "Downloading Image from " + urlStr);
      final String url = urlStr;

      new Thread() {
         public void run() {
            InputStream in = null;

            Message msg = Message.obtain();
            msg.what = 1;

            try {
               in = openHttpConnection(url);
               bitmap = BitmapFactory.decodeStream(in);
               Bundle b = new Bundle();
               b.putParcelable("bitmap", bitmap);
               msg.setData(b);
               in.close();
            }catch (IOException e1) {
               e1.printStackTrace();
            }
            messageHandler.sendMessage(msg);
         }
      }.start();
   }

   private InputStream openHttpConnection(String urlStr) {
      InputStream in = null;
      int resCode = -1;

      try {
         URL url = new URL(urlStr);
         URLConnection urlConn = url.openConnection();

         if (!(urlConn instanceof HttpURLConnection)) {
            throw new IOException("URL is not an Http URL");
         }

         HttpURLConnection httpConn = (HttpURLConnection) urlConn;
         httpConn.setAllowUserInteraction(false);
         httpConn.setInstanceFollowRedirects(true);
         httpConn.setRequestMethod("GET");
         httpConn.connect();
         resCode = httpConn.getResponseCode();

         if (resCode == HttpURLConnection.HTTP_OK) {
            in = httpConn.getInputStream();
         }
      }catch (MalformedURLException e) {
         e.printStackTrace();
      }catch (IOException e) {
         e.printStackTrace();
      }
      return in;
   }

   private Handler messageHandler = new Handler() {
      public void handleMessage(Message msg) {
         super.handleMessage(msg);
         ImageView img = (ImageView) findViewById(R.id.imageView);
         img.setImageBitmap((Bitmap) (msg.getData().getParcelable("bitmap")));
         progressDialog.dismiss();
      }
   };

   private boolean checkInternetConenction() {
      // get Connectivity Manager object to check connection
      ConnectivityManager connec
         =(ConnectivityManager)getSystemService(getBaseContext().CONNECTIVITY_SERVICE);

      // Check for network connections
      if ( connec.getNetworkInfo(0).getState() ==
         android.net.NetworkInfo.State.CONNECTED ||
         connec.getNetworkInfo(0).getState() ==
         android.net.NetworkInfo.State.CONNECTING ||
         connec.getNetworkInfo(1).getState() ==
         android.net.NetworkInfo.State.CONNECTING ||
         connec.getNetworkInfo(1).getState() == android.net.NetworkInfo.State.CONNECTED ) {
            Toast.makeText(this, " Connected ", Toast.LENGTH_LONG).show();
            return true;
         }else if (
            connec.getNetworkInfo(0).getState() ==
            android.net.NetworkInfo.State.DISCONNECTED ||
            connec.getNetworkInfo(1).getState() ==
            android.net.NetworkInfo.State.DISCONNECTED  ) {
               Toast.makeText(this, " Not Connected ", Toast.LENGTH_LONG).show();
               return false;
            }
         return false;
   }

}
这是activity_main.xml 的内容。
<?xml version="1.0" encoding="utf-8"?>
<RelativeLayout xmlns:android="http://schemas.android.com/apk/res/android"
   xmlns:tools="http://schemas.android.com/tools" android:layout_width="match_parent"
   android:layout_height="match_parent" android:paddingLeft="@dimen/activity_horizontal_margin"
   android:paddingRight="@dimen/activity_horizontal_margin"
   android:paddingTop="@dimen/activity_vertical_margin"
   android:paddingBottom="@dimen/activity_vertical_margin" tools:context=".MainActivity">

   <TextView
      android:layout_width="wrap_content"
      android:layout_height="wrap_content"
      android:text="UI Animator Viewer"
      android:id="@+id/textView"
      android:textSize="25sp"
      android:layout_centerHorizontal="true" />

   <TextView
      android:layout_width="wrap_content"
      android:layout_height="wrap_content"
      android:text="Tutorials point"
      android:id="@+id/textView2"
      android:layout_below="@+id/textView"
      android:layout_alignRight="@+id/textView"
      android:layout_alignEnd="@+id/textView"
      android:textColor="#ff36ff15"
      android:textIsSelectable="false"
      android:textSize="35dp" />

   <ImageView
      android:layout_width="wrap_content"
      android:layout_height="wrap_content"
      android:id="@+id/imageView"
      android:layout_below="@+id/textView2"
      android:layout_centerHorizontal="true" />

   <Button
      android:layout_width="wrap_content"
      android:layout_height="wrap_content"
      android:text="Button"
      android:id="@+id/button"
      android:layout_below="@+id/imageView"
      android:layout_centerHorizontal="true"
      android:layout_marginTop="76dp" />

</RelativeLayout>
这是Strings.xml的内容。
<resources>
   <string name="app_name">My Application</string>
</resources>
这是 AndroidManifest.xml 的内容
<?xml version="1.0" encoding="utf-8"?>
<manifest xmlns:android="http://schemas.android.com/apk/res/android"
   package="com.tutorialspoint.myapplication" >
   <uses-permission android:name="android.permission.INTERNET"></uses-permission>
   <uses-permission android:name="android.permission.ACCESS_NETWORK_STATE"></uses-permission>

   <application
      android:allowBackup="true"
      android:icon="@mipmap/ic_launcher"
      android:label="@string/app_name"
      android:theme="@style/AppTheme" >

      <activity
         android:name=".MainActivity"
         android:label="@string/app_name" >

         <intent-filter>
            <action android:name="android.intent.action.MAIN" />
            <category android:name="android.intent.category.LAUNCHER" />
         </intent-filter>

      </activity>

   </application>
</manifest>
让我们尝试运行您的应用程序。 我假设您已将实际的 Android 移动设备与您的计算机连接起来。要从 android studio 运行应用程序,请打开项目的一个活动文件,然后单击工具栏中的运行  图标。在启动您的应用程序之前,Android Studio 将显示以下窗口以选择您要运行 Android 应用程序的选项。
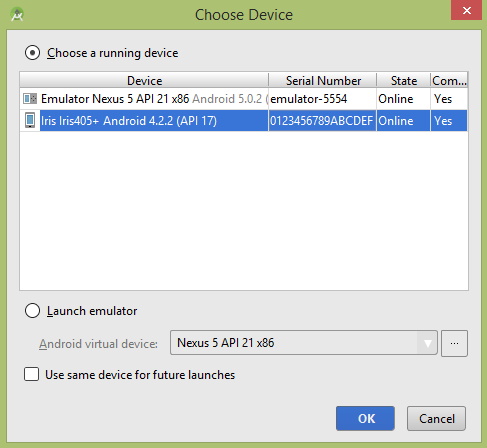
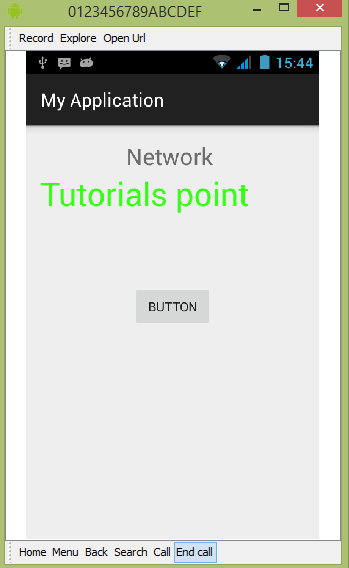
选择您的移动设备作为选项,然后检查您的移动设备,它将显示以下屏幕 −
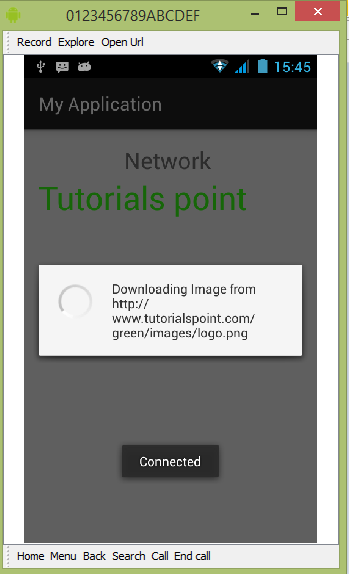
现在只需单击按钮,它将检查互联网连接以及下载图像。
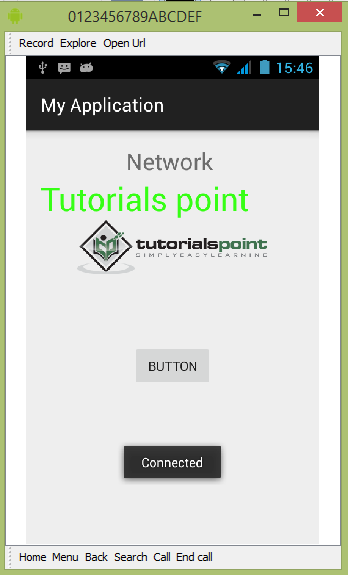
输出如下,它已从互联网上获取徽标。