
Android - 服务
service 服务是在后台运行以执行长时间运行的操作而无需与用户交互的组件,即使应用程序被破坏,它也可以工作。 一个服务本质上可以有两种状态 −
| 序号 | 状态 & 描述 |
|---|---|
| 1 |
Started 当应用程序组件(例如活动)通过调用 startService() 启动服务时,服务即被启动。 一旦启动,服务可以无限期地在后台运行,即使启动它的组件被破坏。 |
| 2 |
Bound 当应用程序组件通过调用 bindService() 绑定到服务时,服务被 绑定。 绑定服务提供了一个客户端-服务器接口,允许组件与服务交互、发送请求、获取结果,甚至通过进程间通信 (IPC) 跨进程执行此操作。 |
服务具有生命周期回调方法,您可以实施这些方法来监控服务状态的变化,并且您可以在适当的阶段执行工作。 下图左图展示了使用 startService() 创建服务时的生命周期,右图展示了使用 bindService() 创建服务时的生命周期: (image courtesy : android.com )
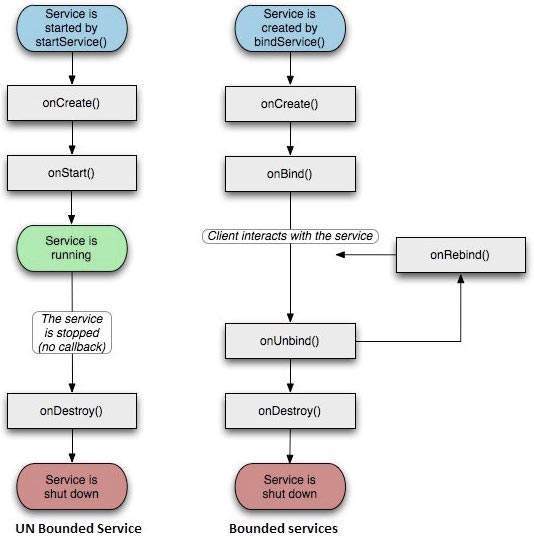
要创建服务,您需要创建一个扩展 Service 基类或其现有子类之一的 Java 类。 Service 基类定义了各种回调方法,下面给出了最重要的方法。 您不需要实现所有回调方法。 但是,重要的是您要了解每一项并实施这些以确保您的应用程序按照用户期望的方式运行。
| 序号 | 回调 & 描述 |
|---|---|
| 1 | onStartCommand() 当另一个组件(例如活动)通过调用 startService() 请求启动服务时,系统会调用此方法。 如果您实现此方法,则您有责任在服务完成时通过调用 stopSelf() 或 stopService() 方法停止服务。 |
| 2 |
onBind() 当另一个组件想要通过调用 bindService() 与服务绑定时,系统调用此方法。 如果您实现此方法,则必须通过返回 IBinder 对象来提供客户端用来与服务通信的接口。 您必须始终实现此方法,但如果您不想允许绑定,则应返回 null。 |
| 3 |
onUnbind() 当所有客户端与服务发布的特定接口断开连接时,系统调用此方法。 |
| 4 |
onRebind() 当新客户端连接到服务时,系统调用此方法,此前它已在其 onUnbind(Intent) 中通知所有已断开连接。 |
| 5 |
onCreate() 首次使用 onStartCommand() 或 onBind() 创建服务时,系统会调用此方法。 执行一次性设置需要此调用。 |
| 6 |
onDestroy() 当服务不再使用并且正在被销毁时,系统会调用此方法。 您的服务应该实现此功能以清理任何资源,例如线程、注册的侦听器、接收器等。 |
以下 skeleton 服务演示了每个生命周期方法 −
package com.tutorialspoint;

import android.app.Service;
import android.os.IBinder;
import android.content.Intent;
import android.os.Bundle;

public class HelloService extends Service {

   /** indicates how to behave if the service is killed */
   int mStartMode;

   /** interface for clients that bind */
   IBinder mBinder;

   /** indicates whether onRebind should be used */
   boolean mAllowRebind;

   /** Called when the service is being created. */
   @Override
   public void onCreate() {

   }

   /** The service is starting, due to a call to startService() */
   @Override
   public int onStartCommand(Intent intent, int flags, int startId) {
      return mStartMode;
   }

   /** A client is binding to the service with bindService() */
   @Override
   public IBinder onBind(Intent intent) {
      return mBinder;
   }

   /** Called when all clients have unbound with unbindService() */
   @Override
   public boolean onUnbind(Intent intent) {
      return mAllowRebind;
   }

   /** Called when a client is binding to the service with bindService()*/
   @Override
   public void onRebind(Intent intent) {

   }

   /** Called when The service is no longer used and is being destroyed */
   @Override
   public void onDestroy() {

   }
}
示例
本示例将通过简单的步骤向您展示如何创建自己的 Android 服务。 按照以下步骤修改我们在 Hello World Example 章节中创建的 Android 应用程序 −
| 步骤 | 描述 |
|---|---|
| 1 | 您将使用 Android StudioIDE 创建一个 Android 应用程序并将其命名为 My Application,位于包 com.example.tutorialspoint7.myapplication 下,如 Hello World 示例 一章所述。 |
| 2 | 修改主活动文件MainActivity.java,添加startService()和stopService()方法。 |
| 3 | 在 com.example.My Application 包下创建一个新的 java 文件 MyService.java。 该文件将实现 Android 服务相关的方法。 |
| 4 | 在 AndroidManifest.xml 文件中使用 <service.../> 标签定义您的服务。 一个应用程序可以有一个或多个服务,没有任何限制。 |
| 5 | 修改 res/layout/activity_main.xml 文件的默认内容以在线性布局中包含两个按钮。 |
| 6 | 无需更改 res/values/strings.xml 文件中的任何常量。 Android Studio 处理字符串值 |
| 7 | 运行应用程序以启动 Android 模拟器并验证应用程序中所做更改的结果。 |
以下是修改后的主活动文件MainActivity.java的内容。该文件可以包含每个基本生命周期方法。 我们添加了 startService() 和 stopService() 方法来启动和停止服务。
package com.example.tutorialspoint7.myapplication;

import android.content.Intent;
import android.support.v7.app.AppCompatActivity;
import android.os.Bundle;

import android.os.Bundle;
import android.app.Activity;
import android.util.Log;
import android.view.View;

public class MainActivity extends Activity {
   String msg = "Android : ";

   /** Called when the activity is first created. */
   @Override
   public void onCreate(Bundle savedInstanceState) {
      super.onCreate(savedInstanceState);
      setContentView(R.layout.activity_main);
      Log.d(msg, "The onCreate() event");
   }

   public void startService(View view) {
      startService(new Intent(getBaseContext(), MyService.class));
   }

   // Method to stop the service
   public void stopService(View view) {
      stopService(new Intent(getBaseContext(), MyService.class));
   }
}
以下是MyService.java 的内容。 该文件可以根据需求实现与服务相关的一个或多个方法。现在我们只实现两个方法 onStartCommand() 和 onDestroy() −
package com.example.tutorialspoint7.myapplication;

import android.app.Service;
import android.content.Intent;
import android.os.IBinder;
import android.support.annotation.Nullable;
import android.widget.Toast;

/**
   * Created by TutorialsPoint7 on 8/23/2016.
*/

public class MyService extends Service {
   @Nullable
   @Override
   public IBinder onBind(Intent intent) {
      return null;
   }

   @Override
   public int onStartCommand(Intent intent, int flags, int startId) {
      // Let it continue running until it is stopped.
      Toast.makeText(this, "Service Started", Toast.LENGTH_LONG).show();
      return START_STICKY;
   }

   @Override
   public void onDestroy() {
      super.onDestroy();
      Toast.makeText(this, "Service Destroyed", Toast.LENGTH_LONG).show();
   }
}
以下将修改 AndroidManifest.xml 文件的内容。 这里我们添加了 <service.../> 标签来包含我们的服务 −
<?xml version="1.0" encoding="utf-8"?>
<manifest xmlns:android="http://schemas.android.com/apk/res/android"
   package="com.example.tutorialspoint7.myapplication">

   <application
      android:allowBackup="true"
      android:icon="@mipmap/ic_launcher"
      android:label="@string/app_name"
      android:supportsRtl="true"
      android:theme="@style/AppTheme">

      <activity android:name=".MainActivity">
         <intent-filter>
            <action android:name="android.intent.action.MAIN" />

            <category android:name="android.intent.category.LAUNCHER" />
         </intent-filter>
      </activity>

      <service android:name=".MyService" />
   </application>

</manifest>
以下是 res/layout/activity_main.xml 文件的内容,包含两个按钮 −
<RelativeLayout xmlns:android="http://schemas.android.com/apk/res/android"
   xmlns:tools="http://schemas.android.com/tools" android:layout_width="match_parent"
   android:layout_height="match_parent" android:paddingLeft="@dimen/activity_horizontal_margin"
   android:paddingRight="@dimen/activity_horizontal_margin"
   android:paddingTop="@dimen/activity_vertical_margin"
   android:paddingBottom="@dimen/activity_vertical_margin" tools:context=".MainActivity">

   <TextView
      android:id="@+id/textView1"
      android:layout_width="wrap_content"
      android:layout_height="wrap_content"
      android:text="Example of services"
      android:layout_alignParentTop="true"
      android:layout_centerHorizontal="true"
      android:textSize="30dp" />

   <TextView
      android:id="@+id/textView2"
      android:layout_width="wrap_content"
      android:layout_height="wrap_content"
      android:text="Tutorials point "
      android:textColor="#ff87ff09"
      android:textSize="30dp"
      android:layout_above="@+id/imageButton"
      android:layout_centerHorizontal="true"
      android:layout_marginBottom="40dp" />

   <ImageButton
      android:layout_width="wrap_content"
      android:layout_height="wrap_content"
      android:id="@+id/imageButton"
      android:src="@drawable/abc"
      android:layout_centerVertical="true"
      android:layout_centerHorizontal="true" />

   <Button
      android:layout_width="wrap_content"
      android:layout_height="wrap_content"
      android:id="@+id/button2"
      android:text="Start Services"
      android:onClick="startService"
      android:layout_below="@+id/imageButton"
      android:layout_centerHorizontal="true" />

   <Button
      android:layout_width="wrap_content"
      android:layout_height="wrap_content"
      android:text="Stop Services"
      android:id="@+id/button"
      android:onClick="stopService"
      android:layout_below="@+id/button2"
      android:layout_alignLeft="@+id/button2"
      android:layout_alignStart="@+id/button2"
      android:layout_alignRight="@+id/button2"
      android:layout_alignEnd="@+id/button2" />

</RelativeLayout>
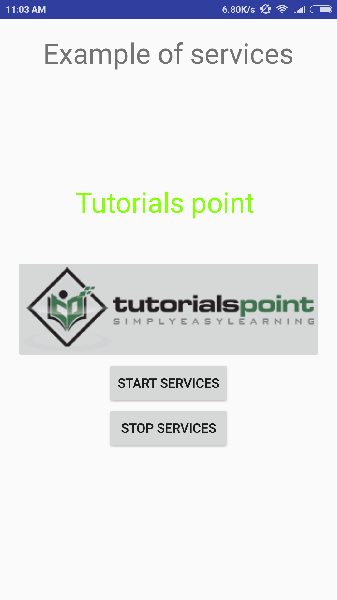
让我们尝试运行我们刚刚修改的 Hello World! 应用程序。 假设您在进行环境设置时已经创建了 AVD。 要从 Android Studio 运行应用程序,请打开项目的一个活动文件,然后单击工具栏中的运行  图标。Android Studio 在您的 AVD 上安装应用程序并启动它,如果您的设置和应用程序一切正常,它将显示以下 Emulator 窗口 −
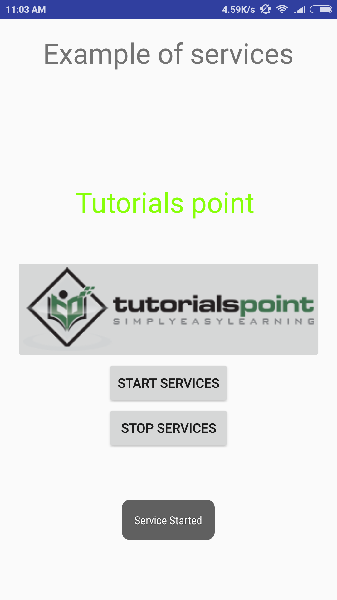
现在要启动您的服务,让我们点击 Start Service 按钮,这将启动服务,根据我们在 onStartCommand() 方法中的编程,一条消息 Service Started 将出现在 模拟器底部如下 −
要停止服务,您可以单击停止服务按钮。

