
Android - Activity 活动
Activity 代表具有用户界面的单个屏幕,就像 Java 的窗口或框架一样。Android Activity 是 ContextThemeWrapper 类的子类。
如果您使用过 C、C++ 或 Java 编程语言,那么您一定已经看到您的程序是从 main() 函数开始的。非常类似的方式,Android 系统在 Activity 中启动其程序,并以调用 onCreate() 回调方法开始。有一系列启动活动的回调方法和一系列关闭活动的回调方法,如下面的活动生命周期图所示: (image courtesy : android.com )
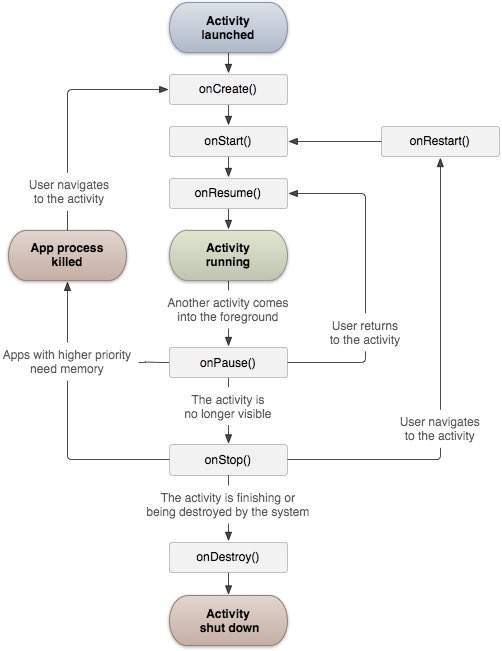
Activity 类定义了以下回调,即事件。 您不需要实现所有回调方法。 但是,重要的是您要了解每一项并实施这些以确保您的应用程序按照用户期望的方式运行。
| 序号 | 回调 & 描述 |
|---|---|
| 1 |
onCreate() 这是第一个回调,并在首次创建活动时调用。 |
| 2 | onStart() 当活动对用户可见时调用此回调。 |
| 3 | onResume() 当用户开始与应用程序交互时调用它。 |
| 4 | onPause() 暂停的活动不接收用户输入并且不能执行任何代码并且在当前活动被暂停并且前一个活动正在恢复时被调用。 |
| 5 | onStop() 当活动不再可见时调用此回调。 |
| 6 | onDestroy() 在系统销毁活动之前调用此回调。 |
| 7 | onRestart() 当活动停止后重新启动时,将调用此回调。 |
示例
本示例将带您通过简单的步骤来展示 Android 应用程序活动的生命周期。 按照以下步骤修改我们在 Hello World Example 章节中创建的 Android 应用程序 −
| 步骤 | 描述 |
|---|---|
| 1 | 您将使用 Android Studio 创建一个 Android 应用程序,并将其命名为 HelloWorld,位于包 com.example.helloworld 下,如 Hello World 示例 一章中所述。 |
| 2 | 修改主活动文件 MainActivity.java,如下所述。 保持其余文件不变。 |
| 3 | 运行应用程序以启动 Android 模拟器并验证应用程序中所做更改的结果。 |
以下是修改后的主活动文件src/com.example.helloworld/MainActivity.java的内容。该文件包括每个基本生命周期方法。 Log.d() 方法已用于生成日志消息 −
package com.example.helloworld;

import android.os.Bundle;
import android.app.Activity;
import android.util.Log;

public class MainActivity extends Activity {
   String msg = "Android : ";

   /** Called when the activity is first created. */
   @Override
   public void onCreate(Bundle savedInstanceState) {
      super.onCreate(savedInstanceState);
      setContentView(R.layout.activity_main);
      Log.d(msg, "The onCreate() event");
   }

   /** Called when the activity is about to become visible. */
   @Override
   protected void onStart() {
      super.onStart();
      Log.d(msg, "The onStart() event");
   }

   /** Called when the activity has become visible. */
   @Override
   protected void onResume() {
      super.onResume();
      Log.d(msg, "The onResume() event");
   }

   /** Called when another activity is taking focus. */
   @Override
   protected void onPause() {
      super.onPause();
      Log.d(msg, "The onPause() event");
   }

   /** Called when the activity is no longer visible. */
   @Override
   protected void onStop() {
      super.onStop();
      Log.d(msg, "The onStop() event");
   }

   /** Called just before the activity is destroyed. */
   @Override
   public void onDestroy() {
      super.onDestroy();
      Log.d(msg, "The onDestroy() event");
   }
}
活动类使用项目的 res/layout 文件夹中可用的 XML 文件加载所有 UI 组件。 以下语句从 res/layout/activity_main.xml 文件 加载 UI 组件:
setContentView(R.layout.activity_main);
一个应用程序可以有一个或多个活动,没有任何限制。您为应用程序定义的每个 Activity 都必须在 AndroidManifest.xml 文件中声明,并且应用程序的主要 Activity 必须在清单中使用 <intent-filter> 声明,其中包括 MAIN 操作和 LAUNCHER 类别,如下所示:
<?xml version="1.0" encoding="utf-8"?>
<manifest xmlns:android="http://schemas.android.com/apk/res/android"
    package="com.example.tutorialspoint7.myapplication">

    <application
        android:allowBackup="true"
        android:icon="@mipmap/ic_launcher"
        android:label="@string/app_name"
        android:supportsRtl="true"
        android:theme="@style/AppTheme">
        <activity android:name=".MainActivity">
            <intent-filter>
                <action android:name="android.intent.action.MAIN" />

                <category android:name="android.intent.category.LAUNCHER" />
            </intent-filter>
        </activity>
    </application>

</manifest>
如果您的一项活动未声明 MAIN 操作或 LAUNCHER 类别,则您的应用程序图标将不会出现在主屏幕的应用程序列表中。
让我们尝试运行我们刚刚修改的 Hello World! 应用程序。假设您在进行环境设置时已经创建了 AVD。要从 Android Studio 运行应用程序,请打开项目的一个活动文件,然后单击工具栏中的运行  图标。Android studio 在您的 AVD 上安装应用程序并启动它,如果您的设置和应用程序一切正常,它将显示 Emulator 窗口,您应该在 Android studio 的 LogCat 窗口中看到以下日志消息 −
08-23 10:32:07.682 4480-4480/com.example.helloworld D/Android :: The onCreate() event
08-23 10:32:07.683 4480-4480/com.example.helloworld D/Android :: The onStart() event
08-23 10:32:07.685 4480-4480/com.example.helloworld D/Android :: The onResume() event

让我们尝试在 Android 模拟器上单击锁屏按钮,它会在 android studio 的 LogCat 窗口中生成以下事件消息:
08-23 10:32:53.230 4480-4480/com.example.helloworld D/Android :: The onPause() event
08-23 10:32:53.294 4480-4480/com.example.helloworld D/Android :: The onStop() event
让我们再次尝试在 Android 模拟器上解锁屏幕,它会在 Android Studio 的 LogCat 窗口中生成以下事件消息:
08-23 10:34:41.390 4480-4480/com.example.helloworld D/Android :: The onStart() event
08-23 10:34:41.392 4480-4480/com.example.helloworld D/Android :: The onResume() event
接下来,让我们再次尝试单击 Android 模拟器上的返回按钮  ,它将在 Android Studio 的 LogCat 窗口中生成以下事件消息,从而完成 Android 应用程序的 Activity 生命周期。
08-23 10:37:24.806 4480-4480/com.example.helloworld D/Android :: The onPause() event
08-23 10:37:25.668 4480-4480/com.example.helloworld D/Android :: The onStop() event
08-23 10:37:25.669 4480-4480/com.example.helloworld D/Android :: The onDestroy() event

