Android - 自定义组件
在预内置组件中实现自己的组件,并使用自己定义的类扩展子类
Android 提供了大量的预构建小部件列表,例如 Button、TextView、EditText、ListView、CheckBox、RadioButton、Gallery、Spinner、AutoCompleteTextView 等。您可以直接在 Android 应用程序开发中使用它,但可能会出现您对任何可用小部件的现有功能不满意的情况。Android 为您提供了创建自己的自定义组件的方法,您可以对其进行自定义以满足您的需求。
如果您只需要对现有小部件或布局进行小幅调整,您可以简单地对小部件或布局进行子类化并覆盖其方法,这将使您能够精确控制屏幕元素的外观和功能。
本教程向您介绍如何创建自定义视图并使用简单易用的步骤在您的应用程序中使用它们。
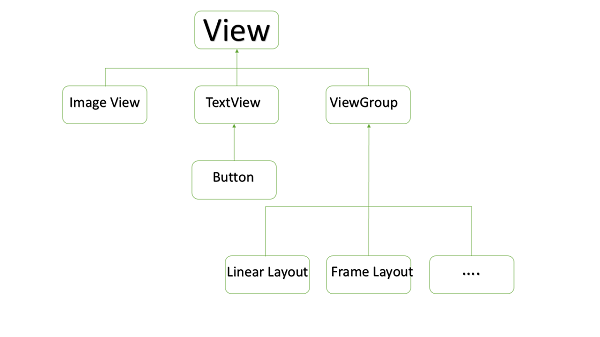
自定义视图层次结构中的自定义组件示例
创建一个简单的自定义组件
| 步骤 | 描述 |
|---|---|
| 1 | 您将使用 Android Studio IDE 创建一个 Android 应用程序,并将其命名为 myapplication 在包 com.example.tutorialspoint7.myapplication 下,如 Hello World 示例 一章中所述。 |
| 2 | 创建一个 XML res/values/attrs.xml 文件以定义新属性及其数据类型。 |
| 3 | 创建 src/mainactivity.java 文件并添加代码以定义您的自定义组件 |
| 4 | 修改 res/layout/activity_main.xml 文件并添加代码以创建颜色复合视图实例以及一些默认属性和新属性。 |
| 5 | 运行应用程序以启动 Android 模拟器并验证应用程序中所做更改的结果。 |
在您的 res/values 文件夹中创建以下名为 attrs.xml 的属性文件。
<?xml version="1.0" encoding="utf-8"?>
<resources>
   <declare-styleable name="TimeView">
      <declare-styleable name="TimeView">
         <attr name="title" format="string" />
         <attr name="setColor" format="boolean"/>
      </declare-styleable>
   </declare-styleable>
</resources>
将活动使用的布局文件更改为以下内容。
<?xml version="1.0" encoding="utf-8"?>
<RelativeLayout xmlns:android="http://schemas.android.com/apk/res/android"
   xmlns:tools="http://schemas.android.com/tools"
   xmlns:custom="http://schemas.android.com/apk/res-auto"
   android:layout_width="match_parent"
   android:layout_height="match_parent"
   tools:context=".MainActivity" >

   <com.example.tutorialspoint7.myapplication.TimeView
      android:id="@+id/timeView"
      android:layout_width="match_parent"
      android:layout_height="wrap_content"
      android:textColor="#fff"
      android:textSize="40sp"
      custom:title="my time view"
      custom:setColor="true" />

   <TextView
      android:layout_width="match_parent"
      android:layout_height="wrap_content"
      android:id="@+id/simple"
      android:layout_below="@id/timeView"
      android:layout_marginTop="10dp" />
</RelativeLayout>
为您的复合视图创建以下名为 timeview 的 java 文件。
package com.example.tutorialspoint7.myapplication;
/**
 * Created by TutorialsPoint7 on 9/14/2016.
 */
import java.text.SimpleDateFormat;
import java.util.Calendar;

import android.content.Context;
import android.content.res.TypedArray;

import android.graphics.Color;
import android.util.AttributeSet;
import android.widget.TextView;

public class TimeView extends TextView {
   private String titleText;
   private boolean color;

   public TimeView(Context context) {
      super(context);
      setTimeView();
   }

   public TimeView(Context context, AttributeSet attrs) {
      super(context, attrs);
      // retrieved values correspond to the positions of the attributes
         TypedArray typedArray = context.obtainStyledAttributes(attrs,
            R.styleable.TimeView);
      int count = typedArray.getIndexCount();
      try{

         for (int i = 0; i < count; ++i) {

            int attr = typedArray.getIndex(i);
            // the attr corresponds to the title attribute
            if(attr == R.styleable.TimeView_title) {

               // set the text from the layout
               titleText = typedArray.getString(attr);
               setTimeView();
            } else if(attr == R.styleable.TimeView_setColor) {
               // set the color of the attr "setColor"
               color = typedArray.getBoolean(attr, false);
               decorateText();
            }
         }
      }

      // the recycle() will be executed obligatorily
      finally {
         // for reuse
         typedArray.recycle();
      }
   }

   public TimeView(Context context, AttributeSet attrs, int defStyle) {
      super(context, attrs, defStyle);
      setTimeView();
   }

   private void setTimeView() {
      // has the format hour.minuits am/pm
      SimpleDateFormat dateFormat = new SimpleDateFormat("hh.mm aa");
      String time = dateFormat.format(Calendar.getInstance().getTime());

      if(this.titleText != null )
      setText(this.titleText+" "+time);
      else
         setText(time);
   }

   private void decorateText() {
      // when we set setColor attribute to true in the XML layout
      if(this.color == true){
         // set the characteristics and the color of the shadow
         setShadowLayer(4, 2, 2, Color.rgb(250, 00, 250));
         setBackgroundColor(Color.CYAN);
      } else {
         setBackgroundColor(Color.RED);
      }
   }
}
将您的 Main 活动 java 文件更改为以下代码并运行您的应用程序。
package com.example.tutorialspoint7.myapplication;

import android.os.Bundle;
import android.widget.TextView;
import android.app.Activity;

public class MainActivity extends Activity {

   @Override
   protected void onCreate(Bundle savedInstanceState) {
      super.onCreate(savedInstanceState);
      setContentView(R.layout.activity_main);

      TextView simpleText = (TextView) findViewById(R.id.simple);
      simpleText.setText("That is a simple TextView");
   }
}
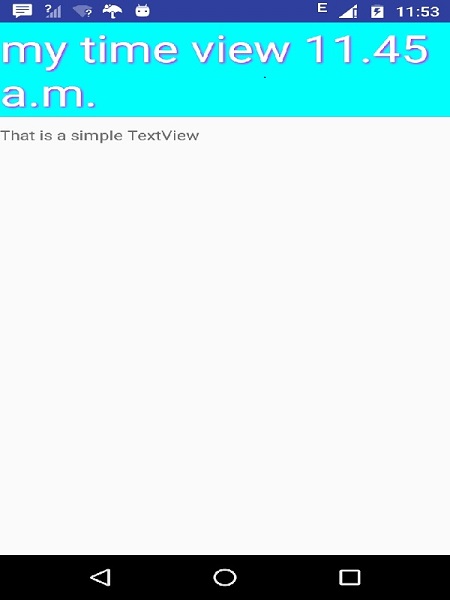
正在运行的应用程序应类似于以下屏幕截图。