
Android - 警报对话框
对话框是提示用户做出决定或输入附加信息的小窗口。
有时,在您的应用程序中,如果您想询问用户是否在响应用户采取的任何特定操作时做出是或否的决定,通过保持相同的活动而不更改屏幕,您可以使用警报对话框。
为了制作警报对话框,您需要制作一个警报对话框生成器的对象,它是警报对话框的内部类。 它的语法如下
AlertDialog.Builder alertDialogBuilder = new AlertDialog.Builder(this);
现在您必须使用 AlertDialog Builder 类的对象设置肯定(是)或否定(否)按钮。 它的语法是
alertDialogBuilder.setPositiveButton(CharSequence text,
   DialogInterface.OnClickListener listener)
alertDialogBuilder.setNegativeButton(CharSequence text,
   DialogInterface.OnClickListener listener)
除此之外,您还可以使用构建器类提供的其他功能来自定义警报对话框。 下面列出了这些
| 序号 | 方法类型 & 描述 |
|---|---|
| 1 |
setIcon(Drawable icon) 此方法设置警报对话框的图标。 |
| 2 |
setCancelable(boolean cancel able) 该方法设置对话框是否可以取消的属性 |
| 3 |
setMessage(CharSequence message) 此方法设置要在警报对话框中显示的消息 |
| 4 |
setMultiChoiceItems(CharSequence[] items, boolean[] checkedItems, DialogInterface.OnMultiChoiceClickListener listener) 此方法将要在对话框中显示的项目列表设置为内容。 被选中的选项会被监听器通知 |
| 5 |
setOnCancelListener(DialogInterface.OnCancelListener onCancelListener) 此方法设置取消对话框时将调用的回调。 |
| 6 |
setTitle(CharSequence title) 此方法设置要出现在对话框中的标题 |
创建和设置对话框构建器后,您将通过调用构建器类的 create() 方法创建一个警报对话框。 它的语法是
AlertDialog alertDialog = alertDialogBuilder.create();
alertDialog.show();
这将创建警报对话框并将其显示在屏幕上。
对话框片段
在进入示例之前,我们需要了解对话框片段。对话框片段是可以在对话框中显示片段的片段
public class DialogFragment extends DialogFragment {
   @Override
   public Dialog onCreateDialog(Bundle savedInstanceState) {
      // Use the Builder class for convenient dialog construction
      AlertDialog.Builder builder = new AlertDialog.Builder(getActivity());
      builder.setPositiveButton(R.string.fire, new DialogInterface.OnClickListener() {
         public void onClick(DialogInterface dialog, int id) {
            toast.makeText(this,"enter a text here",Toast.LENTH_SHORT).show();
         }
      })
      .setNegativeButton(R.string.cancel, new DialogInterface.OnClickListener() {
         public void onClick(DialogInterface dialog, int id) {
            finish();
         });
         // Create the AlertDialog object and return it
         return builder.create();
      }
   }
}
列表对话框
它用于在对话框中显示项目列表。假设用户需要选择一个项目列表,或者需要从多个项目列表中单击一个项目。这种情况我们可以使用列表对话框。< /p>
public Dialog onCreateDialog(Bundle savedInstanceState) {
   AlertDialog.Builder builder = new AlertDialog.Builder(getActivity());
   builder.setTitle(Pick a Color)

   .setItems(R.array.colors_array, new DialogInterface.OnClickListener() {
      public void onClick(DialogInterface dialog, int which) {
         // The 'which' argument contains the index position
         // of the selected item
      }
   });
   return builder.create();
}
单选列表对话框
它用于将单选列表添加到对话框中。我们可以根据用户的选择选中或取消选中。
public Dialog onCreateDialog(Bundle savedInstanceState) {
   mSelectedItems = new ArrayList();
   AlertDialog.Builder builder = new AlertDialog.Builder(getActivity());

   builder.setTitle("This is list choice dialog box");
   .setMultiChoiceItems(R.array.toppings, null,
      new DialogInterface.OnMultiChoiceClickListener() {
      @Override
      public void onClick(DialogInterface dialog, int which, boolean isChecked) {

         if (isChecked) {
            // If the user checked the item, add it to the selected items
            mSelectedItems.add(which);
         }

         else if (mSelectedItems.contains(which)) {
            // Else, if the item is already in the array, remove it
            mSelectedItems.remove(Integer.valueOf(which));
         }
      }
   })

   // Set the action buttons
   .setPositiveButton(R.string.ok, new DialogInterface.OnClickListener() {
      @Override
      public void onClick(DialogInterface dialog, int id) {
         // User clicked OK, so save the mSelectedItems results somewhere
         // or return them to the component that opened the dialog
         ...
      }
   })

   .setNegativeButton(R.string.cancel, new DialogInterface.OnClickListener() {
      @Override
      public void onClick(DialogInterface dialog, int id) {
         ...
      }
   });
   return builder.create();
}
示例
下面的例子演示了 AlertDialog 在 android 中的使用。
要试验这个例子,你需要在模拟器或实际设备上运行它。
| 步骤 | 描述 |
|---|---|
| 1 | 您将使用 Android Studio 创建一个 Android 应用程序,并将其命名为 My Application,位于 com.example.sairamkrishna.myapplication 包下。 |
| 2 | 修改 src/MainActivity.java 文件以添加警报对话框代码以启动对话框。 |
| 3 | 修改布局 XML 文件 res/layout/activity_main.xml 如果需要,添加任何 GUI 组件。 |
| 4 | 无需更改默认字符串常量。 Android Studio 处理 values/string.xml 中的默认字符串 |
| 5 | 运行应用程序并选择一个正在运行的 android 设备并在其上安装应用程序并验证结果。 |
这是src/MainActivity.java的修改代码
package com.example.sairamkrishna.myapplication;

import android.app.AlertDialog;
import android.content.DialogInterface;
import android.support.v7.app.ActionBarActivity;
import android.os.Bundle;
import android.view.View;
import android.widget.Toast;

public class MainActivity extends ActionBarActivity {
   @Override
   protected void onCreate(Bundle savedInstanceState) {
      super.onCreate(savedInstanceState);
      setContentView(R.layout.activity_main);
   }

   public void open(View view){
      AlertDialog.Builder alertDialogBuilder = new AlertDialog.Builder(this);
      alertDialogBuilder.setMessage("Are you sure,
         You wanted to make decision");
      alertDialogBuilder.setPositiveButton("yes",
         new DialogInterface.OnClickListener() {
         @Override
         public void onClick(DialogInterface arg0, int arg1) {
            Toast.makeText(MainActivity.this,"You clicked yes
               button",Toast.LENGTH_LONG).show();
         }
      });

      alertDialogBuilder.setNegativeButton("No",new DialogInterface.OnClickListener() {
         Override
         public void onClick(DialogInterface dialog, int which) {
            finish();
         }
      });

      AlertDialog alertDialog = alertDialogBuilder.create();
      alertDialog.show();
   }
}
这是res/layout/activity_main.xml的修改代码
以下代码中的 abc 表示 tutorialspoint.com 的标志
<?xml version="1.0" encoding="utf-8"?>
<RelativeLayout
   xmlns:android="http://schemas.android.com/apk/res/android"
   xmlns:tools="http://schemas.android.com/tools" android:layout_width="match_parent"
   android:layout_height="match_parent"
   android:paddingLeft="@dimen/activity_horizontal_margin"
   android:paddingRight="@dimen/activity_horizontal_margin"
   android:paddingTop="@dimen/activity_vertical_margin"
   android:paddingBottom="@dimen/activity_vertical_margin"
   tools:context=".MainActivity">

   <TextView
      android:layout_width="wrap_content"
      android:layout_height="wrap_content"
      android:text="Alert Dialog"
      android:id="@+id/textView"
      android:textSize="35dp"
      android:layout_alignParentTop="true"
      android:layout_centerHorizontal="true" />

   <TextView
      android:layout_width="wrap_content"
      android:layout_height="wrap_content"
      android:text="Tutorialspoint"
      android:id="@+id/textView2"
      android:textColor="#ff3eff0f"
      android:textSize="35dp"
      android:layout_below="@+id/textView"
      android:layout_centerHorizontal="true" />

   <ImageView
      android:layout_width="wrap_content"
      android:layout_height="wrap_content"
      android:id="@+id/imageView"
      android:src="@drawable/abc"
      android:layout_below="@+id/textView2"
      android:layout_alignRight="@+id/textView2"
      android:layout_alignEnd="@+id/textView2"
      android:layout_alignLeft="@+id/textView"
      android:layout_alignStart="@+id/textView" />
   <Button
      android:layout_width="wrap_content"
      android:layout_height="wrap_content"
      android:text="Alert dialog"
      android:id="@+id/button"
      android:layout_below="@+id/imageView"
      android:layout_alignRight="@+id/textView2"
      android:layout_alignEnd="@+id/textView2"
      android:layout_marginTop="42dp"
      android:onClick="open"
      android:layout_alignLeft="@+id/imageView"
      android:layout_alignStart="@+id/imageView" />

</RelativeLayout>
这是 Strings.xml
<resources>
    <string name="app_name">My Application</string>
</resources>
这是 AndroidManifest.xml 的默认代码
<?xml version="1.0" encoding="utf-8"?>
<manifest xmlns:android="http://schemas.android.com/apk/res/android"
   package="com.example.sairamkrishna.myapplication" >

   <application
      android:allowBackup="true"
      android:icon="@drawable/ic_launcher"
      android:label="@string/app_name"
      android:theme="@style/AppTheme" >

      <activity
         android:name="com.example.sairamkrishna.myapplication.MainActivity"
         android:label="@string/app_name" >

         <intent-filter>
            <action android:name="android.intent.action.MAIN" />
            <category android:name="android.intent.category.LAUNCHER" />
         </intent-filter>

      </activity>

   </application>
</manifest>
让我们尝试运行您的应用程序。 我假设您已将实际的 Android 移动设备与您的计算机连接起来。 要从 Android Studio 运行应用程序,请打开项目的一个活动文件,然后单击工具栏中的 Run  图标。 在启动您的应用程序之前,Android Studio 将显示以下窗口以选择您要运行 Android 应用程序的选项。
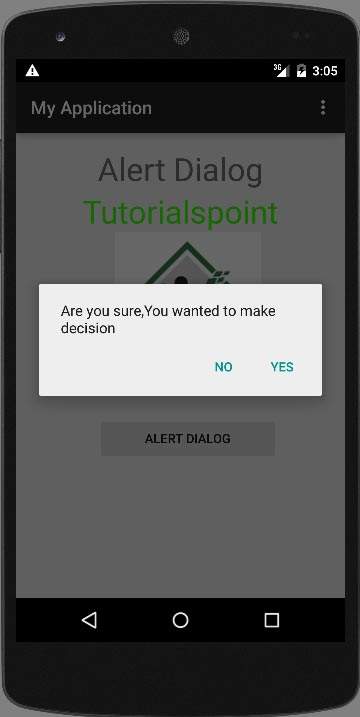
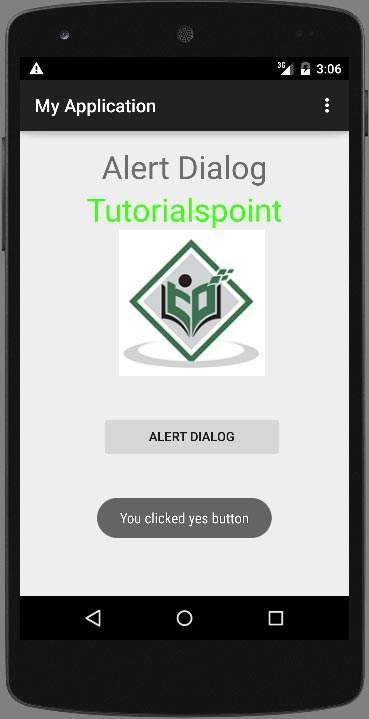
选择一个选项,然后单击它。 假设,如果你点击了是按钮,那么结果如下
如果您单击 no 按钮,它将调用 finish() 并关闭您的应用程序。

