Android - 相机
这些是以下两种方式,您可以在应用程序中使用相机
在我们的应用程序中使用现有的安卓相机应用程序
在我们的应用中直接使用 android 提供的 Camera API
在我们的应用程序中使用现有的安卓相机应用程序
您将使用 MediaStore.ACTION_IMAGE_CAPTURE 启动安装在手机上的现有相机应用程序。 它的语法如下
Intent intent = new Intent(android.provider.MediaStore.ACTION_IMAGE_CAPTURE);
除了上述之外,MediaStore 还提供了其他可用的 Intent。 它们列出如下
| 序号 | 意图类型和描述 |
|---|---|
| 1 |
ACTION_IMAGE_CAPTURE_SECURE 当设备被保护时,它返回从相机捕获的图像 |
| 2 |
ACTION_VIDEO_CAPTURE 它调用 android 中现有的视频应用程序来捕获视频 |
| 3 |
EXTRA_SCREEN_ORIENTATION 它用于将屏幕的方向设置为垂直或横向 |
| 4 |
EXTRA_FULL_SCREEN 用于控制 ViewImage 的用户界面 |
| 5 |
INTENT_ACTION_VIDEO_CAMERA 此意图用于在视频模式下启动相机 |
| 6 |
EXTRA_SIZE_LIMIT 用于指定视频或图像捕获大小的大小限制 |
现在您将使用函数 startActivityForResult() 来启动此活动并等待其结果。 它的语法如下所示
startActivityForResult(intent,0)
此方法已在 activity 类中定义。 我们从主要活动中调用它。 Activity 类中定义了一些方法,它们执行相同的工作,但在您不是从 Activity 而是从其他地方调用时使用。 它们在下面列出
| 序号 | Activity 活动函数描述 |
|---|---|
| 1 |
startActivityForResult(Intent intent, int requestCode, Bundle options) 它启动一个活动,但可以使用额外的选项包 |
| 2 |
startActivityFromChild(Activity child, Intent intent, int requestCode) 当您的活动是任何其他活动的子活动时,它会启动活动 |
| 3 |
startActivityFromChild(Activity child, Intent intent, int requestCode, Bundle options) 它的工作原理与上面相同,但它可以采用捆绑形式的额外值 |
| 4 |
startActivityFromFragment(Fragment fragment, Intent intent, int requestCode) 它从您当前所在的片段中启动活动 |
| 5 |
startActivityFromFragment(Fragment fragment, Intent intent, int requestCode, Bundle options) 它不仅从片段中启动活动,还可以使用它来获取额外的值 |
无论您使用哪个函数启动活动,它们都会返回结果。 结果可以通过重写函数 onActivityResult 来获得。
示例
这是一个示例,展示了如何启动现有的相机应用程序来捕获图像并以位图的形式显示结果。
要试验此示例,您需要在支持摄像头的实际设备上运行此示例。
| 步骤 | 描述 |
|---|---|
| 1 | 您将使用 Android Studio IDE 创建一个 Android 应用程序,并将其命名为 Camera,位于 com.example.sairamkrishna.myapplication 下。 |
| 2 | 修改 src/MainActivity.java 文件以添加意图代码以启动相机。 |
| 3 | 修改布局 XML 文件 res/layout/activity_main.xml |
| 4 | 添加相机权限和运行应用程序并选择一个正在运行的 android 设备并在其上安装应用程序并验证结果。 |
以下是修改后的主活动文件src/MainActivity.java.的内容
package com.example.sairamkrishna.myapplication;

import android.Manifest;
import android.app.Activity;
import android.app.AlertDialog;

import android.content.Context;
import android.content.DialogInterface;
import android.content.Intent;
import android.content.SharedPreferences;
import android.content.pm.PackageManager;

import android.net.Uri;
import android.os.Bundle;
import android.provider.Settings;

import android.support.v4.app.ActivityCompat;
import android.support.v4.content.ContextCompat;
import android.support.v7.app.AppCompatActivity;
import android.support.v7.widget.Toolbar;

public class MainActivity extends AppCompatActivity {
   public static final int MY_PERMISSIONS_REQUEST_CAMERA = 100;
   public static final String ALLOW_KEY = "ALLOWED";
   public static final String CAMERA_PREF = "camera_pref";

   @Override
   protected void onCreate(Bundle savedInstanceState) {
      super.onCreate(savedInstanceState);
      setContentView(R.layout.activity_main);

      if (ContextCompat.checkSelfPermission(this, Manifest.permission.CAMERA) != PackageManager.PERMISSION_GRANTED) {
         if (getFromPref(this, ALLOW_KEY)) {
            showSettingsAlert();
         } else if (ContextCompat.checkSelfPermission(this,
            Manifest.permission.CAMERA)

            != PackageManager.PERMISSION_GRANTED) {

               // Should we show an explanation?
               if (ActivityCompat.shouldShowRequestPermissionRationale(this,
                  Manifest.permission.CAMERA)) {
                  showAlert();
               } else {
                  // No explanation needed, we can request the permission.
                  ActivityCompat.requestPermissions(this,
                     new String[]{Manifest.permission.CAMERA},
                     MY_PERMISSIONS_REQUEST_CAMERA);
               }
            }
      } else {
         openCamera();
      }

   }
   public static void saveToPreferences(Context context, String key, Boolean allowed) {
      SharedPreferences myPrefs = context.getSharedPreferences(CAMERA_PREF,
         Context.MODE_PRIVATE);
      SharedPreferences.Editor prefsEditor = myPrefs.edit();
      prefsEditor.putBoolean(key, allowed);
      prefsEditor.commit();
   }

   public static Boolean getFromPref(Context context, String key) {
      SharedPreferences myPrefs = context.getSharedPreferences(CAMERA_PREF,
         Context.MODE_PRIVATE);
      return (myPrefs.getBoolean(key, false));
   }

   private void showAlert() {
      AlertDialog alertDialog = new AlertDialog.Builder(MainActivity.this).create();
      alertDialog.setTitle("Alert");
      alertDialog.setMessage("App needs to access the Camera.");

      alertDialog.setButton(AlertDialog.BUTTON_NEGATIVE, "DONT ALLOW",
         new DialogInterface.OnClickListener() {
            public void onClick(DialogInterface dialog, int which) {
               dialog.dismiss();
               finish();
            }
      });

      alertDialog.setButton(AlertDialog.BUTTON_POSITIVE, "ALLOW",
         new DialogInterface.OnClickListener() {

            public void onClick(DialogInterface dialog, int which) {
               dialog.dismiss();
               ActivityCompat.requestPermissions(MainActivity.this,
               new String[]{Manifest.permission.CAMERA},
               MY_PERMISSIONS_REQUEST_CAMERA);
            }
      });
      alertDialog.show();
   }

   private void showSettingsAlert() {
      AlertDialog alertDialog = new AlertDialog.Builder(MainActivity.this).create();
      alertDialog.setTitle("Alert");
      alertDialog.setMessage("App needs to access the Camera.");

      alertDialog.setButton(AlertDialog.BUTTON_NEGATIVE, "DONT ALLOW",
         new DialogInterface.OnClickListener() {

            public void onClick(DialogInterface dialog, int which) {
               dialog.dismiss();
               //finish();
            }
      });

      alertDialog.setButton(AlertDialog.BUTTON_POSITIVE, "SETTINGS",
         new DialogInterface.OnClickListener() {

            public void onClick(DialogInterface dialog, int which) {
               dialog.dismiss();
               startInstalledAppDetailsActivity(MainActivity.this);
            }
      });

      alertDialog.show();
   }

   @Override
   public void onRequestPermissionsResult(int requestCode, String permissions[], int[] grantResults) {
      switch (requestCode) {
         case MY_PERMISSIONS_REQUEST_CAMERA: {
            for (int i = 0, len = permissions.length; i < len; i++) {
               String permission = permissions[i];

               if (grantResults[i] == PackageManager.PERMISSION_DENIED) {
                  boolean
                  showRationale =
                     ActivityCompat.shouldShowRequestPermissionRationale(
                     this, permission);

                  if (showRationale) {
                     showAlert();
                  } else if (!showRationale) {
                     // user denied flagging NEVER ASK AGAIN
                     // you can either enable some fall back,
                     // disable features of your app
                     // or open another dialog explaining
                     // again the permission and directing to
                     // the app setting
                     saveToPreferences(MainActivity.this, ALLOW_KEY, true);
                  }
               }
            }
         }

         // other 'case' lines to check for other
         // permissions this app might request
      }
   }

   @Override
   protected void onResume() {
      super.onResume();
   }

   public static void startInstalledAppDetailsActivity(final Activity context) {
      if (context == null) {
         return;
      }

      final Intent i = new Intent();
      i.setAction(Settings.ACTION_APPLICATION_DETAILS_SETTINGS);
      i.addCategory(Intent.CATEGORY_DEFAULT);
      i.setData(Uri.parse("package:" + context.getPackageName()));
      i.addFlags(Intent.FLAG_ACTIVITY_NEW_TASK);
      i.addFlags(Intent.FLAG_ACTIVITY_NO_HISTORY);
      i.addFlags(Intent.FLAG_ACTIVITY_EXCLUDE_FROM_RECENTS);
      context.startActivity(i);
   }

   private void openCamera() {
      Intent intent = new Intent("android.media.action.IMAGE_CAPTURE");
      startActivity(intent);
   }
}
以下是 res/layout/activity_main.xml 文件的内容−
<?xml version="1.0" encoding="utf-8"?>
<RelativeLayout xmlns:android="http://schemas.android.com/apk/res/android"
   xmlns:tools="http://schemas.android.com/tools"
      android:layout_width="match_parent"
   android:layout_height="match_parent"
   android:paddingLeft="@dimen/activity_horizontal_margin"
   android:paddingRight="@dimen/activity_horizontal_margin"
   android:paddingTop="@dimen/activity_vertical_margin"
   android:paddingBottom="@dimen/activity_vertical_margin" tools:context=".MainActivity">
</RelativeLayout>
以下将是 res/values/strings.xml 的内容来定义一个新的常量
<resources>
   <string name="app_name">My Application</string>
</resources>
以下是 AndroidManifest.xml 的默认内容 −
<?xml version="1.0" encoding="utf-8"?>
<manifest xmlns:android="http://schemas.android.com/apk/res/android"
   package="com.example.sairamkrishna.myapplication" >
  <uses-permission android:name="android.permission.CAMERA" />
   <application
      android:allowBackup="true"
      android:icon="@drawable/ic_launcher"
      android:label="@string/app_name"
      android:theme="@style/AppTheme" >

      <activity
         android:name="com.example.sairamkrishna.myapplication.MainActivity"
         android:label="@string/app_name" >

         <intent-filter>
            <action android:name="android.intent.action.MAIN" />
            <category android:name="android.intent.category.LAUNCHER" />
         </intent-filter>

     </activity>

   </application>
</manifest>
让我们尝试运行您的应用程序。 我假设您已将实际的 Android 移动设备与您的计算机连接起来。要从 Android Studio 运行应用程序,请打开项目的一个活动文件,然后单击工具栏中的 Run  图标。在启动您的应用程序之前,Android Studio 将显示以下窗口以选择您要运行 Android 应用程序的选项。
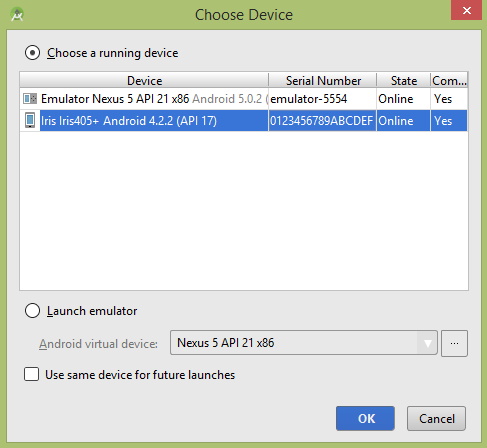
选择您的移动设备作为选项,然后检查您的移动设备,这将打开相机并显示以下屏幕 −