
Android - SMS 发送短信
在 Android 中,您可以使用 SmsManager API 或设备内置的 SMS 应用程序来发送 SMS。 在本教程中,我们向您展示了发送 SMS 消息的两个基本示例 −
SmsManager API
SmsManager smsManager = SmsManager.getDefault();
smsManager.sendTextMessage("phoneNo", null, "sms message", null, null);
内置短信应用
Intent sendIntent = new Intent(Intent.ACTION_VIEW);
sendIntent.putExtra("sms_body", "default content");
sendIntent.setType("vnd.android-dir/mms-sms");
startActivity(sendIntent);
当然,两者都需要SEND_SMS 权限。
<uses-permission android:name="android.permission.SEND_SMS" />
除了上述方法,SmsManager 类中还有一些其他重要的功能可用。 下面列出了这些方法 −
| 序号 | 方法 & 描述 |
|---|---|
| 1 |
ArrayList<String> divideMessage(String text) 此方法将消息文本分成几个片段,不大于最大 SMS 消息大小。 |
| 2 |
static SmsManager getDefault() 该方法用于获取 SmsManager 的默认实例 |
| 3 |
void sendDataMessage(String destinationAddress, String scAddress, short destinationPort, byte[] data, PendingIntent sentIntent, PendingIntent deliveryIntent) 此方法用于将基于数据的 SMS 发送到特定的应用程序端口。 |
| 4 |
void sendMultipartTextMessage(String destinationAddress, String scAddress, ArrayList<String> parts, ArrayList<PendingIntent> sentIntents, ArrayList<PendingIntent> deliveryIntents) 发送基于多部分文本的 SMS。 |
| 5 |
void sendTextMessage(String destinationAddress, String scAddress, String text, PendingIntent sentIntent, PendingIntent deliveryIntent) 发送基于文本的 SMS。 |
示例
以下示例向您展示了如何使用 SmsManager 对象向给定的手机号码发送短信。
要试验此示例,您需要配备最新 Android 操作系统的实际移动设备,否则您将不得不使用可能无法工作的模拟器。
| 步骤 | 描述 |
|---|---|
| 1 | 您将使用 Android Studio IDE 创建一个 Android 应用程序,并将其命名为 tutorialspoint,位于包 com.example.tutorialspoint 下。 |
| 2 | 修改 src/MainActivity.java 文件并添加所需的代码来处理发送短信。 |
| 3 | 修改布局 XML 文件 res/layout/activity_main.xml 添加任何 GUI 组件(如果需要)。 我正在添加一个简单的 GUI 来接收要发送的手机号码和 SMS 文本,以及一个简单的按钮来发送 SMS。 |
| 4 | 无需在 res/values/strings.xml 中定义默认字符串常量。 Android Studio 负责处理默认常量。 |
| 5 | 修改AndroidManifest.xml如下图 |
| 6 | 运行应用程序以启动 Android 模拟器并验证应用程序中所做更改的结果。 |
以下是修改后的主活动文件src/com.example.tutorialspoint/MainActivity.java的内容。
package com.example.tutorialspoint;

import android.Manifest;
import android.content.pm.PackageManager;
import android.os.Bundle;
import android.app.Activity;

import android.support.v4.app.ActivityCompat;
import android.support.v4.content.ContextCompat;
import android.telephony.SmsManager;

import android.util.Log;
import android.view.Menu;
import android.view.View;

import android.widget.Button;
import android.widget.EditText;
import android.widget.Toast;

public class MainActivity extends Activity {
   private static final int MY_PERMISSIONS_REQUEST_SEND_SMS =0 ;
   Button sendBtn;
   EditText txtphoneNo;
   EditText txtMessage;
   String phoneNo;
   String message;

   @Override
   protected void onCreate(Bundle savedInstanceState) {
      super.onCreate(savedInstanceState);
      setContentView(R.layout.activity_main);

      sendBtn = (Button) findViewById(R.id.btnSendSMS);
      txtphoneNo = (EditText) findViewById(R.id.editText);
      txtMessage = (EditText) findViewById(R.id.editText2);

      sendBtn.setOnClickListener(new View.OnClickListener() {
         public void onClick(View view) {
            sendSMSMessage();
         }
      });
   }

   protected void sendSMSMessage() {
      phoneNo = txtphoneNo.getText().toString();
      message = txtMessage.getText().toString();

      if (ContextCompat.checkSelfPermission(this,
         Manifest.permission.SEND_SMS)
         != PackageManager.PERMISSION_GRANTED) {
            if (ActivityCompat.shouldShowRequestPermissionRationale(this,
               Manifest.permission.SEND_SMS)) {
            } else {
               ActivityCompat.requestPermissions(this,
                  new String[]{Manifest.permission.SEND_SMS},
                  MY_PERMISSIONS_REQUEST_SEND_SMS);
            }
      }
   }

   @Override
   public void onRequestPermissionsResult(int requestCode,String permissions[], int[] grantResults) {
      switch (requestCode) {
         case MY_PERMISSIONS_REQUEST_SEND_SMS: {
            if (grantResults.length > 0
               && grantResults[0] == PackageManager.PERMISSION_GRANTED) {
                  SmsManager smsManager = SmsManager.getDefault();
                  smsManager.sendTextMessage(phoneNo, null, message, null, null);
                  Toast.makeText(getApplicationContext(), "SMS sent.",
                     Toast.LENGTH_LONG).show();
            } else {
               Toast.makeText(getApplicationContext(),
                  "SMS faild, please try again.", Toast.LENGTH_LONG).show();
               return;
            }
         }
      }

   }
}
以下是 res/layout/activity_main.xml 文件的内容 −
这里 abc 表示关于 tutorialspoint 的标志
<?xml version="1.0" encoding="utf-8"?>
<RelativeLayout xmlns:android="http://schemas.android.com/apk/res/android"
   xmlns:tools="http://schemas.android.com/tools"
   android:layout_width="match_parent"
   android:layout_height="match_parent"
   android:paddingBottom="@dimen/activity_vertical_margin"
   android:paddingLeft="@dimen/activity_horizontal_margin"
   android:paddingRight="@dimen/activity_horizontal_margin"
   android:paddingTop="@dimen/activity_vertical_margin"
   tools:context="MainActivity">

   <TextView
      android:id="@+id/textView1"
      android:layout_width="wrap_content"
      android:layout_height="wrap_content"
      android:text="Sending SMS Example"
      android:layout_alignParentTop="true"
      android:layout_centerHorizontal="true"
      android:textSize="30dp" />

   <TextView
      android:id="@+id/textView2"
      android:layout_width="wrap_content"
      android:layout_height="wrap_content"
      android:text="Tutorials point "
      android:textColor="#ff87ff09"
      android:textSize="30dp"
      android:layout_below="@+id/textView1"
      android:layout_alignRight="@+id/imageButton"
      android:layout_alignEnd="@+id/imageButton" />

   <ImageButton
      android:layout_width="wrap_content"
      android:layout_height="wrap_content"
      android:id="@+id/imageButton"
      android:src="@drawable/abc"
      android:layout_below="@+id/textView2"
      android:layout_centerHorizontal="true" />

   <EditText
      android:layout_width="wrap_content"
      android:layout_height="wrap_content"
      android:id="@+id/editText"
      android:hint="Enter Phone Number"
      android:phoneNumber="true"
      android:textColorHint="@color/abc_primary_text_material_dark"
      android:layout_below="@+id/imageButton"
      android:layout_centerHorizontal="true" />

   <EditText
      android:layout_width="wrap_content"
      android:layout_height="wrap_content"
      android:id="@+id/editText2"
      android:layout_below="@+id/editText"
      android:layout_alignLeft="@+id/editText"
      android:layout_alignStart="@+id/editText"
      android:textColorHint="@color/abc_primary_text_material_dark"
      android:layout_alignRight="@+id/imageButton"
      android:layout_alignEnd="@+id/imageButton"
      android:hint="Enter SMS" />

   <Button
      android:layout_width="wrap_content"
      android:layout_height="wrap_content"
      android:text="Send Sms"
      android:id="@+id/btnSendSMS"
      android:layout_below="@+id/editText2"
      android:layout_centerHorizontal="true"
      android:layout_marginTop="48dp" />

</RelativeLayout>
以下将是 res/values/strings.xml 的内容来定义两个新常量 −
<?xml version="1.0" encoding="utf-8"?>
<resources>
   <string name="app_name">tutorialspoint</string>
</resources>
以下是 AndroidManifest.xml 的默认内容 −
<?xml version="1.0" encoding="utf-8"?>
<manifest xmlns:android="http://schemas.android.com/apk/res/android"
   package="com.example.tutorialspoint" >

   <uses-permission android:name="android.permission.SEND_SMS" />

   <application
      android:allowBackup="true"
      android:icon="@drawable/ic_launcher"
      android:label="@string/app_name"
      android:theme="@style/AppTheme" >

      <activity
         android:name="com.example.tutorialspoint.MainActivity"
         android:label="@string/app_name" >

         <intent-filter>
            <action android:name="android.intent.action.MAIN" />
            <category android:name="android.intent.category.LAUNCHER" />
         </intent-filter>

      </activity>

   </application>
</manifest>
让我们尝试运行您的 tutorialspoint 应用程序。 我假设您已将实际的 Android 移动设备与您的计算机连接起来。要从 Android Studio 运行应用程序,请打开项目的活动文件之一,然后单击工具栏中的 Run  图标。在启动您的应用程序之前,Android Studio 安装程序将显示以下窗口以选择您要运行 Android 应用程序的选项。
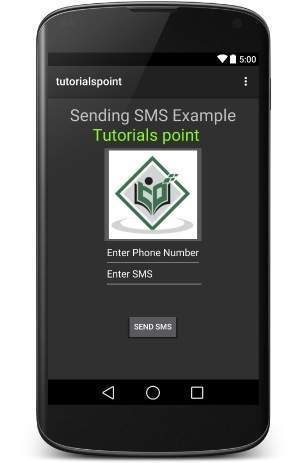
现在您可以输入所需的手机号码和要在该号码上发送的短信。 最后点击Send SMS按钮发送您的短信。 确保您的 GSM/CDMA 连接正常,以便将您的 SMS 发送给其收件人。
您可以获取一些用逗号分隔的 SMS,然后在您的程序中,您必须将它们解析为数组字符串,最后您可以使用循环将消息发送到所有给定的号码。 这样您就可以编写自己的 SMS 客户端了。 下一节将向您展示如何使用现有的短信客户端发送短信。
使用内置 Intent 发送短信
您可以使用 Android Intent 通过调用 Android 的内置短信功能来发送短信。 以下部分解释了发送 SMS 所需的 Intent 对象的不同部分。
Intent 对象 - 发送 SMS 的操作
您将使用 ACTION_VIEW 操作来启动安装在您的 Android 设备上的 SMS 客户端。 以下是使用 ACTION_VIEW 操作创建意图的简单语法。
Intent smsIntent = new Intent(Intent.ACTION_VIEW);
Intent 对象 - 发送 SMS 的数据/类型
要发送短信,您需要使用 setData() 方法将 smsto: 指定为 URI,数据类型将是 vnd.android-dir/mms-sms 使用 setType() 方法如下 −
smsIntent.setData(Uri.parse("smsto:"));
smsIntent.setType("vnd.android-dir/mms-sms");
Intent 对象 - 发送短信的额外内容
Android 已内置支持添加电话号码和短信以发送短信,如下所示 −
smsIntent.putExtra("address"  , new String("0123456789;3393993300"));
smsIntent.putExtra("sms_body"  , "Test SMS to Angilla");
这里的地址和 sms_body 区分大小写,只能用小字符指定。 您可以在单个字符串中指定多个数字,但用分号 (;) 分隔。
示例
以下示例向您展示了如何使用 Intent 对象启动 SMS 客户端以将 SMS 发送给给定的收件人。
要试验此示例,您需要配备最新 Android 操作系统的实际移动设备,否则您将不得不使用可能无法工作的模拟器。
| 步骤 | 描述 |
|---|---|
| 1 | 您将使用 Android Studio IDE 创建一个 Android 应用程序,并将其命名为 tutorialspoint,位于包 com.example.tutorialspoint 下。 |
| 2 | 修改 src/MainActivity.java 文件并添加所需的代码来处理发送 SMS。 |
| 3 | 修改布局 XML 文件 res/layout/activity_main.xml 添加任何 GUI 组件(如果需要)。 我正在添加一个简单的按钮来启动 SMS 客户端。 |
| 4 | 无需定义默认常量。Android Studio 会处理默认常量。 |
| 5 | 修改AndroidManifest.xml如下图 |
| 6 | 运行应用程序以启动 Android 模拟器并验证应用程序中所做更改的结果。 |
以下是修改后的主活动文件src/com.example.tutorialspoint/MainActivity.java的内容。
package com.example.tutorialspoint;

import android.net.Uri;
import android.os.Bundle;
import android.app.Activity;
import android.content.Intent;
import android.util.Log;
import android.view.Menu;
import android.view.View;
import android.widget.Button;
import android.widget.Toast;

public class MainActivity extends Activity {
   @Override
   protected void onCreate(Bundle savedInstanceState) {
      super.onCreate(savedInstanceState);
      setContentView(R.layout.activity_main);

      Button startBtn = (Button) findViewById(R.id.button);
      startBtn.setOnClickListener(new View.OnClickListener() {
         public void onClick(View view) {
            sendSMS();
         }
      });
   }

   protected void sendSMS() {
      Log.i("Send SMS", "");
      Intent smsIntent = new Intent(Intent.ACTION_VIEW);

      smsIntent.setData(Uri.parse("smsto:"));
      smsIntent.setType("vnd.android-dir/mms-sms");
      smsIntent.putExtra("address"  , new String ("01234"));
      smsIntent.putExtra("sms_body"  , "Test ");

      try {
         startActivity(smsIntent);
         finish();
         Log.i("Finished sending SMS...", "");
      } catch (android.content.ActivityNotFoundException ex) {
         Toast.makeText(MainActivity.this,
         "SMS faild, please try again later.", Toast.LENGTH_SHORT).show();
      }
   }

   @Override
   public boolean onCreateOptionsMenu(Menu menu) {
      // Inflate the menu; this adds items to the action bar if it is present.
      getMenuInflater().inflate(R.menu.main, menu);
      return true;
   }
}
以下是 res/layout/activity_main.xml 文件的内容 −
这里 abc 表示关于 tutorialspoint 的标志
<?xml version="1.0" encoding="utf-8"?>
<RelativeLayout xmlns:android="http://schemas.android.com/apk/res/android"
   xmlns:tools="http://schemas.android.com/tools"
   android:layout_width="match_parent"
   android:layout_height="match_parent"
   android:paddingLeft="@dimen/activity_horizontal_margin"
   android:paddingRight="@dimen/activity_horizontal_margin"
   android:paddingTop="@dimen/activity_vertical_margin"
   android:paddingBottom="@dimen/activity_vertical_margin"
   tools:context=".MainActivity">

   <TextView
      android:layout_width="wrap_content"
      android:layout_height="wrap_content"
      android:text="Drag and Drop Example"
      android:id="@+id/textView"
      android:layout_alignParentTop="true"
      android:layout_centerHorizontal="true"
      android:textSize="30dp" />

   <TextView
      android:layout_width="wrap_content"
      android:layout_height="wrap_content"
      android:text="Tutorials Point "
      android:id="@+id/textView2"
      android:layout_below="@+id/textView"
      android:layout_centerHorizontal="true"
      android:textSize="30dp"
      android:textColor="#ff14be3c" />

   <ImageView
      android:layout_width="wrap_content"
      android:layout_height="wrap_content"
      android:id="@+id/imageView"
      android:src="@drawable/abc"
      android:layout_marginTop="48dp"
      android:layout_below="@+id/textView2"
      android:layout_centerHorizontal="true" />

   <Button
      android:layout_width="wrap_content"
      android:layout_height="wrap_content"
      android:text="Compose SMS"
      android:id="@+id/button"
      android:layout_below="@+id/imageView"
      android:layout_alignRight="@+id/textView2"
      android:layout_alignEnd="@+id/textView2"
      android:layout_marginTop="54dp"
      android:layout_alignLeft="@+id/imageView"
      android:layout_alignStart="@+id/imageView" />

</RelativeLayout>
以下将是 res/values/strings.xml 的内容来定义两个新常量 −
<?xml version="1.0" encoding="utf-8"?>
<resources>
   <string name="app_name">tutorialspoint</string>
</resources>
以下是 AndroidManifest.xml 的默认内容 −
<?xml version="1.0" encoding="utf-8"?>
<manifest xmlns:android="http://schemas.android.com/apk/res/android"
   package="com.example.tutorialspoint" >

   <application
      android:allowBackup="true"
      android:icon="@drawable/ic_launcher"
      android:label="@string/app_name"
      android:theme="@style/AppTheme" >

      <activity
         android:name="com.example.tutorialspoint.MainActivity"
         android:label="@string/app_name" >

         <intent-filter>
            <action android:name="android.intent.action.MAIN" />
            <category android:name="android.intent.category.LAUNCHER" />
         </intent-filter>

      </activity>

   </application>
</manifest>
让我们尝试运行您的 tutorialspoint 应用程序。 我假设您已将实际的 Android 移动设备与您的计算机连接起来。 要从 Android Studio 运行应用程序,请打开项目的活动文件之一,然后单击工具栏中的 Run 图标。在启动您的应用程序之前,Android Studio 将显示以下窗口以选择您要运行 Android 应用程序的选项。
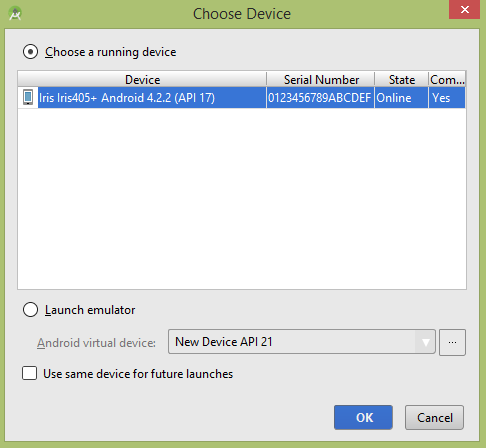
选择您的移动设备作为选项,然后检查您的移动设备,它将显示以下屏幕 −
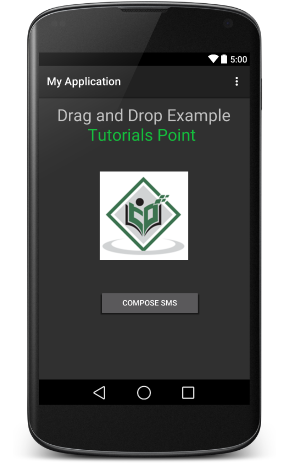
现在使用 Compose SMS 撰写短信按钮启动 Android 内置短信客户端,如下图所示 −
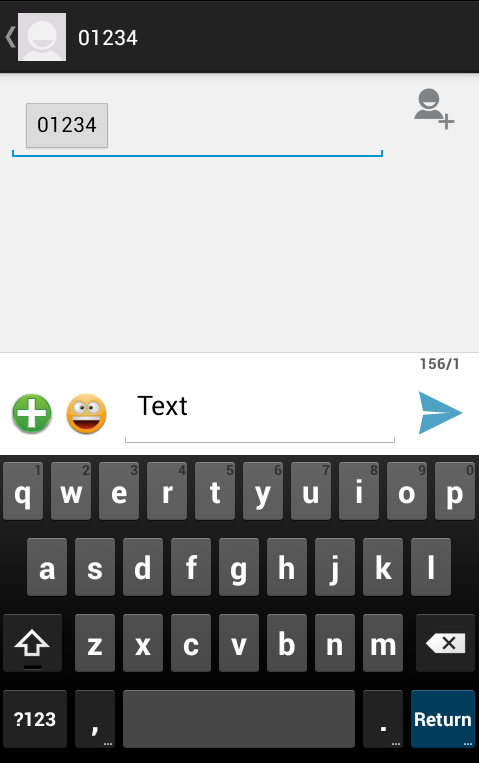
您可以修改任何一个给定的默认字段,最后使用发送 SMS 按钮将您的 SMS 发送给提到的收件人。

