
Android - 广播接收器
广播接收器只响应来自其他应用程序或系统本身的广播消息。 这些消息有时称为事件或意图。 例如,应用程序还可以发起广播,让其他应用程序知道某些数据已下载到设备并可供它们使用,因此广播接收器将拦截此通信并启动适当的操作。
有以下两个重要步骤可以使 BroadcastReceiver 适用于系统广播的意图 −
创建广播接收器。
注册广播接收器
还有一个附加的步骤,要实现自定义的意图,那么将必须创建并广播意图。
创建广播接收器
广播接收器实现为 BroadcastReceiver 类的子类,并覆盖 onReceive() 方法,其中每条消息都作为 Intent 对象参数接收。
public class MyReceiver extends BroadcastReceiver {
   @Override
   public void onReceive(Context context, Intent intent) {
      Toast.makeText(context, "Intent Detected.", Toast.LENGTH_LONG).show();
   }
}
注册广播接收器
应用程序通过在 AndroidManifest.xml 文件中注册广播接收器来侦听特定的广播意图。假设我们要为系统生成的事件 ACTION_BOOT_COMPLETED 注册 MyReceiver,一旦 Android 系统完成启动过程,系统就会触发该事件。
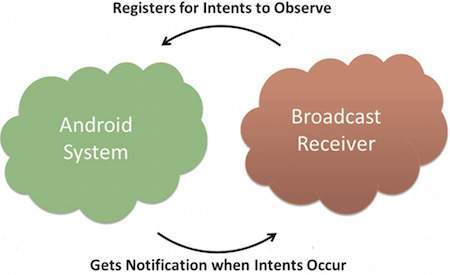
广播接收器
<application
   android:icon="@drawable/ic_launcher"
   android:label="@string/app_name"
   android:theme="@style/AppTheme" >
   <receiver android:name="MyReceiver">

      <intent-filter>
         <action android:name="android.intent.action.BOOT_COMPLETED">
         </action>
      </intent-filter>

   </receiver>
</application>
现在,每当您的 Android 设备启动时,它都会被 BroadcastReceiver MyReceiver 拦截,并执行 onReceive() 中实现的逻辑。
Intent 类中有几个系统生成的事件定义为最终静态字段。 下表列出了一些重要的系统事件。
| 序号 | 事件常数 & 描述 |
|---|---|
| 1 |
android.intent.action.BATTERY_CHANGED 包含电池充电状态、电量和其他信息的粘性广播。 |
| 2 |
android.intent.action.BATTERY_LOW 指示设备上的电池电量不足。 |
| 3 |
android.intent.action.BATTERY_OKAY 表示电池电量低后现在可以了。 |
| 4 |
android.intent.action.BOOT_COMPLETED 在系统完成引导后广播一次。 |
| 5 | android.intent.action.BUG_REPORT 显示报告错误的活动。 |
| 6 | android.intent.action.CALL 对数据指定的人进行呼叫。 |
| 7 | android.intent.action.CALL_BUTTON 用户按下"call"按钮以转到拨号器或其他适当的 UI 以拨打电话。 |
| 8 | android.intent.action.DATE_CHANGED 日期已更改。 |
| 9 | android.intent.action.REBOOT 让设备重新启动。 |
广播自定义意图
如果您希望您的应用程序本身应该生成并发送自定义意图,那么您必须使用活动类中的 sendBroadcast() 方法来创建和发送这些意图。 如果您使用 sendStickyBroadcast(Intent) 方法,则 Intent 是 sticky,这意味着您发送的 Intent 在广播完成后仍然存在。
public void broadcastIntent(View view) {
   Intent intent = new Intent();
   intent.setAction("com.tutorialspoint.CUSTOM_INTENT");
   sendBroadcast(intent);
}
这个意图 com.tutorialspoint.CUSTOM_INTENT 也可以像我们注册系统生成的意图一样以类似的方式注册。
<application
   android:icon="@drawable/ic_launcher"
   android:label="@string/app_name"
   android:theme="@style/AppTheme" >
   <receiver android:name="MyReceiver">

      <intent-filter>
         <action android:name="com.tutorialspoint.CUSTOM_INTENT">
         </action>
      </intent-filter>

   </receiver>
</application>
示例
本示例将向您解释如何创建 BroadcastReceiver 来拦截自定义意图。 一旦熟悉了自定义意图,就可以对应用程序进行编程以拦截系统生成的意图。 那么让我们按照以下步骤来修改我们在Hello World Example章节中创建的Android应用程序 −
| 步骤 | 描述 |
|---|---|
| 1 | 您将使用 Android Studio 创建一个 Android 应用程序,并将其命名为 My Application,位于包 com.example.tutorialspoint7.myapplication 下,如 Hello World 示例 一章所述。 |
| 2 | 修改主活动文件 MainActivity.java 以添加 broadcastIntent() 方法。 |
| 3 | 在 com.example.tutorialspoint7.myapplication 包下创建一个名为 MyReceiver.java 的新 java 文件,以定义 BroadcastReceiver。 |
| 4 | 应用程序可以不受任何限制地处理一个或多个自定义和系统意图。 您要拦截的每个意图都必须使用 <receiver.../> 标记在您的 AndroidManifest.xml 文件中注册 |
| 5 | 修改 res/layout/activity_main.xml 文件的默认内容以包含广播意图的按钮。 |
| 6 | 无需修改字符串文件,Android Studio 会处理 string.xml 文件。 |
| 7 | 运行应用程序以启动 Android 模拟器并验证应用程序中所做更改的结果。 |
以下是修改后的主活动文件 MainActivity.java 的内容。 该文件可以包含每个基本生命周期方法。 我们添加了 broadcastIntent() 方法来广播自定义意图。
package com.example.tutorialspoint7.myapplication;

import android.app.Activity;
import android.content.Intent;
import android.os.Bundle;
import android.view.View;

public class MainActivity extends Activity {

   /** Called when the activity is first created. */
   @Override

   public void onCreate(Bundle savedInstanceState) {
      super.onCreate(savedInstanceState);
      setContentView(R.layout.activity_main);
   }

   // broadcast a custom intent.

   public void broadcastIntent(View view){
      Intent intent = new Intent();
      intent.setAction("com.tutorialspoint.CUSTOM_INTENT"); sendBroadcast(intent);
   }
}
以下是 MyReceiver.java 的内容:
package com.example.tutorialspoint7.myapplication;

import android.content.BroadcastReceiver;
import android.content.Context;
import android.content.Intent;
import android.widget.Toast;

/**
 * Created by TutorialsPoint7 on 8/23/2016.
 */
public class MyReceiver extends BroadcastReceiver{
   @Override
   public void onReceive(Context context, Intent intent) {
      Toast.makeText(context, "Intent Detected.", Toast.LENGTH_LONG).show();
   }
}
以下将修改 AndroidManifest.xml 文件的内容。 这里我们添加了 <receiver.../> 标签来包含我们的服务:
<?xml version="1.0" encoding="utf-8"?>
<manifest xmlns:android="http://schemas.android.com/apk/res/android"
   package="com.example.tutorialspoint7.myapplication">

   <application
      android:allowBackup="true"
      android:icon="@mipmap/ic_launcher"
      android:label="@string/app_name"
      android:supportsRtl="true"
      android:theme="@style/AppTheme">

      <activity android:name=".MainActivity">
         <intent-filter>
            <action android:name="android.intent.action.MAIN" />

            <category android:name="android.intent.category.LAUNCHER" />
         </intent-filter>
      </activity>

      <receiver android:name="MyReceiver">
         <intent-filter>
            <action android:name="com.tutorialspoint.CUSTOM_INTENT">
            </action>
         </intent-filter>

      </receiver>
   </application>

</manifest>
以下将是 res/layout/activity_main.xml 文件的内容,其中包含一个按钮来广播我们的自定义意图 −
<RelativeLayout
   xmlns:android="http://schemas.android.com/apk/res/android"
   xmlns:tools="http://schemas.android.com/tools"
   android:layout_width="match_parent"
   android:layout_height="match_parent"
   android:paddingLeft="@dimen/activity_horizontal_margin"
   android:paddingRight="@dimen/activity_horizontal_margin"
   android:paddingTop="@dimen/activity_vertical_margin"
   android:paddingBottom="@dimen/activity_vertical_margin"
   tools:context=".MainActivity">

   <TextView
      android:id="@+id/textView1"
      android:layout_width="wrap_content"
      android:layout_height="wrap_content"
      android:text="Example of Broadcast"
      android:layout_alignParentTop="true"
      android:layout_centerHorizontal="true"
      android:textSize="30dp" />

   <TextView
      android:id="@+id/textView2"
      android:layout_width="wrap_content"
      android:layout_height="wrap_content"
      android:text="Tutorials point "
      android:textColor="#ff87ff09"
      android:textSize="30dp"
      android:layout_above="@+id/imageButton"
      android:layout_centerHorizontal="true"
      android:layout_marginBottom="40dp" />

   <ImageButton
      android:layout_width="wrap_content"
      android:layout_height="wrap_content"
      android:id="@+id/imageButton"
      android:src="@drawable/abc"
      android:layout_centerVertical="true"
      android:layout_centerHorizontal="true" />

   <Button
      android:layout_width="wrap_content"
      android:layout_height="wrap_content"
      android:id="@+id/button2"
      android:text="Broadcast Intent"
      android:onClick="broadcastIntent"
      android:layout_below="@+id/imageButton"
      android:layout_centerHorizontal="true" />

</RelativeLayout>
让我们尝试运行我们刚刚修改的 Hello World! 应用程序。假设您在进行环境设置时已经创建了 AVD。要从 Android Studio 运行应用程序,请打开项目的活动文件之一,然后单击工具栏中的运行  图标。Android Studio 在您的 AVD 上安装应用程序并启动它,如果您的设置和应用程序一切正常,它将显示以下 Emulator 窗口 −
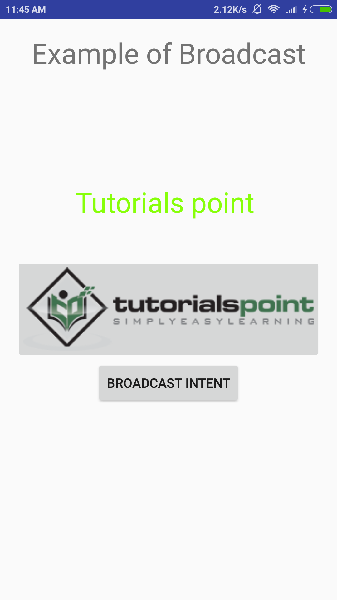
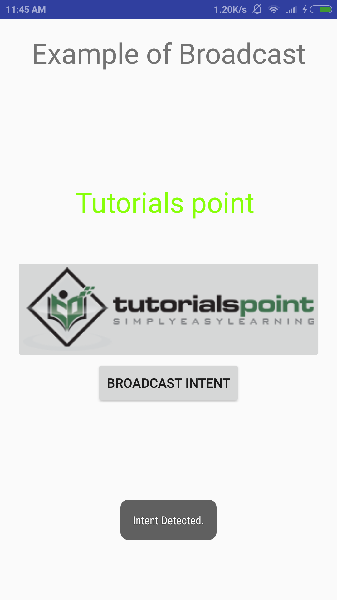
现在广播我们的自定义意图,让我们点击 Broadcast Intent 按钮,这将广播我们的自定义意图 "com.tutorialspoint.CUSTOM_INTENT" 将被我们注册的 BroadcastReceiver 即 MyReceiver 拦截,并且根据我们实现的逻辑,吐司将出现在 模拟器底部如下 −
您可以尝试实现其他 BroadcastReceiver 来拦截系统生成的意图,例如系统启动、日期更改、电池电量不足等。

