
Android 网格视图
Android GridView 网格视图在二维滚动网格(行和列)中显示项目,并且网格项目不一定是预先确定的,但它们会使用 ListAdapter 自动插入到布局中
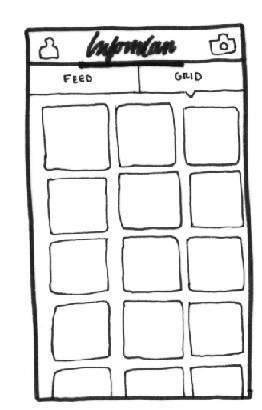
网格视图
适配器实际上是 UI 组件和将数据填充到 UI 组件中的数据源之间的桥梁。 适配器可用于向微调器、列表视图、网格视图等提供数据。
ListView 和 GridView 是 AdapterView 的子类,可以通过将它们绑定到 Adapter 来填充它们,后者检索来自外部源的数据并创建一个表示每个数据条目的视图。
GridView 属性
以下是 GridView 特有的重要属性 −
| 序号 | 属性 & 描述 |
|---|---|
| 1 | android:id 这是唯一标识布局的 ID。 |
| 2 | android:columnWidth 这指定了每列的固定宽度。 这可以以 px、dp、sp、in 或 mm 为单位。 |
| 3 | android:gravity 指定每个单元格内的重力。 可能的值是 top、bottom、left、right、center、center_vertical、center_horizontal 等。 |
| 4 | android:horizontalSpacing 定义列之间的默认水平间距。 这可以以 px、dp、sp、in 或 mm 为单位。 |
| 5 | android:numColumns 定义要显示的列数。 可以是整数值,例如 "100" 或 auto_fit,这意味着显示尽可能多的列以填充可用空间。 |
| 6 | android:stretchMode 定义列应如何拉伸以填充可用的空白空间(如果有)。 这必须是其中一个值 −
|
| 7 | android:verticalSpacing 定义行之间的默认垂直间距。 这可以以 px、dp、sp、in 或 mm 为单位。 |
示例
本示例将通过简单的步骤向您展示如何使用 GridView 创建您自己的 Android 应用程序。 按照以下步骤修改我们在 Hello World Example 章节中创建的 Android 应用程序 −
| 步骤 | 描述 |
|---|---|
| 1 | 您将使用 Android Studio IDE 创建一个 Android 应用程序,并将其命名为 HelloWorld,位于包 com.example.helloworld 下,如 Hello World 示例 一章中所述。 |
| 2 | 修改 res/layout/activity_main.xml 文件的默认内容以包含具有自我解释属性的 GridView 内容。 |
| 3 | 无需更改 string.xml,Android Studio 会处理放在 string.xml 中的默认字符串 |
| 4 | 让我们在 res/drawable-hdpi 文件夹中放几张图片。 比如 sample0.jpg、sample1.jpg、sample2.jpg、sample3.jpg、sample4.jpg、sample5.jpg、sample6.jpg 和 sample7.jpg。 |
| 5 | 在扩展 BaseAdapter 的 com.example.helloworld 包下创建一个名为 ImageAdapter 的新类。 此类将实现用于填充视图的适配器的功能。 |
| 6 | 运行应用程序以启动 Android 模拟器并验证应用程序中所做更改的结果。 |
以下是修改后的主活动文件src/com.example.helloworld/MainActivity.java的内容。 该文件可以包含每个基本生命周期方法。
package com.example.helloworld;

import android.os.Bundle;
import android.app.Activity;
import android.view.Menu;
import android.widget.GridView;

public class MainActivity extends Activity {
   @Override
   protected void onCreate(Bundle savedInstanceState) {
      super.onCreate(savedInstanceState);
      setContentView(R.layout.activity_main);

      GridView gridview = (GridView) findViewById(R.id.gridview);
      gridview.setAdapter(new ImageAdapter(this));
   }
}
以下是 res/layout/activity_main.xml 文件的内容 −
<?xml version="1.0" encoding="utf-8"?>
<GridView xmlns:android="http://schemas.android.com/apk/res/android"
   android:id="@+id/gridview"
   android:layout_width="fill_parent"
   android:layout_height="fill_parent"
   android:columnWidth="90dp"
   android:numColumns="auto_fit"
   android:verticalSpacing="10dp"
   android:horizontalSpacing="10dp"
   android:stretchMode="columnWidth"
   android:gravity="center"
/>
以下将是 res/values/strings.xml 的内容来定义两个新常量 −
<?xml version="1.0" encoding="utf-8"?>
<resources>
   <string name="app_name">HelloWorld</string>
   <string name="action_settings">Settings</string>
</resources>
以下是 src/com.example.helloworld/ImageAdapter.java 文件的内容 −
package com.example.helloworld;

import android.content.Context;

import android.view.View;
import android.view.ViewGroup;

import android.widget.BaseAdapter;
import android.widget.GridView;
import android.widget.ImageView;

public class ImageAdapter extends BaseAdapter {
   private Context mContext;

   // Constructor
   public ImageAdapter(Context c) {
      mContext = c;
   }

   public int getCount() {
      return mThumbIds.length;
   }

   public Object getItem(int position) {
      return null;
   }

   public long getItemId(int position) {
      return 0;
   }

   // create a new ImageView for each item referenced by the Adapter
   public View getView(int position, View convertView, ViewGroup parent) {
      ImageView imageView;

      if (convertView == null) {
         imageView = new ImageView(mContext);
         imageView.setLayoutParams(new GridView.LayoutParams(85, 85));
         imageView.setScaleType(ImageView.ScaleType.CENTER_CROP);
         imageView.setPadding(8, 8, 8, 8);
      }
      else
      {
         imageView = (ImageView) convertView;
      }
      imageView.setImageResource(mThumbIds[position]);
      return imageView;
   }

   // Keep all Images in array
   public Integer[] mThumbIds = {
      R.drawable.sample_2, R.drawable.sample_3,
      R.drawable.sample_4, R.drawable.sample_5,
      R.drawable.sample_6, R.drawable.sample_7,
      R.drawable.sample_0, R.drawable.sample_1,
      R.drawable.sample_2, R.drawable.sample_3,
      R.drawable.sample_4, R.drawable.sample_5,
      R.drawable.sample_6, R.drawable.sample_7,
      R.drawable.sample_0, R.drawable.sample_1,
      R.drawable.sample_2, R.drawable.sample_3,
      R.drawable.sample_4, R.drawable.sample_5,
      R.drawable.sample_6, R.drawable.sample_7
   };
}
让我们尝试运行我们刚刚修改的 Hello World! 应用程序。假设您在进行环境设置时已经创建了 AVD。 要从 Android Studio 运行应用程序,请打开项目的活动文件之一,然后单击工具栏中的 Run  图标 . Android Studio 在您的 AVD 上安装应用程序并启动它,如果您的设置和应用程序一切正常,它将显示以下 Emulator 窗口 −
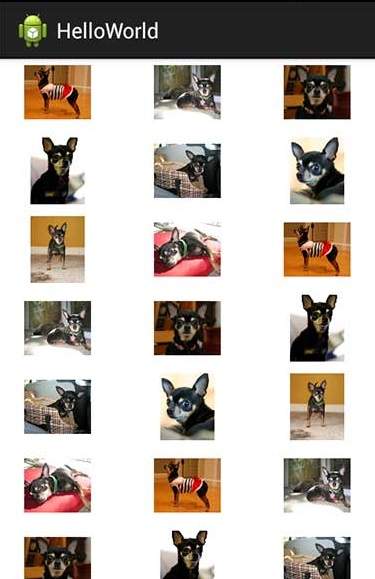
子活动示例
让我们扩展上面示例的功能,我们将全屏显示选定的网格图像。为了实现这一点,我们需要引入一个新的活动。 请记住,对于我们需要执行所有步骤的任何活动,例如我们必须实现一个活动类,在 AndroidManifest.xml 文件中定义该活动,定义相关布局,最后通过它在主活动类中将该子活动与主活动链接。所以让我们按照步骤修改上面的例子 −
| 步骤 | 描述 |
|---|---|
| 1 | 您将使用 Android Studio IDE 创建一个 Android 应用程序,并将其命名为 HelloWorld,位于包 com.example.helloworld 下,如 Hello World 示例 一章中所述。 |
| 2 | 在包 com.example.helloworld 下创建一个新的 Activity 类作为 SingleViewActivity.java,如下所示。 |
| 3 | 在 res/layout/ 文件夹下为新的活动创建新的布局文件。 让我们将此 XML 文件命名为 single_view.xml。 |
| 4 | 使用 <activity.../> 标签在 AndroidManifest.xml 文件中定义您的新活动。 一个应用程序可以有一个或多个活动,没有任何限制。 |
| 5 | 运行应用程序以启动 Android 模拟器并验证应用程序中所做更改的结果。 |
以下是修改后的主活动文件src/com.example.helloworld/MainActivity.java的内容。 该文件可以包含每个基本生命周期方法。
package com.example.helloworld;

import android.app.Activity;
import android.content.Intent;
import android.os.Bundle;

import android.view.Menu;
import android.view.View;

import android.widget.AdapterView;
import android.widget.AdapterView.OnItemClickListener;
import android.widget.GridView;

public class MainActivity extends Activity {
   @Override
   protected void onCreate(Bundle savedInstanceState) {
      super.onCreate(savedInstanceState);
      setContentView(R.layout.activity_main);

      GridView gridview = (GridView) findViewById(R.id.gridview);
      gridview.setAdapter(new ImageAdapter(this));

      gridview.setOnItemClickListener(new OnItemClickListener() {
         public void onItemClick(AdapterView<?> parent,
            View v, int position, long id){
            // Send intent to SingleViewActivity
            Intent i = new Intent(getApplicationContext(), SingleViewActivity.class);
            // Pass image index
            i.putExtra("id", position);
            startActivity(i);
         }
      });
   }
}
以下是新活动文件 src/com.example.helloworld/SingleViewActivity.java 文件的内容 −
package com.example.helloworld;

import android.app.Activity;
import android.content.Intent;
import android.os.Bundle;
import android.widget.ImageView;

public class SingleViewActivity extends Activity {
   @Override
   public void onCreate(Bundle savedInstanceState) {
      super.onCreate(savedInstanceState);
      setContentView(R.layout.single_view);

      // Get intent data
      Intent i = getIntent();

      // Selected image id
      int position = i.getExtras().getInt("id");
      ImageAdapter imageAdapter = new ImageAdapter(this);

      ImageView imageView = (ImageView) findViewById(R.id.SingleView);
      imageView.setImageResource(imageAdapter.mThumbIds[position]);
   }
}
以下是 res/layout/single_view.xml 文件的内容 −
<?xml version="1.0" encoding="utf-8"?>
<LinearLayout
   xmlns:android="http://schemas.android.com/apk/res/android"
   android:layout_width="match_parent"
   android:layout_height="match_parent"
   android:orientation="vertical" >

<ImageView android:id="@+id/SingleView"
   android:layout_width="fill_parent"
   android:layout_height="fill_parent"/>

</LinearLayout>
以下将是 AndroidManifest.xml 的内容,用于定义两个新常量 −
<?xml version="1.0" encoding="utf-8"?>
<manifest xmlns:android="http://schemas.android.com/apk/res/android"
   package="com.example.helloworld">

   <application
      android:allowBackup="true"
      android:icon="@drawable/ic_launcher"
      android:label="@string/app_name"
      android:theme="@style/AppTheme" >

      <activity
         android:name="com.example.helloworld.MainActivity"
         android:label="@string/app_name" >

         <intent-filter>
            <action android:name="android.intent.action.MAIN" />
            <category android:name="android.intent.category.LAUNCHER" />
         </intent-filter>

      </activity>

      <activity android:name=".SingleViewActivity"></activity>

   </application>
</manifest>
让我们尝试运行我们刚刚修改的 Hello World! 应用程序。假设您在进行环境设置时已经创建了 AVD。 要从 Android Studio 运行应用程序,请打开项目的一个活动文件,然后单击工具栏中的 Run 图标 . Android Studio 在您的 AVD 上安装应用程序并启动它,如果您的设置和应用程序一切正常,它将显示以下 Emulator 窗口 −
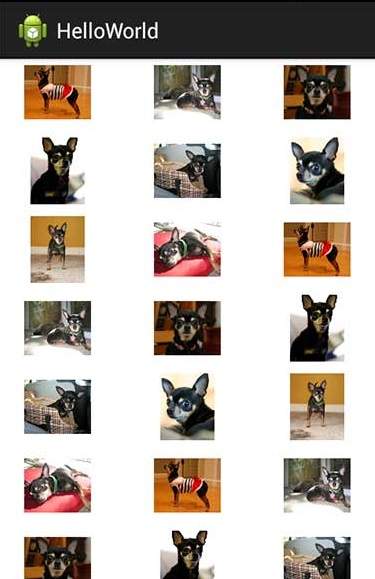
现在,如果您单击任一图像,它将显示为单个图像,例如−
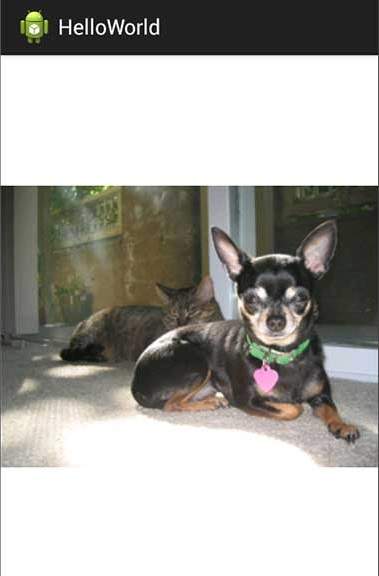
请注意,上述图片取自 Android 官方网站。

