
Android - ImageButton 控件
ImageButton 图像按钮是一个绝对布局,它使您能够指定其子项的确切位置。 这显示了一个带有图像(而不是文本)的按钮,用户可以按下或单击该按钮。
Android 按钮样式集
ImageButton 属性
以下是与 ImageButton 控件相关的重要属性。 您可以查看 Android 官方文档以获取完整的属性列表和可用于更改这些属性的相关方法是运行时。
继承自 android.widget.ImageView 类 −
| 序号 | 属性 & 描述 |
|---|---|
| 1 | android:adjustViewBounds 如果您希望 ImageView 调整其边界以保持其可绘制对象的纵横比,请将其设置为 true。 |
| 2 | android:baseline 这是该视图中基线的偏移量。 |
| 3 | android:baselineAlignBottom 如果为 true,则图像视图将根据其底部边缘与基线对齐。 |
| 4 | android:cropToPadding 如果为 true,图像将被裁剪以适应其填充。 |
| 5 | android:src 这会将一个可绘制对象设置为此 ImageView 的内容。 |
继承自 android.view.View 类 −
| 序号 | 属性 & 描述 |
|---|---|
| 1 | android:background 这是用作背景的可绘制对象。 |
| 2 | android:contentDescription 这定义了简要描述视图内容的文本。 |
| 3 | android:id 这为此视图提供了一个标识符名称 |
| 4 | android:onClick 这是在该视图的上下文中单击视图时要调用的方法的名称。 |
| 5 | android:visibility 这控制视图的初始可见性。 |
示例
本示例将通过简单的步骤向您展示如何使用线性布局和 ImageButton 创建您自己的 Android 应用程序。
| 步骤 | 描述 |
|---|---|
| 1 | 您将使用 Android Studio IDE 创建一个 Android 应用程序,并将其命名为 myapplication 在包 com.example.myapplication 下,如 Hello World 示例 一章中所述。 |
| 2 | 修改 src/MainActivity.java 文件,添加点击事件。 |
| 3 | 修改 res/layout/activity_main.xml 文件的默认内容以包含 Android UI 控件。 |
| 4 | 不需要在 android 中定义默认常量,Android studio 会处理默认常量。 |
| 5 | 运行应用程序以启动 Android 模拟器并验证应用程序中所做更改的结果。 |
以下是修改后的主活动文件 src/com.example.myapplication/MainActivity.java 的内容。 该文件可以包含每个基本生命周期方法。
在下面的示例中,abc 表示 tutorialspoint 的图像
package com.example.myapplication;

import android.os.Bundle;
import android.app.Activity;
import android.view.View;
import android.view.View.OnClickListener;
import android.widget.ImageButton;
import android.widget.Toast;

public class MainActivity extends Activity {
   ImageButton imgButton;

   @Override
   protected void onCreate(Bundle savedInstanceState) {
      super.onCreate(savedInstanceState);
      setContentView(R.layout.activity_main);

      imgButton =(ImageButton)findViewById(R.id.imageButton);
      imgButton.setOnClickListener(new View.OnClickListener() {
         @Override
         public void onClick(View v) {
            Toast.makeText(getApplicationContext(),"You download is
               resumed",Toast.LENGTH_LONG).show();
         }
      });
   }
}
以下是 res/layout/activity_main.xml 文件的内容 −
<?xml version="1.0" encoding="utf-8"?>
<RelativeLayout
   xmlns:android="http://schemas.android.com/apk/res/android"
   xmlns:tools="http://schemas.android.com/tools" android:layout_width="match_parent"
   android:layout_height="match_parent" android:paddingLeft="@dimen/activity_horizontal_margin"
   android:paddingRight="@dimen/activity_horizontal_margin"
   android:paddingTop="@dimen/activity_vertical_margin"
   android:paddingBottom="@dimen/activity_vertical_margin"
   tools:context=".MainActivity">

   <TextView android:text="Tutorials Point"
      android:layout_width="wrap_content"
      android:layout_height="wrap_content"
      android:textSize="30dp"
      android:layout_alignParentTop="true"
      android:layout_alignRight="@+id/imageButton"
      android:layout_alignEnd="@+id/imageButton" />

   <ImageButton
      android:layout_width="wrap_content"
      android:layout_height="wrap_content"
      android:id="@+id/imageButton"
      android:layout_centerVertical="true"
      android:layout_centerHorizontal="true"
      android:src="@drawable/abc"/>

</RelativeLayout>
以下将是定义这些新常量的 res/values/strings.xml 的内容 −
<?xml version="1.0" encoding="utf-8"?>
<resources>
   <string name="app_name">myapplication</string>
</resources>
以下是 AndroidManifest.xml 的默认内容 −
<?xml version="1.0" encoding="utf-8"?>
<manifest xmlns:android="http://schemas.android.com/apk/res/android"
   package="com.example.myapplication" >

   <application
      android:allowBackup="true"
      android:icon="@drawable/ic_launcher"
      android:label="@string/app_name"
      android:theme="@style/AppTheme" >

      <activity
         android:name="com.example.myapplication.MainActivity"
         android:label="@string/app_name" >

         <intent-filter>
            <action android:name="android.intent.action.MAIN" />
            <category android:name="android.intent.category.LAUNCHER" />
         </intent-filter>

      </activity>

   </application>
</manifest>
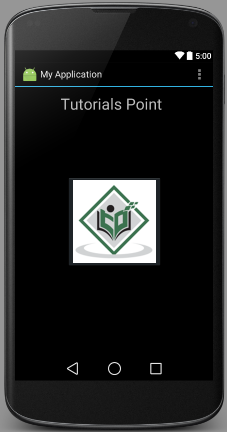
让我们尝试运行您的 myapplication 应用程序。 假设您在进行环境设置时已经创建了 AVD。要从 Android Studio 运行应用程序,请打开项目的一个活动文件,然后单击工具栏中的 Run  图标。 Android Studio 在您的 AVD 上安装应用程序并启动它,如果您的设置和应用程序一切正常,它将显示以下 Emulator 窗口 −
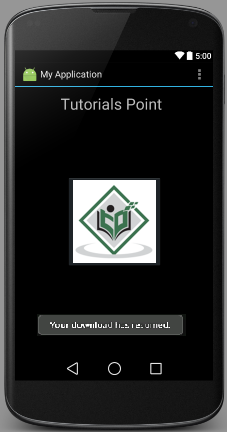
单击 ImageButton 后将出现以下屏幕,它显示一条 toast 消息。
练习
我建议在 Layout XML 文件中使用不同属性的 ImageButton 以及在编程时尝试上述示例,以获得 ImageButton 的不同外观。 尝试使其可编辑,更改字体颜色、字体系列、宽度、textSize 等并查看结果。 您还可以在一个活动中尝试使用多个 ImageButton 控件的上述示例。

