
Android - RadioButton 单选按钮控件
RadioButton 有两种状态:选中或未选中。这允许用户从一组选项中选择一个选项。
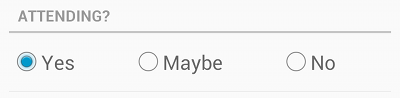
单选按钮
示例
本示例将通过简单的步骤向您展示如何使用线性布局和 RadioButton 创建您自己的 Android 应用程序。
| 步骤 | 描述 |
|---|---|
| 1 | 您将使用 Android Studio 创建一个 Android 应用程序,并将其命名为 My Application,位于包 com.example.saira_000.myapplication 下,如 Hello World 示例 一章所述。 |
| 2 | 修改 src/MainActivity.java 文件,添加点击事件。 |
| 2 | 修改 res/layout/activity_main.xml 文件的默认内容以包含 Android UI 控件。 |
| 3 | Android Studio 会处理默认常量,因此无需在 string.xml 文件中声明默认常量 |
| 4 | 运行应用程序以启动 Android 模拟器并验证应用程序中所做更改的结果。 |
以下是修改后的主活动文件 src/MainActivity.java 的内容。 该文件可以包含每个基本生命周期方法。
在下面的例子中 abc 表示 tutorialspoint 的图像
package com.example.saira_000.myapplication;

import android.support.v7.app.ActionBarActivity;
import android.os.Bundle;
import android.view.View;
import android.widget.Button;
import android.widget.ImageButton;
import android.widget.RadioButton;
import android.widget.RadioGroup;
import android.widget.Toast;

public class MainActivity extends ActionBarActivity {
   RadioGroup rg1;
   RadioButton rb1;
   Button b1;

   protected void onCreate(Bundle savedInstanceState) {
      super.onCreate(savedInstanceState);
      setContentView(R.layout.activity_main);
      addListenerRadioButton();
   }

   private void addListenerRadioButton() {
      rg1 = (RadioGroup) findViewById(R.id.radioGroup);
      b1 = (Button) findViewById(R.id.button2);
      b1.setOnClickListener(new View.OnClickListener() {
         @Override
         public void onClick(View v) {
            int selected=rg1.getCheckedRadioButtonId();
            rb1=(RadioButton)findViewById(selected);
            Toast.makeText(MainActivity.this,rb1.getText(),Toast.LENGTH_LONG).show();
         }
      });
   }
}
以下是 res/layout/activity_main.xml 文件的内容 −
<?xml version="1.0" encoding="utf-8"?>
<RelativeLayout xmlns:android="http://schemas.android.com/apk/res/android"
   xmlns:tools="http://schemas.android.com/tools"
   android:layout_width="match_parent"
   android:layout_height="match_parent"
   android:paddingBottom="@dimen/activity_vertical_margin"
   android:paddingLeft="@dimen/activity_horizontal_margin"
   android:paddingRight="@dimen/activity_horizontal_margin"
   android:paddingTop="@dimen/activity_vertical_margin"
   tools:context=".MainActivity">

   <TextView
      android:id="@+id/textView1"
      android:layout_width="wrap_content"
      android:layout_height="wrap_content"
      android:text="Example of Radio Button"
      android:layout_alignParentTop="true"
      android:layout_centerHorizontal="true"
      android:textSize="30dp" />

   <TextView
      android:id="@+id/textView2"
      android:layout_width="wrap_content"
      android:layout_height="wrap_content"
      android:text="Tutorials point"
      android:textColor="#ff87ff09"
      android:textSize="30dp"
      android:layout_above="@+id/imageButton"
      android:layout_centerHorizontal="true"
      android:layout_marginBottom="40dp" />

   <ImageButton
      android:layout_width="wrap_content"
      android:layout_height="wrap_content"
      android:id="@+id/imageButton"
      android:src="@drawable/abc"
      android:layout_centerVertical="true"
      android:layout_centerHorizontal="true" />

   <Button
      android:layout_width="wrap_content"
      android:layout_height="wrap_content"
      android:id="@+id/button2"
      android:text="ClickMe"
      android:layout_alignParentBottom="true"
      android:layout_centerHorizontal="true" />

   <RadioGroup
      android:id="@+id/radioGroup"
      android:layout_width="fill_parent"
      android:layout_height="fill_parent"
      android:layout_below="@+id/imageButton"
      android:layout_alignLeft="@+id/textView2"
      android:layout_alignStart="@+id/textView2">

      <RadioButton
         android:layout_width="142dp"
         android:layout_height="wrap_content"
         android:text="JAVA"
         android:id="@+id/radioButton"
         android:textSize="25dp"
         android:textColor="@android:color/holo_red_light"
         android:checked="false"
         android:layout_gravity="center_horizontal" />

      <RadioButton
         android:layout_width="wrap_content"
         android:layout_height="wrap_content"
         android:text="ANDROID"
         android:id="@+id/radioButton2"
         android:layout_gravity="center_horizontal"
         android:checked="false"
         android:textColor="@android:color/holo_red_dark"
         android:textSize="25dp" />

      <RadioButton
         android:layout_width="136dp"
         android:layout_height="wrap_content"
         android:text="HTML"
         android:id="@+id/radioButton3"
         android:layout_gravity="center_horizontal"
         android:checked="false"
         android:textSize="25dp"
         android:textColor="@android:color/holo_red_dark" />

   </RadioGroup>

</RelativeLayout>
以下将是定义这些新常量的 res/values/strings.xml 的内容 −
<?xml version="1.0" encoding="utf-8"?>
<resources>
   <string name="app_name">My Application</string>
</resources>
以下是 AndroidManifest.xml 的默认内容 −
<?xml version="1.0" encoding="utf-8"?>
<manifest xmlns:android="http://schemas.android.com/apk/res/android"
   package="com.example.saira_000.myapplication" >

   <application
      android:allowBackup="true"
      android:icon="@drawable/ic_launcher"
      android:label="@string/app_name"
      android:theme="@style/AppTheme" >

      <activity
         android:name="com.example.My Application.MainActivity"
         android:label="@string/app_name" >

         <intent-filter>
            <action android:name="android.intent.action.MAIN" />
            <category android:name="android.intent.category.LAUNCHER" />
         </intent-filter>

      </activity>

   </application>
</manifest>
让我们尝试运行您的 My Application 应用程序。 我假设您在进行环境设置时已经创建了 AVD。 要从 Android Studio 运行应用程序,请打开项目的活动文件之一,然后单击工具栏中的 Run  图标。 Android Studio 在您的 AVD 上安装应用程序并启动它,如果您的设置和应用程序一切正常,它将显示以下 Emulator 窗口 −
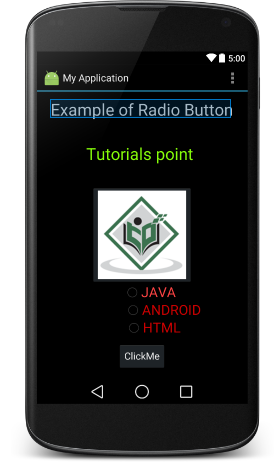
如果用户选择了任何一个单选按钮,它应该在 Toast 消息中给出相同的名称。 假设,如果用户选择了 JAVA,它会以 JAVA 的形式给出吐司消息
练习
我建议在 Layout XML 文件中使用不同属性的 RadioButton 以及在编程时尝试上面的示例,以获得 RadioButton 的不同外观。 尝试使其可编辑,更改字体颜色、字体系列、宽度、textSize 等并查看结果。 您还可以在一个活动中尝试使用多个 RadioButton 控件的上述示例。

